Sugar YMP-01 thermal printer on M1 Mac: halftone + 1D 49 F0 nn density command
 Contents
I wrote a previous post on driving the Sugar mini printer from a PC. It got me to the point where I could send ESC/POS commands over BLE and print text and small images, but compared to the same photo printed from the official Sugar app (WalkPrint), the image quality was completely different — my output came out blurry and oddly faint.
Separately I was deep in the middle of an RFCOMM rework of the HP Sprocket late at night, the topic of halftone preprocessing came up there, and I realized the same trick should apply to the Sugar. One thing led to another and this became a sequel.
End state:
- Floyd-Steinberg dithering to convert photos into something a thermal head can actually render
- BLE write-without-response at around 5 KB/s
- Identified a vendor-specific density command
1D 49 F0 nnfrom observing the official WalkPrint app’s behavior - Python client that paces correctly and feeds enough paper to clear the tear bar
Notes on the rabbit holes I fell into along the way.
Preprocessing for thermal photo printing: halftone
A thermal printer’s output is strictly binary — each dot is either fired or not. If you binarize a grayscale photo naïvely with > 128 ? 0 : 1, all the mid-tones collapse and you end up with faces rendered as solid black blobs.
The classic answer (used in newspapers for decades) is halftoning: convert mid-tones into spatial patterns of black dots whose local density approximates the gray value.
Two common approaches:
| Method | Behavior | Suitability for thermal |
|---|---|---|
| Clustered-dot | Threshold matrix where ink dots grow from cluster centers outward. Newspaper-photo aesthetic | Classic; very even grain |
| Floyd-Steinberg | Error diffusion — quantization error propagates to neighboring pixels. Noisy but preserves detail | Best for detail recovery |
I implemented both in Python and compared previews.
import numpy as np
from PIL import Image, ImageOps

CLUSTERED = np.array([
    [24,10,12,26,35,47,49,37],
    [ 8, 0, 2,14,45,59,61,51],
    [22, 6, 4,16,43,57,63,53],
    [30,20,18,28,33,41,55,39],
    [34,46,48,38,25,11,13,27],
    [44,58,60,50, 9, 1, 3,15],
    [42,56,62,52,23, 7, 5,17],
    [32,40,54,36,31,21,19,29],
], dtype=np.float32)
CLUSTERED = (CLUSTERED + 0.5) * (256.0 / 64.0)

def clustered_halftone(gray_np):
    h, w = gray_np.shape
    tile = np.tile(CLUSTERED, (h//8+1, w//8+1))[:h, :w]
    return (gray_np > tile).astype(np.uint8) * 255

def floyd_steinberg(gray_np):
    a = gray_np.astype(np.float32).copy()
    h, w = a.shape
    for y in range(h):
        for x in range(w):
            old = a[y, x]
            new = 255.0 if old >= 128 else 0.0
            a[y, x] = new
            err = old - new
            if x+1 < w: a[y, x+1] += err * 7/16
            if y+1 < h:
                if x > 0:   a[y+1, x-1] += err * 3/16
                a[y+1, x] += err * 5/16
                if x+1 < w: a[y+1, x+1] += err * 1/16
return np.clip(a, 0, 255).astype(np.uint8)| Clustered-dot preview (newspaper style) | Floyd-Steinberg preview (detail recovery) |
|---|---|
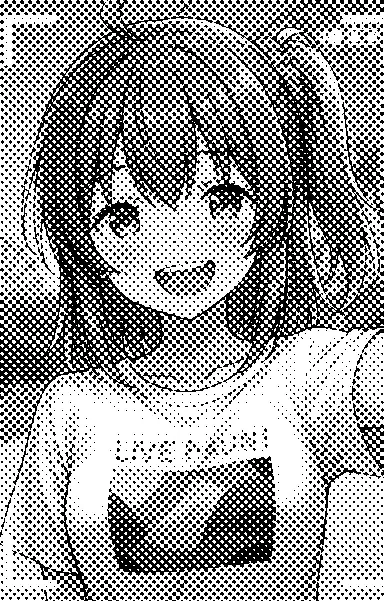 | 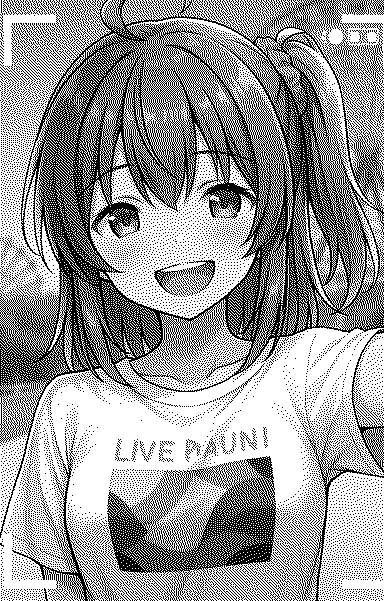 |
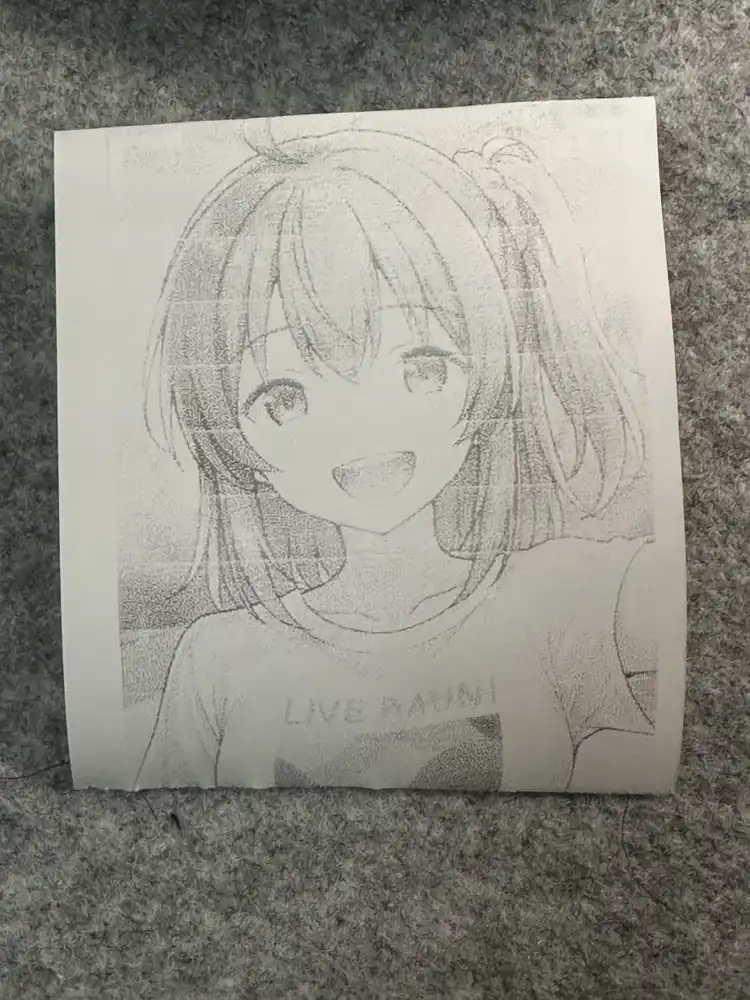
On actual prints, Floyd-Steinberg recovers the face shadows and even small text (the “LIVE PAUNI” T-shirt logo). Clustered-dot has a retro newspaper-photo feel that’s nice in its own way, but fine detail tends to mush. I went with FS for the rest of the experiments.
BLE pacing
The Sugar exposes the ISSC Transparent UART service:
Service:  49535343-fe7d-4ae5-8fa9-9fafd205e455
Write:    49535343-8841-43f4-a8d4-ecbe34729bb3 (write, write-without-response)
Notify:   49535343-1e4d-4bd9-ba61-23c647249616 (read, notify)
First I tried just hosing all the data into write_without_response back to back:
| Pacing | Result |
|---|---|
| 26 KB/s (no delay) | Only the top of the image prints, then the printer stops (buffer overflow) |
| 400 B/s (too slow) | Print head stutters — pft, pft, pft — with white horizontal gaps cutting through the image |
| 5 KB/s (200B / 40ms) | Completes cleanly, image looks correct |
Thermal printers need flow control paced by the print head, not by the radio link. BLE write-without-response has no per-write ACK, so the radio side is fast and dumb; whatever exceeds the printer’s small internal buffer (a few KB) is silently dropped.
Conversely, if data arrives slower than the head consumes it, the head pauses waiting for the next chunk, the stepper motor keeps advancing paper, and you get visible white bands. The sweet spot is close to the head’s natural throughput, slightly above it at most.
Standard ESC/POS density commands all do nothing here
The Sugar’s default print comes out light. WalkPrint can clearly make it darker, so there must be some density-setting byte sequence. I tried every plausible ESC/POS density command I knew about:
| Command tried | Origin | Result |
|---|---|---|
ESC 7 n1 n2 n3 (heating time) | Phomemo-style vendor extension | Completely ignored |
51 78 A4 00 01 00 nn ck FF (Quality) | Cat-Printer / iPrint family | Printer stops (protocol gets confused) |
10 FF 10 00 nn (DLE FF density) | DP-L13 style real-time command | Nothing prints |
There’s no standardized “print density” command in ESC/POS itself — every manufacturer defines their own. The Sugar belongs to none of the families above.
Identifying the density command by observing the official app
When WalkPrint prints the same image, it’s visibly darker. So the app must be sending some density-setting command before the image data. I focused on GS I-family vendor sub-functions and worked through likely candidates on the printer, and 1D 49 F0 nn (GS I 0xF0 nn, with nn being the density value) turned out to change the print darkness.
Measured behavior of the density parameter:
| nn (decimal) | hex | Subjective darkness |
|---|---|---|
| 0x0A (10) | default-equivalent | light |
| 0x0C (12) | “new” preset light | slightly light |
| 0x0F (15) | “old” dark / “new” medium | medium |
| 0x12 (18) | “new” preset dark | dark |
| 0x14 (20) | “public” preset light | dark |
| 0x1E (30) | “public” preset dark / max | very dark |
The printer accepts values in the 5–30 range. Going above 30 either gets ignored or is clamped internally by firmware.
There’s also a paired speed command 1D 49 F1 nn, where larger nn means faster paper feed (= lighter prints). The official app sends density and speed together to compose the final print quality.
Higher density slows down the printer
Bumping to density 30 at 5 KB/s caused the print to stop about a third of the way down the image (around the neck).
The reason is simple: at higher density the thermal head dwells longer per dot, so its effective throughput drops. 5 KB/s is now too fast and the buffer overflows again.
Empirically-measured stable pacing per density level:
| Density value | Pacing that worked | Complete |
|---|---|---|
| 10 (default) | 5 KB/s | ✓ (light) |
| 18 (“new” dark) | ~3 KB/s | ✓ (medium) |
| 30 (“public” dark / max) | 2 KB/s | ✓ (dark) |
Slow the pacing as you raise the density — avoid both buffer overflow and head-stalling at the same time.
Trailing paper feed
The thermal head and the tear bar sit roughly 25–35 mm apart on most of these mini printers. Right after a print completes, the bottom of the image is still inside the printer, behind the tear bar.
I tried ESC J FF (1B 4A FF, = 255 × 1/8 mm ≈ 32 mm), but firmware appears to cap or partially ignore it — the image only made it as far as the chest before the paper stopped advancing.
ESC d 30 (a 90 mm line-based feed) plus 20 trailing line feeds as insurance reliably pushes the print past the tear bar:
final_feed = bytes([0x1B, 0x64, 0x1E])  # ESC d 30
lfs = bytes([0x0A] * 20)
payload = density + init + header + raster + final_feed + lfs
Final form
import asyncio, time, struct
import numpy as np
from PIL import Image
from bleak import BleakClient

ADDR = "..."  # YMP-01 BLE address
WRITE_CHAR = "49535343-8841-43f4-a8d4-ecbe34729bb3"

# halftone-binarize image and format as ESC/POS bitmap
img = Image.open('photo.jpg').convert('L')
img = ImageOps.autocontrast(img, cutoff=2)
img.thumbnail((384, 9999), Image.LANCZOS)
gray = np.asarray(img)
bits = floyd_steinberg(gray)
bits = (bits < 128).astype(np.uint8)
# 1bpp packed
raster = bytearray()
for y in range(bits.shape[0]):
    for x in range(0, bits.shape[1], 8):
        b = 0
        for i in range(8):
            if bits[y, x+i]: b |= (1 << (7-i))
        raster.append(b)

W = bits.shape[1]; H = bits.shape[0]
density = bytes([0x1D, 0x49, 0xF0, 0x1E])          # WalkPrint density 30 (max)
init    = bytes([0x1B, 0x40])                      # ESC @
header  = bytes([0x1D, 0x76, 0x30, 0x00,           # GS v 0
                 (W//8) & 0xff, ((W//8)>>8) & 0xff,
                 H & 0xff, (H>>8) & 0xff])
feed    = bytes([0x1B, 0x64, 0x1E]) + bytes([0x0A]*20)
payload = density + init + header + bytes(raster) + feed

async def main():
    async with BleakClient(ADDR, timeout=20.0) as c:
        CHUNK = 200; SLEEP = 0.10  # 2 KB/s, tuned for max density
        for i in range(0, len(payload), CHUNK):
            await c.write_gatt_char(WRITE_CHAR, payload[i:i+CHUNK], response=False)
            await asyncio.sleep(SLEEP)
        await asyncio.sleep(3)

asyncio.run(main())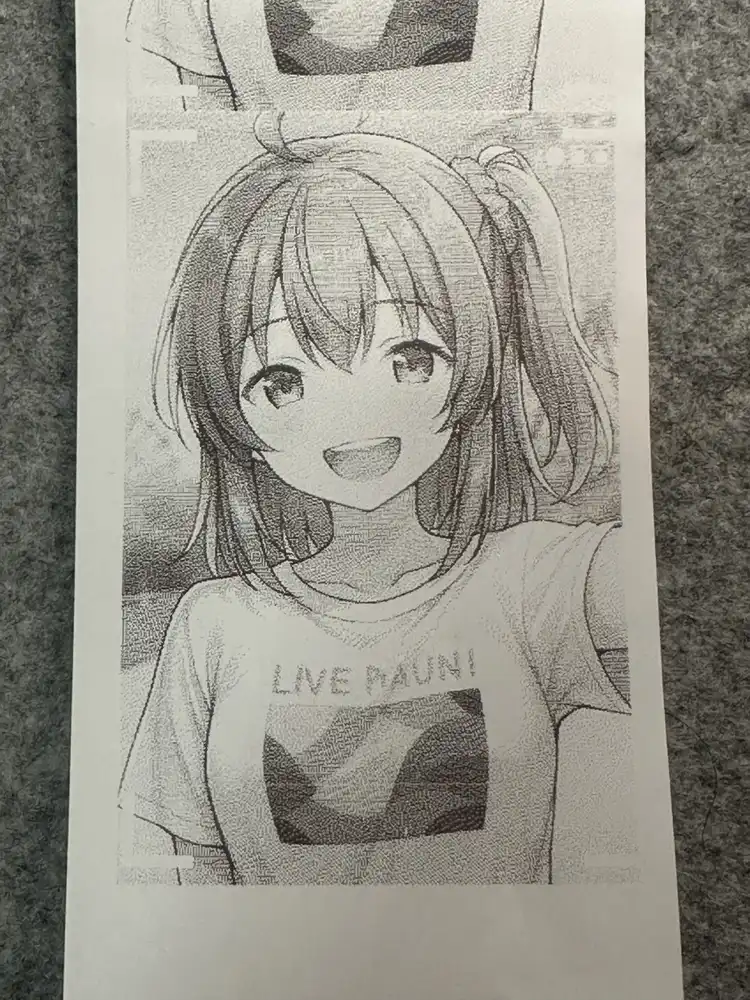
With halftone preprocessing + density 30 + the right pacing, the output is essentially indistinguishable from WalkPrint’s by eye.
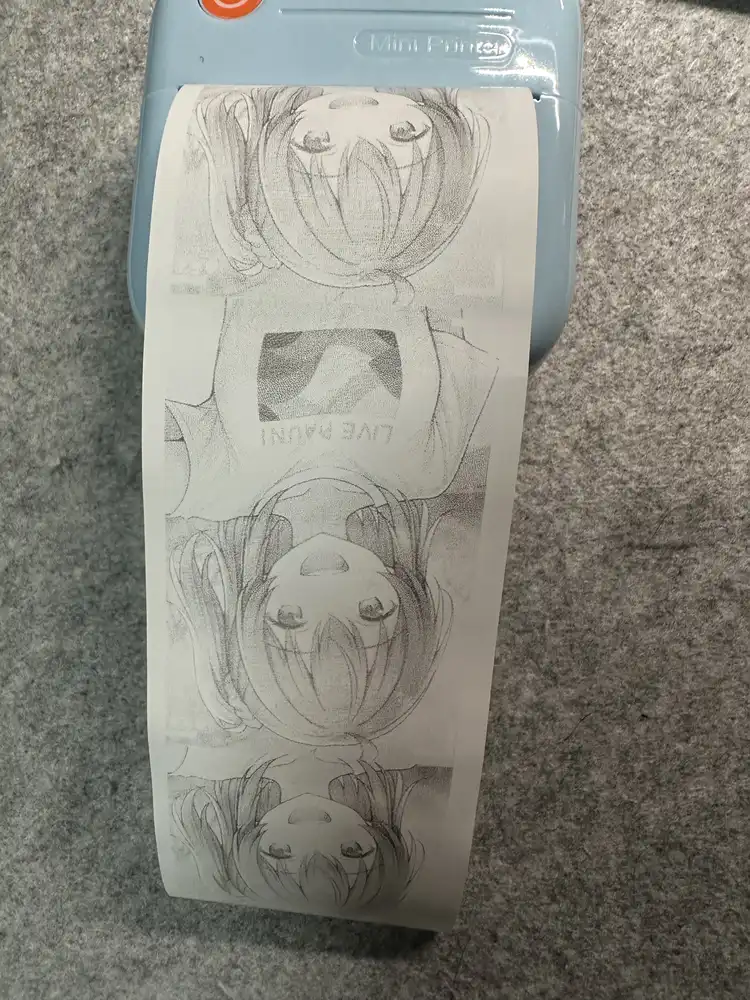
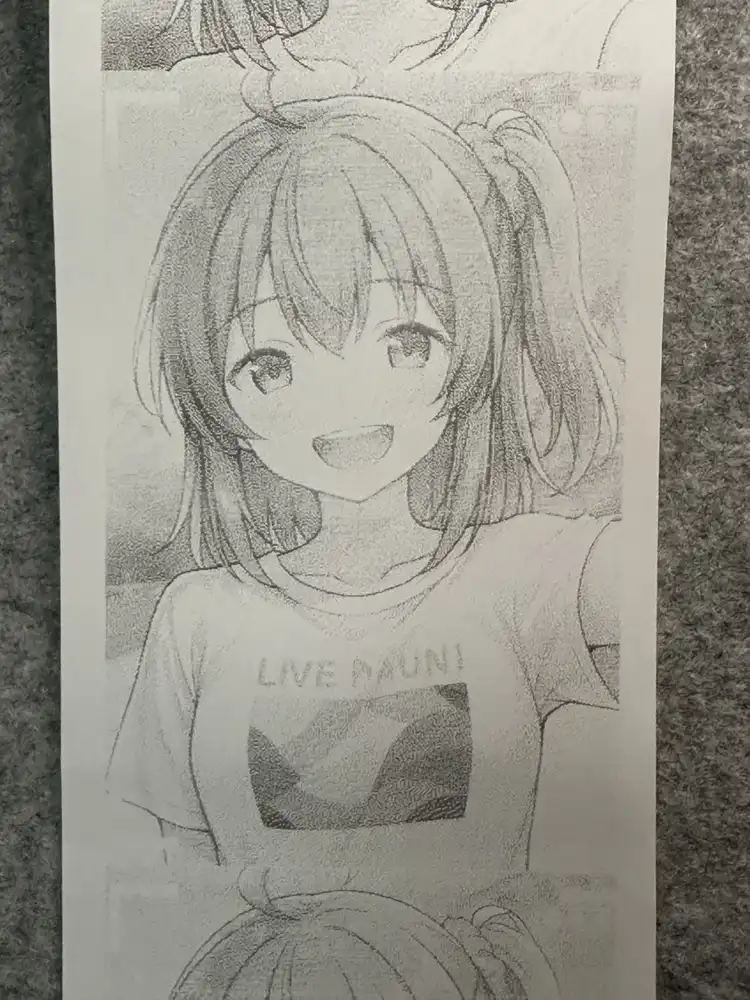
The continuous test strip from tweaking density and pacing without tearing between attempts: