Can Qwen Image Edit Convert Photos to Pixel Art?
 Contents
In the previous article, I tested RPG parameter extraction using local VLMs. The original idea from that article was:
I want to build a pipeline that converts photos to pixel art and composites them into RPG battle scenes.
VLM parameter extraction works. Next step: nail down the photo-to-pixel-art conversion at the front of the pipeline.
The Pipeline
graph TD
    A[Camera capture] --> B[Pixel art conversion]
    B --> C[Vision LLM<br/>RPG parameter extraction]
    C --> D[Battle scene compositing]
    D --> E[HP Sprocket 200<br/>ZINK print]
This article focuses on step B. I compared Qwen Image Edit (AI image editing), JS-based algorithmic color reduction, and SDXL img2img with style LoRAs to find the best approach.
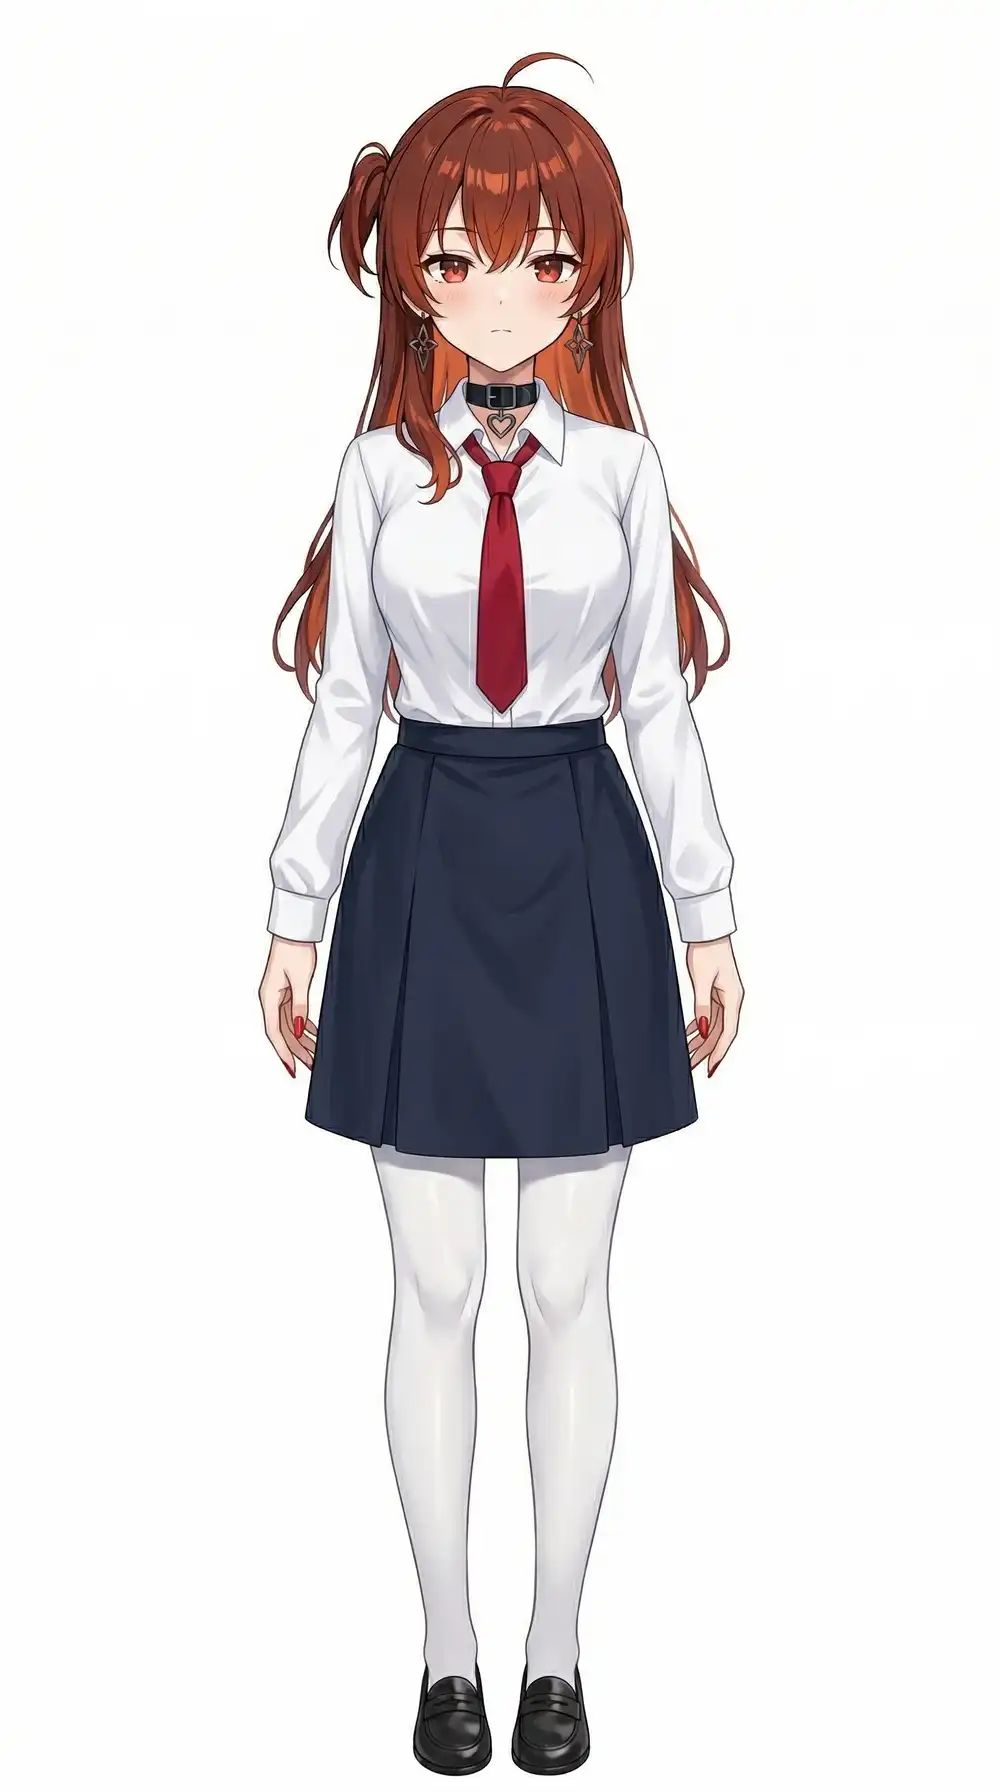
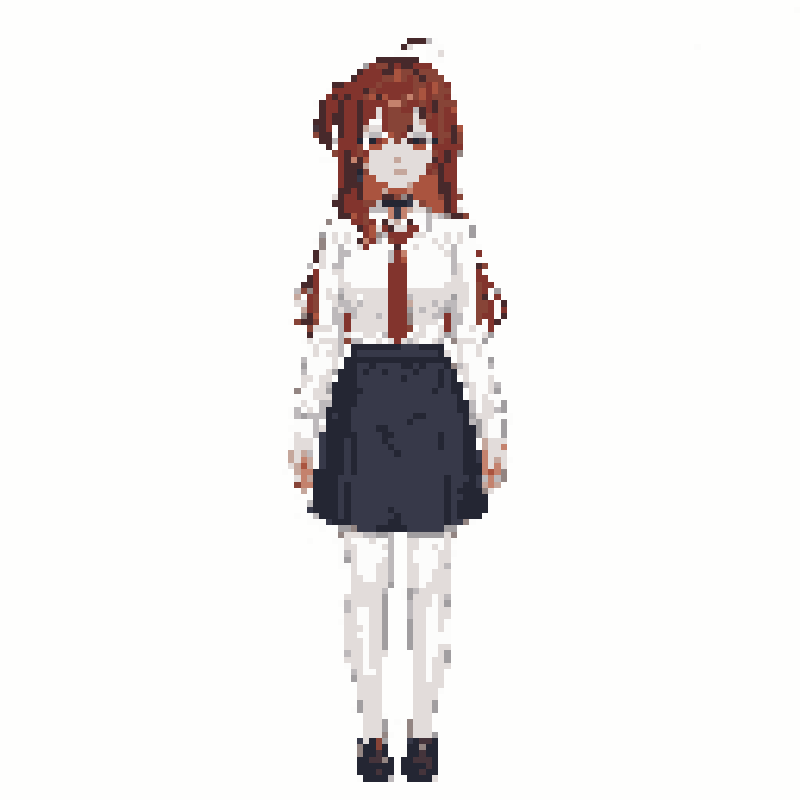
Test Image
A character illustration generated by Gemini. Real photos (figures, etc.) will be tested later.
Tools
Qwen Image Edit (via mflux)
As previously tested, the fastest setup on M1 Max 64GB is mflux + Lightning LoRA + 8-bit quantization. Runs directly from CLI without ComfyUI.
mflux-generate-qwen-edit \
  --image-paths input.png \
  --prompt "..." \
  --steps 4 --guidance 1.0 \
  --quantize 8 \
  --lora-paths Qwen-Image-Edit-Lightning-4steps-V1.0-bf16.safetensors \
  --lora-scales 1.0 \
  --output output.png
Using Phr00t AIO v16 (Qwen-Image-Edit-2509 base). Version comparison suggests v23 (2511 base) has better prompt adherence, but mflux only supports Edit 2509 at this point.
JS Color Reduction
Same logic as the pixel art converter in the lab. Nearest-neighbor downscaling + Median Cut color reduction. A browser tool, but used here as a Node.js + sharp CLI script.
The process:
- Downscale to target size (e.g. 64px longest edge) with nearest-neighbor
- Generate a palette (e.g. 16 colors) via Median Cut
- Map every pixel to the nearest palette color
No AI involved. Pure algorithm, finishes instantly.
Comparing 3 Patterns
graph LR
    A[Source] --> B1[Pattern A<br/>Qwen only]
    A --> B2[Pattern B<br/>JS then Qwen]
    A --> B3[Pattern C<br/>Qwen then JS]

    B1 --> C1[Qwen Image Edit<br/>prompt-driven]
    B2 --> C2a[JS reduction]
    C2a --> C2b[Qwen Image Edit<br/>add detail]
    B3 --> C3a[Qwen Image Edit<br/>prompt-driven]
    C3a --> C3b[JS reduction]
Pattern A: Qwen Image Edit Only (Strong Prompt)
Go all-in on the prompt to force pixel art conversion in one shot.
Transform into low-resolution pixel art with visible square pixels,
like a Super Nintendo RPG character sprite, limited color palette,
no anti-aliasing, blocky pixelated style| Input | Output |
|---|---|
|  |
It’s pixel art if you squint, but it’s basically still an illustration. No real pixel feel. v16’s strong character adherence makes it resist style conversion prompts.
- Time: 2:30
- Memory: ~30GB
Pattern B: JS Reduction -> Qwen Image Edit
Pixelate with JS first, then have Qwen add detail.
JS conversion at 64px longest edge, 16 colors.
| JS output (64px, 16 colors) | -> Qwen refinement |
|---|---|
 |
Feeding the JS pixel art into Qwen produced something that looked like RoboCop. Qwen tried to “fill in” the low-res input and added unwanted detail everywhere. Completely mangled.
Speed was also bad. Despite the input being 512x910px (the 64px JS output upscaled with nearest-neighbor), it took 5:10 — more than double the usual 2:30. Blocky low-res inputs seem to tank Qwen’s processing efficiency.
- Time: 5:10 (2x slower than normal)
- Memory: ~30GB
Pattern C: Qwen Image Edit -> JS Reduction
Post-process Qwen’s output with JS.
| Qwen output | -> JS reduction (64px, 16 colors) |
|---|---|
 |
Force Qwen’s “sort-of pixel art illustration” down to low resolution and reduced colors. It’s pixel art, but whether the original character is recognizable is debatable. Still the best of the three patterns — Qwen cleaned up the lines enough that the JS reduction didn’t completely destroy the shape.
- Time: 2:30 (Qwen) + instant (JS) = 2:30
- Memory: ~30GB (JS is negligible)
JS Size Comparison
Varying the JS reduction size for Pattern C’s post-processing.
| 64px | 48px | 32px |
|---|---|---|
32px starts to feel like SNES era. 64px has too much information and just looks like a “small image”. For RPG battle scene sprites, 32-48px seemed right.
…or so I thought. Looking at them on screen, 32-64px are just mosaics. Bumping up the resolution.
Retry at 128px / 256px
Tested both JS-only (source -> JS reduction) and Pattern C (Qwen output -> JS reduction) at 128px and 256px.
JS only (direct from source)
| 128px | 256px |
|---|---|
JS-only is terrible. Just blurry and creepy. Color reduction + downscaling alone drops too much information and falls into the uncanny valley.
Pattern C (Qwen -> JS)
| 128px | 256px |
|---|---|
 |  |
Better — Qwen’s line cleanup helps the character remain recognizable after JS reduction. At 256px it almost passes as pixel art.
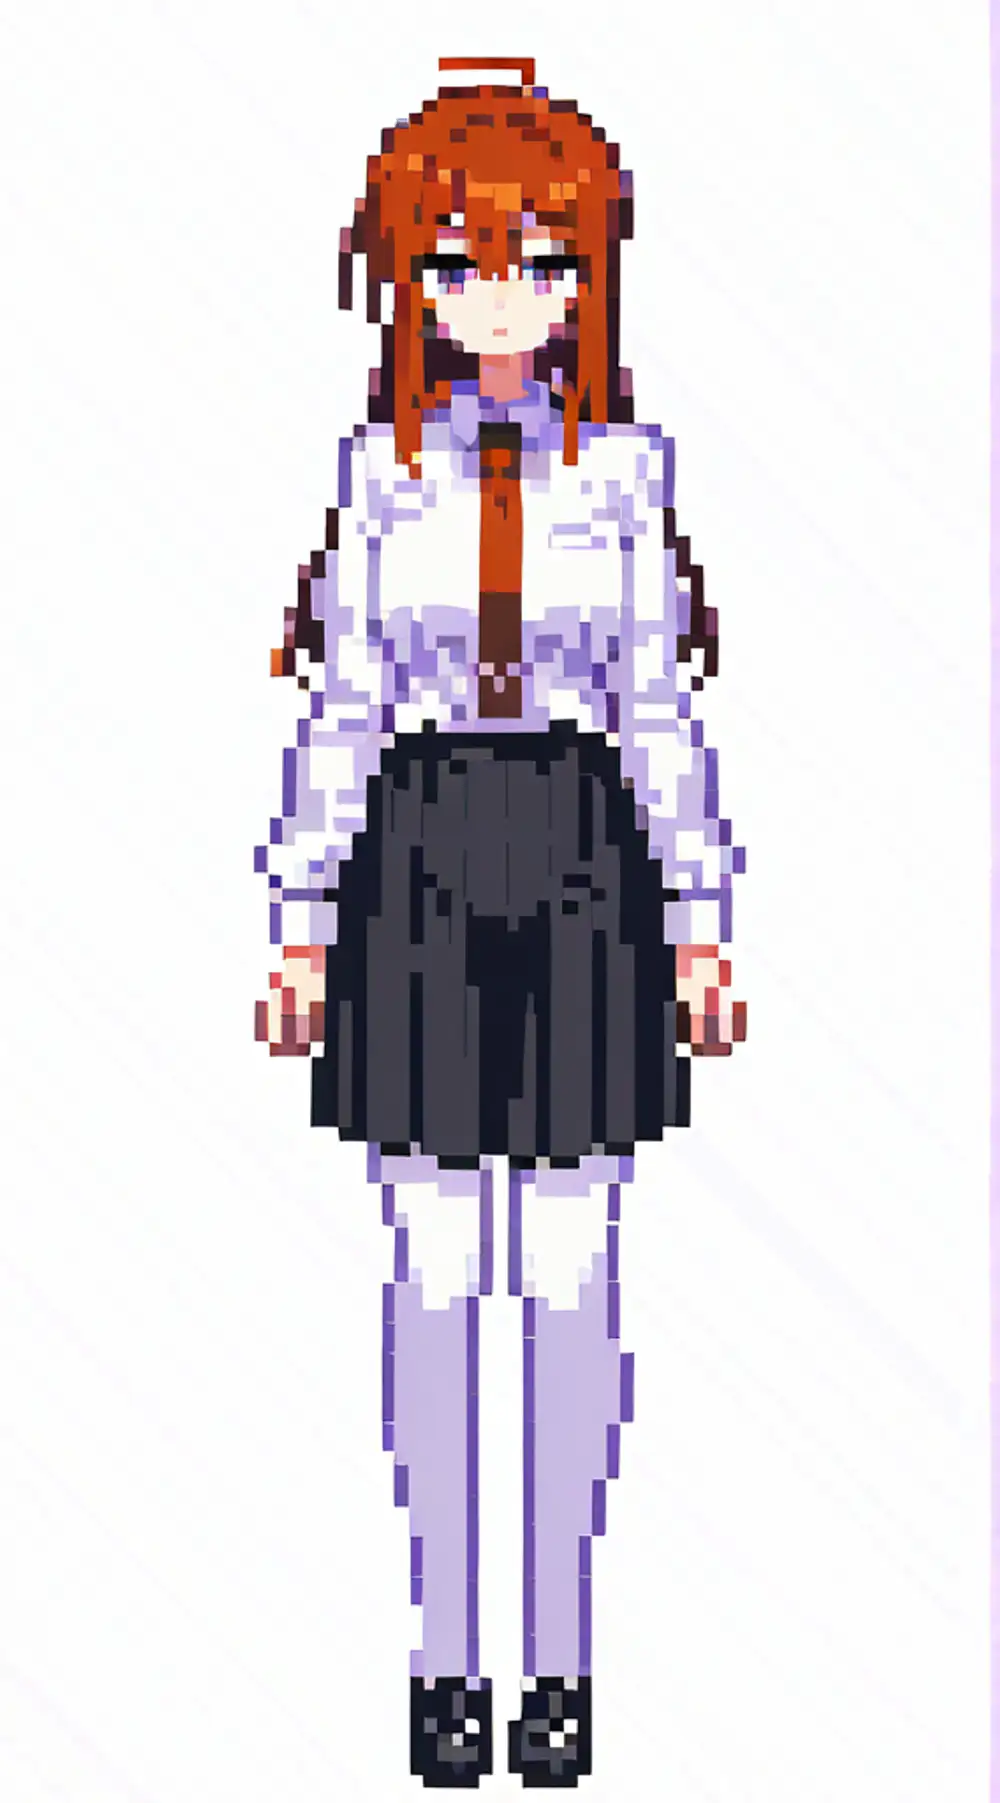
Pattern D: Qwen -> Illustrious i2i + LoRA
Patterns A-C were all mediocre. Then I remembered a ComfyUI workflow sitting on my machine (PixelArtチビテスト) — WAI-Illustrious + pixel-art-xl LoRA + chibistylexl LoRA for generating chibi pixel art characters.
That workflow was text-to-image with a character LoRA. The real pipeline takes arbitrary photos, so character LoRAs are off the table. Instead, feed Qwen’s output as img2img (i2i) input and use only style LoRAs.
graph LR
    A[Source] --> B[Qwen Image Edit]
    B --> C[Illustrious i2i<br/>+ pixel-art-xl LoRA<br/>+ chibistylexl LoRA]
    C --> D[Pixel art]
Settings
| Parameter | Value |
|---|---|
| Checkpoint | WAI-Illustrious SDXL v16.0 |
| LoRA 1 | pixel-art-xl-v1.1 (strength: 0.7) |
| LoRA 2 | chibistylexl-v1-2 (strength: 0.8) |
| Prompt | chibi character, pixel art, dot art, 1girl, full body, simple background, white background |
| Negative | lowres, bad anatomy, worst quality, low quality, blurry, realistic, photo, 3d |
| Steps | 25 |
| CFG | 7.0 |
| Sampler | euler_ancestral |
| Denoise | 0.6 |
Result
| Qwen output (input) | -> Illustrious i2i + LoRA |
|---|---|
 |
Sharp pixel edges, clearly reads as pixel art. Qwen preserved the character features while Illustrious + LoRA handled the “make it look like proper pixel art” part.
- Time: 2:30 (Qwen) + ~1:30 (Illustrious i2i) = ~4 min
- No character LoRA needed, works with arbitrary input images
…but then the obvious question: if Illustrious i2i handles the pixel art conversion, do we even need Qwen?
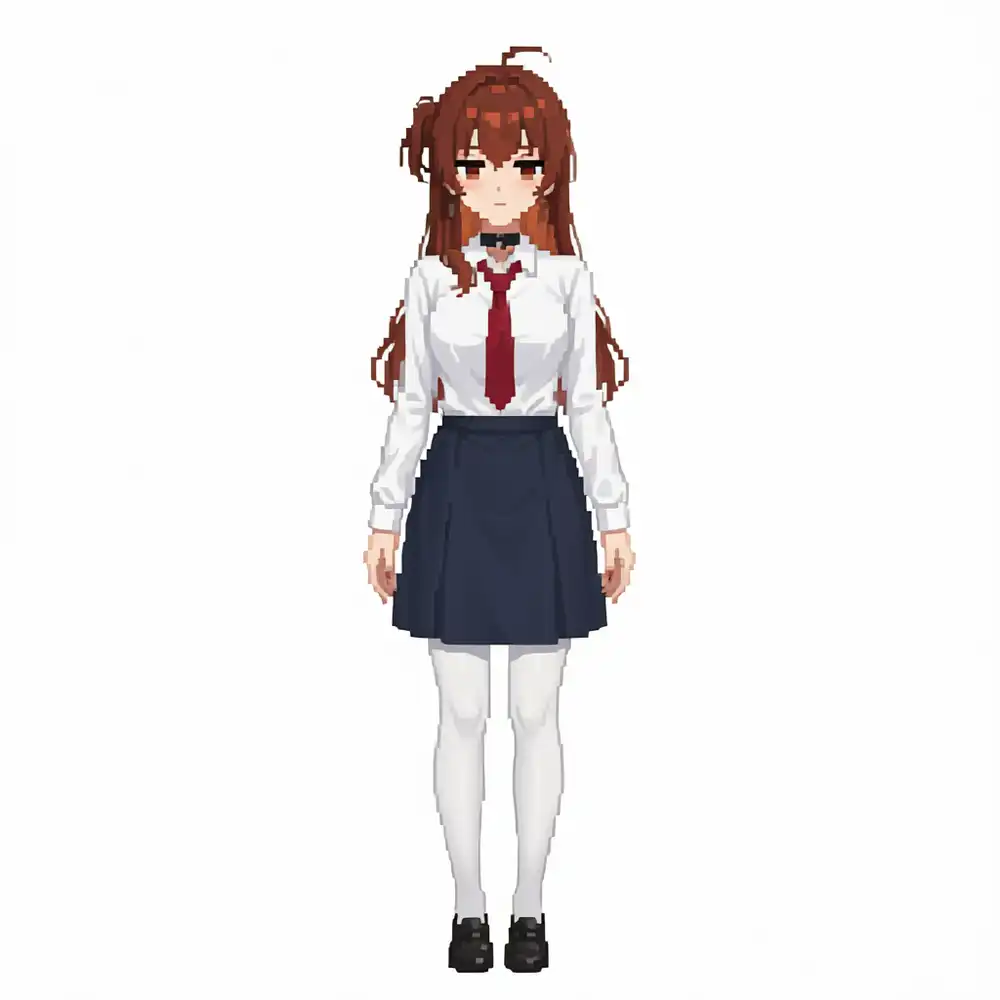
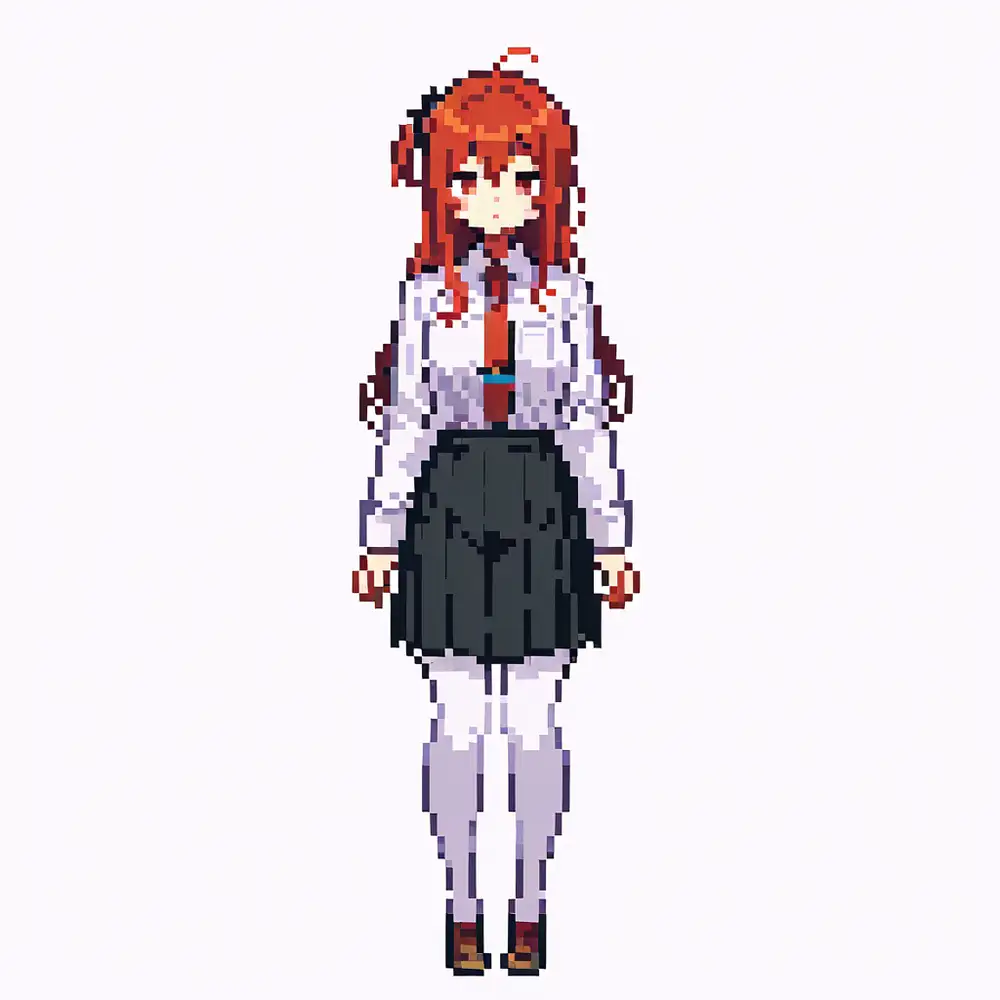
Pattern E: Illustrious i2i Only (No Qwen)
Feed the source image directly into Illustrious i2i + LoRA. Shortest possible route.
graph LR
    A[Source] --> B[Illustrious i2i<br/>+ pixel-art-xl LoRA]
    B --> C[Pixel art]
About the LoRAs
Both are SDXL style LoRAs available on Civitai.
- pixel-art-xl v1.1: Converts images to pixel art style. Civitai recommends NOT putting “pixel art” in the prompt, and downscaling 8x with nearest-neighbor after generation for pixel-perfect results
- ChibiStyleXL v1.2: Converts to chibi (deformed) style. Designed for use alongside other LoRAs
Pattern D stacked both, but stacking LoRAs causes blurring. For pixel art conversion, pixel-art-xl alone is enough.
Chibi LoRA Comparison
| pixel-art-xl + chibistylexl | pixel-art-xl only |
|---|---|
 |
Barely any difference. The chibi LoRA (strength 0.8) didn’t noticeably change the proportions. At denoise 0.6, the source composition is preserved too strongly for the chibi effect to kick in. pixel-art-xl alone is sufficient, and one LoRA means lighter processing.
Note: the gray line on the right edge is a VAE artifact from the input width (572px) not being a multiple of 8 as SDXL expects. Easily fixed by resizing in production.
Result
| Input (source) | -> Illustrious i2i |
|---|---|
|
Pixel art without Qwen. Just works.
- Time: ~1:30 (Illustrious i2i only)
- Memory: Illustrious 6.5GB (saves 30GB by skipping Qwen)
Pattern D vs E
| D: Qwen -> Illustrious | E: Illustrious only | |
|---|---|---|
| Time | 4:00 | 1:30 |
| Memory | 30GB + 6.5GB | 6.5GB |
| Pipeline | Complex | Simple |
Visually, Pattern D has more character — Qwen’s reinterpretation adds a slightly different nuance. But Pattern E is overwhelmingly more practical for pipeline integration.
Summary
| Pattern | Time | Pixel Art Quality | Notes |
|---|---|---|---|
| A: Qwen only | 2:30 | Low | Barely pixel art |
| B: JS -> Qwen | 5:10 | Low | RoboCop |
| C: Qwen -> JS | 2:30 | Medium | Recognizable but unconvincing |
| D: Qwen -> IL i2i (2 LoRAs) | 4:00 | High | Proper pixel art, has character |
| E: IL i2i only (1 LoRA) | 1:30 | High | No Qwen, minimal LoRA, fastest |
Pattern E wins on speed, memory, and simplicity. No Qwen (30GB), no chibi LoRA. Illustrious 6.5GB + VLM (Gemma 3 12B: 9.6GB) = 16GB total, a quarter of the 64GB available.
Print Target
Final output goes to HP Sprocket 200 (2x3 inch ZINK, 668x1002px). Pattern E output preserves the source aspect ratio, so crop and nearest-neighbor upscale to 668x1002 to keep pixel edges sharp.
Bonus: Where Qwen Is Actually Needed
Qwen wasn’t useful for pixel art conversion, but it can do things LoRAs fundamentally cannot: semantic transformation. Turning a character into a monster is beyond what style LoRAs can do.
Transform this character into a Dragon Quest style monster,
cute slime-like creature inspired by the character's colors and outfit| Input | DQ Slime style | Demon style |
|---|---|---|
| 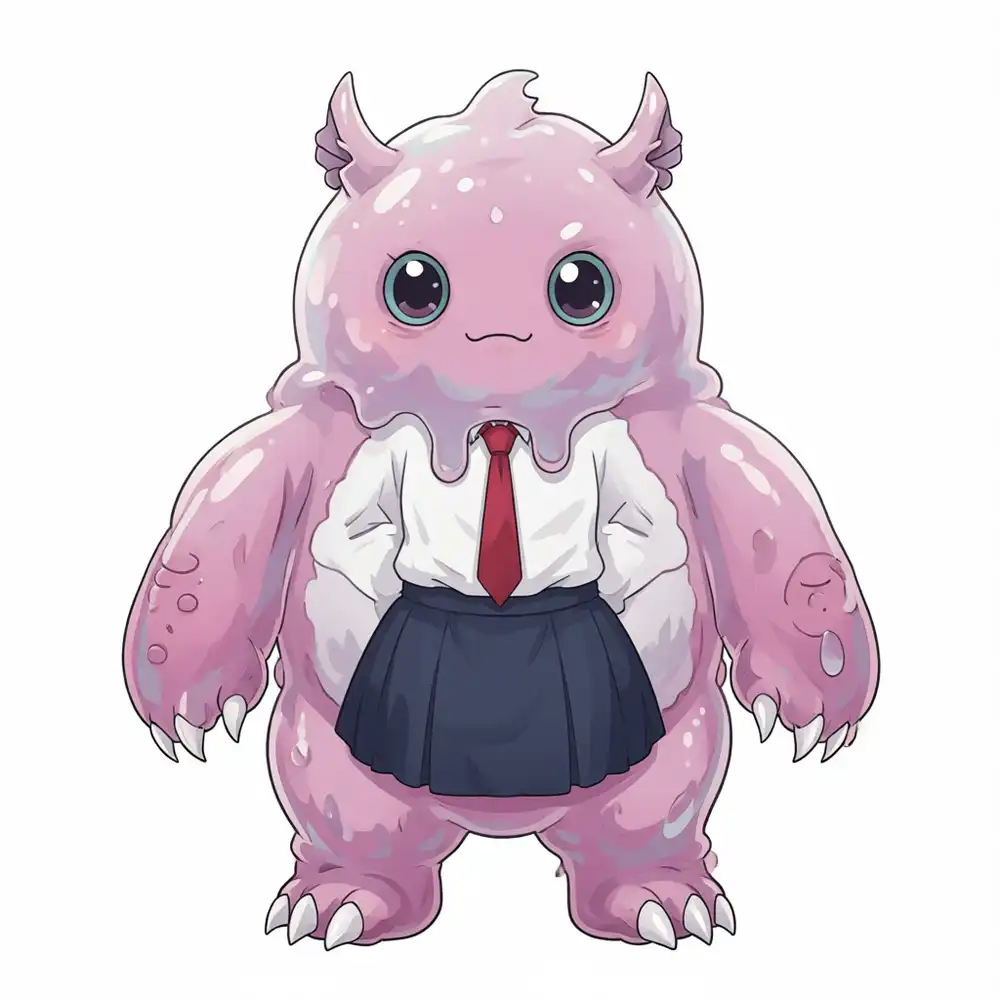 | 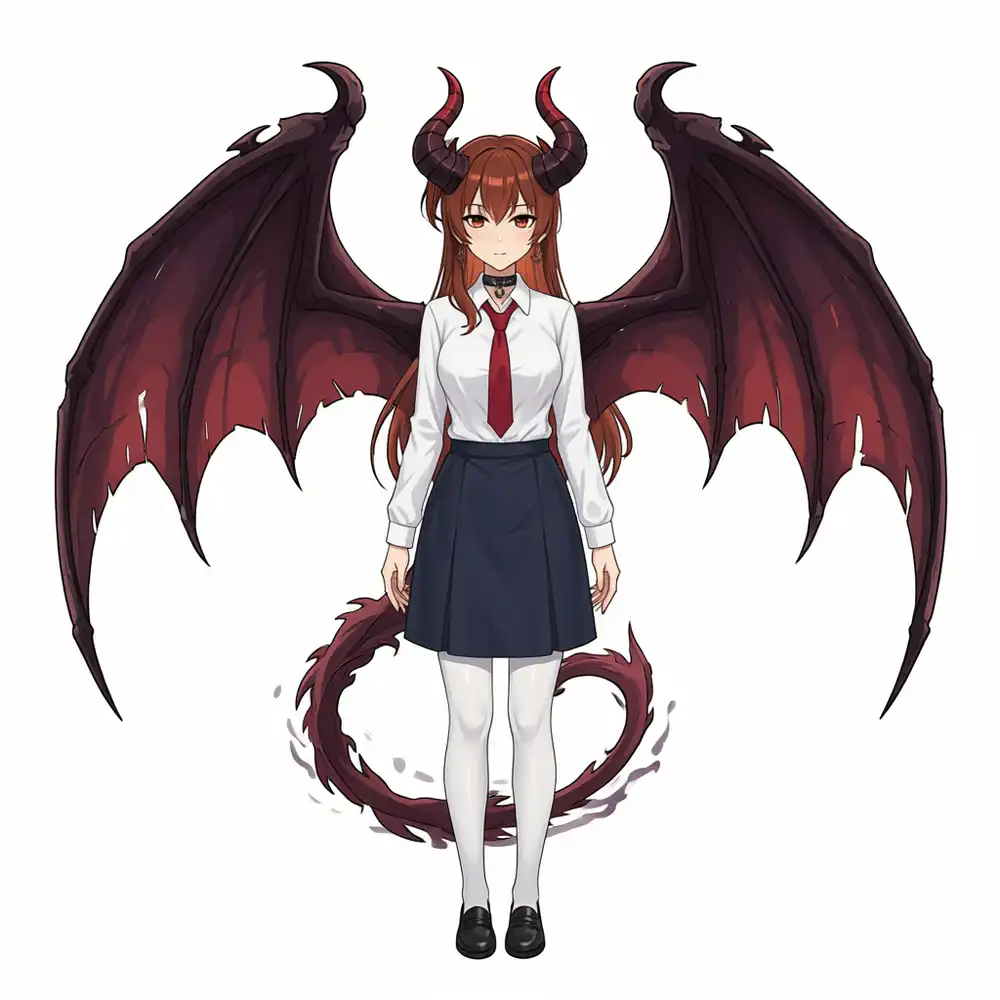 |
The slime version “absorbed” the school uniform rather than wearing it — the red tie and navy skirt melted into the slime’s body surface. Post-digestion vibes. Straying too far from human form causes the source features to dissolve.
The demon version was prompted as a succubus but the horns and wings came out too beefy — more dragon girl than succubus. Still, it kept the school uniform intact with the human form preserved. Qwen excels at additive transformations where parts are added to the original. LoRAs change “how something looks” while Qwen can change “what something is.” If the pipeline ever needs a “monster conversion mode,” that’s where Qwen comes in.
Adopted Pipeline
Pixel art conversion pipeline uses Pattern E.
graph TD
    A[Camera capture] --> B[Illustrious i2i<br/>pixel-art-xl LoRA]
    B --> C[Vision LLM<br/>RPG parameter extraction]
    C --> D[Battle scene compositing]
    D --> E[HP Sprocket 200<br/>ZINK print]
Dropping Qwen simplified the pipeline and cut processing time from 4 minutes to 1.5 minutes. Memory footprint is drastically smaller too.
Next: connecting a camera for real photo input. Final article: end-to-end pipeline run.