Anima inpaint on Mac ComfyUI: LanPaint + Crop-and-Stitch cuts 32 min to 2.5 min
 Contents
The goal: get Anima (Qwen-Image family) inpaint running at usable speed on M1 Max 64GB ComfyUI. Most people do this on CUDA, so there are almost no Mac-side write-ups, and existing SDXL-style guides stall in several places when applied to Anima.
The short version: first, SetLatentNoiseMask failed silently with Anima + Anima-Turbo LoRA and burned 67 seconds returning the input image unchanged. Switching to LanPaint and running the official Example_26 worked, but took 32 min 45 sec per image on M1 Max. Inpaint-CropAndStitch on top brought text inpaint down to 2 min 31 sec, and a clothing-replacement workflow (white shirt, red necktie, navy skirt onto a nude image) finished in about 7 minutes. The speed problem is solved that far, but the output pose stays anchored to the source image’s contrapposto and forward-leaning chest, and prompt tuning, split masks, and incremental inpaint passes can’t dislodge it. Without something like ControlNet OpenPose for skeleton-level control, the pose is not solvable from the prompt side. On CUDA none of this optimization matters; the default LanPaint template should land in 3 to 5 minutes on an RTX 3060 12GB. This article is the Mac-specific salvage path plus a sharper boundary line for what prompt-only tuning can and cannot fix.
In order.
Environment
| Item | Value |
|---|---|
| Machine | MacBook Pro M1 Max 64GB unified memory |
| OS | macOS Darwin 25.3.0 |
| Python | 3.13.11 (miniconda base) |
| PyTorch | 2.10.0 |
| Backend | MPS |
| ComfyUI | 0.16.4 |
| Frontend | 1.41.16 |
| New custom_nodes | LanPaint, ComfyUI-Inpaint-CropAndStitch |
The model files I touched. The “Used in inpaint” column shows whether each was actually loaded for the inpaint passes.
| Type | Filename | Used in inpaint | Purpose |
|---|---|---|---|
| diffusion model | animaOfficial_preview3Base.safetensors | yes | CircleStone Labs official Anima preview3-base derivative. Main model for inpaint |
| diffusion model | waiANIMA_v10.safetensors | -(reference) | WAI-tuned preview3-base derivative. Sometimes used for txt2img |
| text encoder | qwen_3_06b_base.safetensors | yes | Qwen3 0.6B, the standard pairing for Anima |
| VAE | qwen_image_vae.safetensors | yes | Qwen Image VAE |
| LoRA | kanachan-waianima-rework-v4_epoch150.safetensors | no (not applied here) | Separate character LoRA. Applying it would mix “trained-feature drift inside the mask” issues with the inpaint behavior I want to observe, so this round runs the base model only |
| LoRA | anima-turbo-lora-v0.1.safetensors | no (it silently breaks inpaint, see below) | txt2img speed-up. Off for inpaint by default |
The new custom_nodes I added are LanPaint and ComfyUI-Inpaint-CropAndStitch. Neither has external dependencies, a plain git clone is enough. comfyui-impact-pack already failed to import because of missing segment_anything-family deps, but it does not affect the inpaint path. rembg-comfyui-node-better crashes ComfyUI on startup with an OMP double-load, so I always launch with KMP_DUPLICATE_LIB_OK=TRUE to dodge it.
KMP_DUPLICATE_LIB_OK=TRUE python ~/ComfyUI/main.pyThe SDXL-style VAEEncode + SetLatentNoiseMask path silently does nothing
The first thing I built was the textbook setup: LoadImage feeds VAEEncode and MaskBlur+ in parallel, then SetLatentNoiseMask stamps the mask onto the latent, then KSampler.
flowchart TD
    A[LoadImage] -->|IMAGE| B[VAEEncode]
    A -->|MASK| C[MaskBlur+]
    B --> D[SetLatentNoiseMask]
    C --> D
    D --> E[KSampler]
    E --> F[VAEDecode]
    F --> G[SaveImage]
KSampler was on the same settings I use for plain Anima txt2img: 10 steps / cfg 1.0 / er_sde / simple with Turbo LoRA. denoise=0.45 finished in 67.50 sec. The output was effectively identical to the input. I assumed Turbo might just be weak under masked sampling, so I cranked denoise=1.0 to force the masked region to regenerate from full noise. Same result. Both inside and outside the mask the original image came back.
To split the issue, I attached MaskPreview+ to both MaskBlur+ and the LoadImage MASK output to see what the sampler was actually receiving. The painted area was correctly extracted as white. That confirmed: the mask is reaching the sampler, but KSampler is not touching the masked region at all.
Reading comfy/samplers.py:399 in ComfyUI, the masked-sampling path looks like:
latent_mask = 1. - denoise_mask
x = x * denoise_mask + self.inner_model.inner_model.scale_latent_inpaint(
    x=x, sigma=sigma, noise=self.noise, latent_image=self.latent_image
) * latent_mask
scale_latent_inpaint is a per-model method, and Anima/Qwen-Image uses BaseModel’s default model_sampling.noise_scaling. In principle, flow matching should still inject (1-sigma)*latent + sigma*noise into the masked region, keep the unmasked region clean, and regenerate the masked region as sigma walks from 1 to 0. In practice on this stack it does not.
Two plausible causes. One is that Anima-Turbo LoRA has glued the model’s noise prediction onto a “compressed trajectory tuned for very few steps,” so the (1-sigma)*latent + sigma*noise intermediate inside the masked region falls outside the training distribution and the model returns “do not move” predictions for the masked region. The other is that the combination of flow matching with er_sde + simple + denoise=1.0 + an image-derived latent ends up with something like start_sigma=end_sigma, idling the sampler. Removing Anima-Turbo and running plain Anima makes the masked region come alive on the same SetLatentNoiseMask path, so the Turbo LoRA compatibility is at least the dominant axis. Plain Anima txt2img is fine with Turbo; the symptom only surfaces in inpaint.
Standard inpaint guides assume you paint a mask, hit Queue, and get a result. “The output is pixel-identical to the input” is not in their failure modes. There is no error, no warning, and so people who take an SDXL guide straight to Anima + Turbo are the ones who land on this. Searching doesn’t surface it either.
Get a known-good run from LanPaint’s Example_26
I dug through Civitai and GitHub for the most reproducible Anima/Qwen-Image inpaint success and landed on LanPaint. It is a training-free inpaint sampler distributed as a ComfyUI custom_node, used by swapping KSampler for LanPaint_KSampler. The README explicitly lists Anima among supported models.
Universal Compatibility – Works instantly with almost any model (Z-image, Z-image-base, Hunyuan, Wan 2.2, Qwen Image/Edit, Anima, HiDream, SD 3.5, Flux-series, SDXL, SD 1.5 or custom LoRAs) and ControlNet.
The examples/Example_26/ folder ships an Anima-tuned workflow with ComfyUI metadata baked into the PNG. Drag the PNG onto the ComfyUI canvas and the workflow loads as-is.
LanPaint’s key idea is “Multiple iterations before denoising.” A regular sampler calls the model once per step; LanPaint runs additional thinking iterations per step to align the masked-region content with the unmasked surroundings (LanPaint_NumSteps controls how many). The compute cost is roughly usual_steps × NumSteps, and in exchange the masked region updates correctly even under the conditions where SetLatentNoiseMask silently does nothing. The README also warns about distillation LoRAs, and since Anima-Turbo is in that family I bypassed Turbo for the first run.
Warning: LanPaint has degraded performance on distillation models, such as Flux.dev, due to a similar issue with LORA training. Please use low flux guidance (1.0-2.0) to mitigate this issue.
Running Example_26 as-is
Dragging InPainted_Drag_Me_to_ComfyUI.png onto the canvas loads the workflow. The companion Masked_Load_Me_in_Loader.png is the sample input: a character holding a sign with the LanPaint logo, where the sign area has the mask baked into the alpha channel.
The graph is collapsed into a single group node. Convert to Nodes expands it: UNETLoader on anima-preview3-base.safetensors, CLIPLoader on qwen_3_06b_base.safetensors, VAELoader on qwen_image_vae.safetensors, LanPaint_KSampler at steps=30 / cfg=5.0 / er_sde / simple / denoise=1.0 / NumSteps=5 / Prompt mode=Image First, ImageScale set to 512×512 internally. My local checkpoint was renamed to animaOfficial_preview3Base.safetensors, so that was the only edit I made.
Real wall-clock numbers on M1 Max with KMP_DUPLICATE_LIB_OK=TRUE:
0%|          | 0/30 [00:00<?, ?it/s]
3%|▎         | 1/30 [01:09<33:45, 69.83s/it]
...
Prompt executed in 1965.18 seconds
About 66 seconds per step, 32 min 45 sec total. The output has the LanPaint text drawn correctly inside the masked sign area and matches the quality of the official sample.
LanPaint + Anima works, but a 32-minute single image is not something you run all afternoon on M1 Max. The thinking iterations are doing real work though: under conditions where SetLatentNoiseMask alone failed, the masked region cleanly swaps content here. The internal alignment loop seems to compensate for the trajectory drift caused by distillation enough to converge inside the mask.
Cutting the time 13x with Inpaint-CropAndStitch
Most of LanPaint’s weight comes from sampling the full image. At ~1024×1024 latent on M1 Max + MPS the per-step time sits around a minute. When the mask only covers a small fraction of the image, sampling the surrounding area is wasted compute.
lquesada/ComfyUI-Inpaint-CropAndStitch crops to the mask’s bounding box (plus a configurable context margin), runs sampling on the small crop, and stitches the result back into the original frame. InpaintCropImproved takes image and mask and returns a stitcher handle plus cropped_image / cropped_mask; InpaintStitchImproved takes the stitcher and the inpainted crop and produces a full-size IMAGE again. The graph I used:
flowchart TD
    A[LoadImage] --> B[InpaintCropImproved]
    B -->|cropped image| C[VAEEncode]
    B -->|cropped mask| D[SetLatentNoiseMask]
    C --> D
    D --> E[LanPaint_KSampler]
    E --> F[VAEDecode]
    F --> G[InpaintStitchImproved]
    B -.->|stitcher handle| G
    G --> H[SaveImage]
SetLatentNoiseMask stays in the path even with LanPaint; the small post-crop mask flows into LanPaint that way.
From the official defaults I cut three things: steps 30 → 15, LanPaint_NumSteps 5 → 3, and output_target_width/height from full down to 512×512.
| Setting | Default | Used | Effect |
|---|---|---|---|
| LanPaint steps | 30 | 15 | Half the sampling iterations |
| LanPaint_NumSteps | 5 | 3 | Thinking iterations down to 60% |
output_target_width/height | (full) | 512 | Processing resolution after crop |
Running crop-inpaint on LanPaint_Anima_Example26_Masked.png:
Prompt executed in 151.03 seconds2 min 31 sec, about 13x faster than the unmodified default’s 32 min 45 sec. Per-step is about 10 sec, down from 66 sec, so the resolution drop plus the thinking-iteration trim buys roughly 6x at the per-step level.
Quality takes a small hit. The default rendering reproduces LanPaint in correct mixed case on the sign; the trimmed run produces LANPAINT in all caps. Detail demands like “draw text accurately” weaken when you cut thinking iterations, but for hair, clothing, or small accessories the difference is hard to spot.
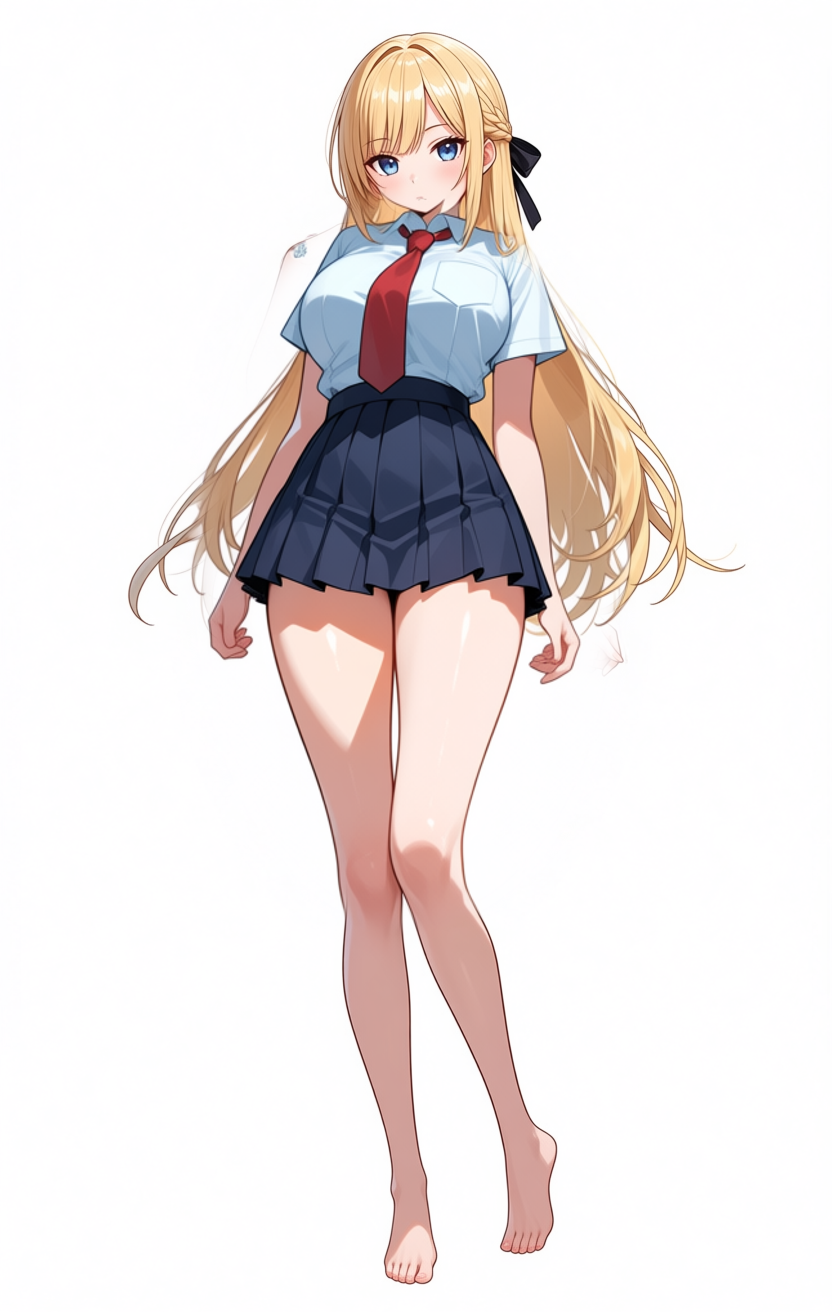
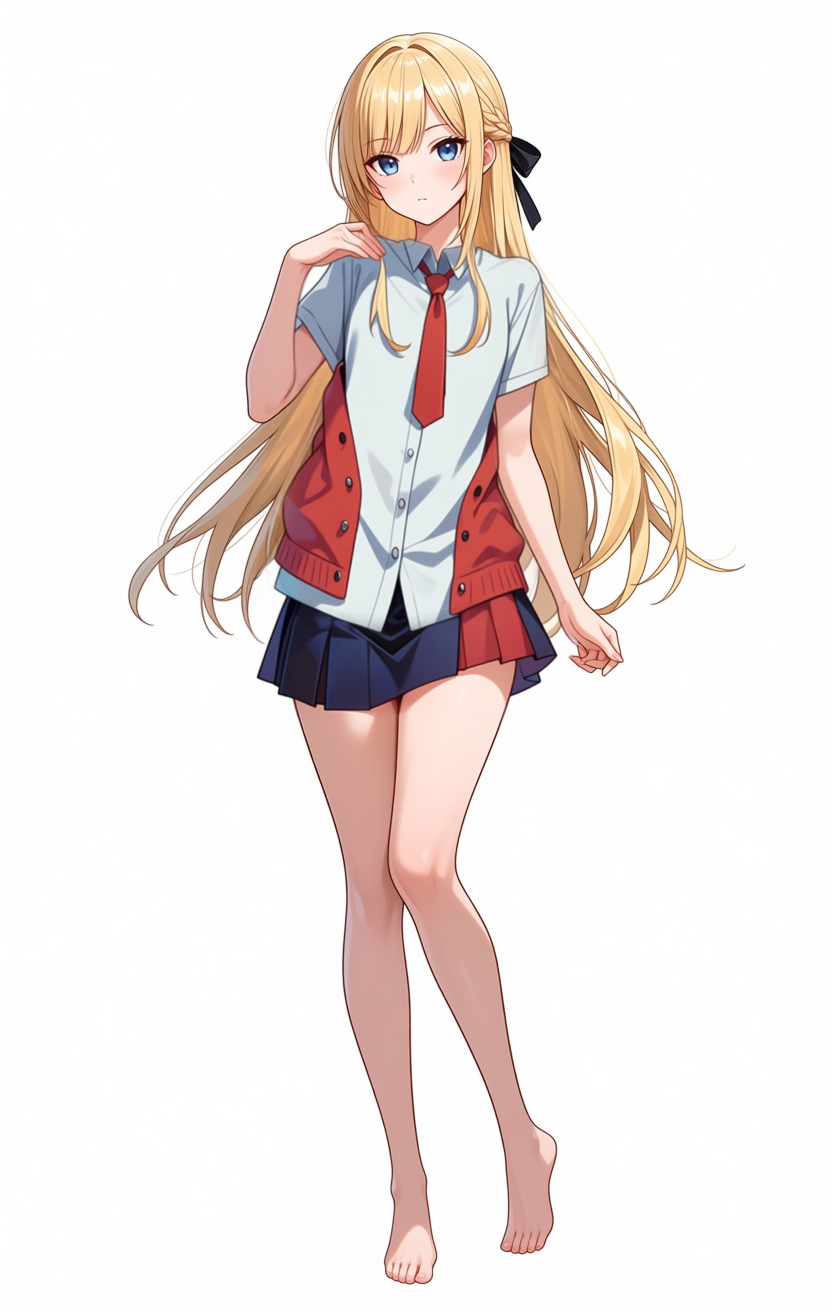
Applying it to clothing replacement
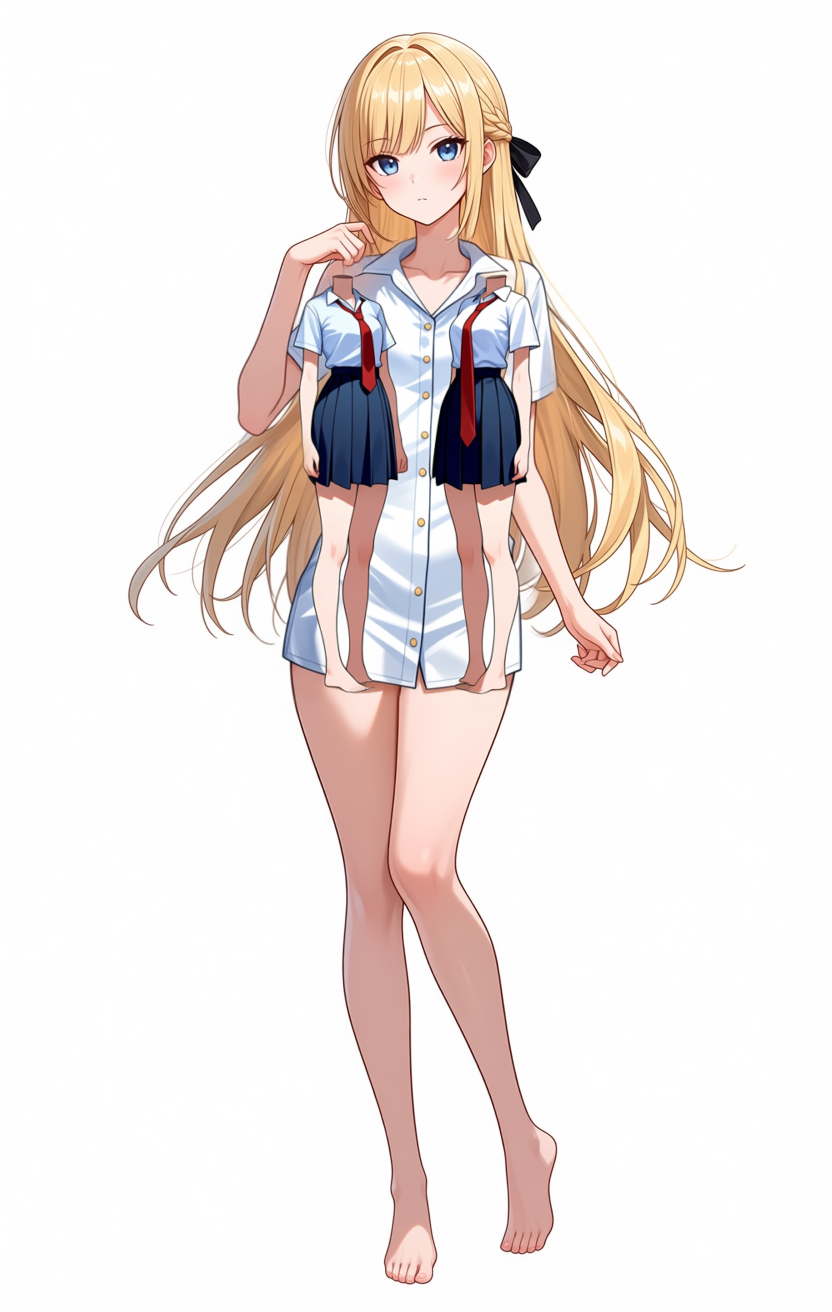
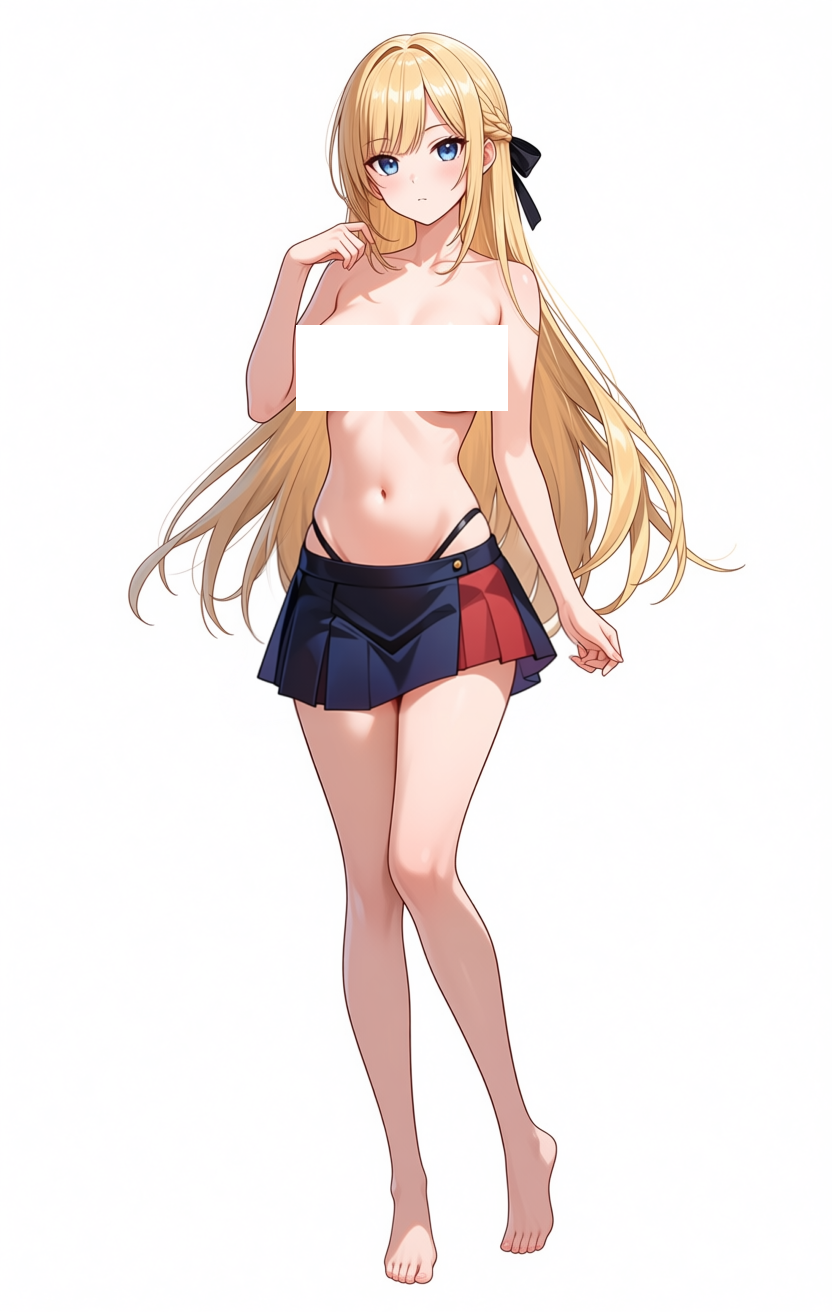
Text inpaint is a small-mask case, which is where crop gives the biggest payoff. The more realistic workload is clothing replacement: take genserver_00195_.png, a 832×1312 standing-pose nude that came out of plain Anima txt2img, and put a white short-sleeve collared shirt, a red necktie, and a navy pleated skirt onto it. Stacking a character LoRA like kanachan on top introduces its own LoRA-fit issues, so this round runs base Anima only to keep the variables down. The mask now covers from chest to mid-thigh, so the sampling region is large and the crop benefit shrinks.
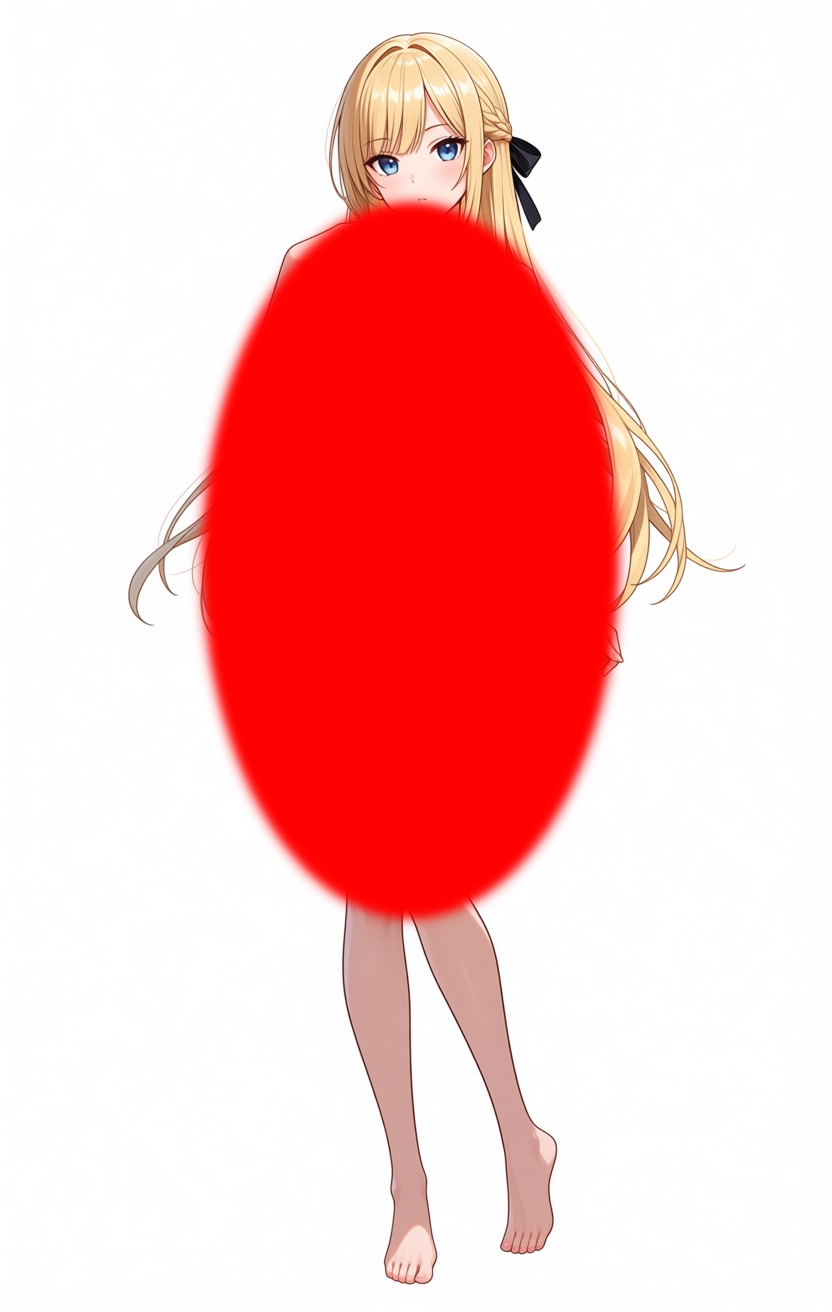
For the first attempt I generated an ellipse mask with PIL and baked it into the image. The red area in the image above is the inpaint target.
Clothing has more detail than text, so I raised the processing resolution. The mask is already large so I kept the context expansion modest and bumped the mask blend to soften the skin border. I also nudged LanPaint_NumSteps back up a notch for quality.
| Setting | Text inpaint | Clothing | Reason |
|---|---|---|---|
output_target_width/height | 512 | 768 | Detail for collar, necktie knot, pleats |
context_from_mask_extend_factor | 1.5 | 1.3 | Mask is already large, avoid over-expansion |
mask_blend_pixels | 32 | 48–64 | Smoother seam against bare skin |
LanPaint_NumSteps | 3 | 4 | Quality bias on thinking iterations |
| steps | 15 | 15 | Same |
| cfg | 4.0 | 4.0 | Same |
Positive prompt names the clothing; negative blocks both nude exposure and body-shape runaway.
masterpiece, best quality, score_7, safe. 1girl, long blonde hair, slim figure,
standing pose, white collared button-up shirt with short sleeves, red necktie,
navy blue pleated skirt, bare legs, white background, full body.

(negative)
worst quality, low quality, score_1, score_2, score_3, blurry, jpeg artifacts,
sepia, nude, naked, topless, exposed breasts, nipples, pubic, censor
At 768 and a large mask the per-step time goes up to ~30 sec. 15 steps gives roughly 7 min/image.
First take (programmatic ellipse mask): four issues at once
Running the first frame with the PIL-generated ellipse mask. The clothing is correct as prompted, but several issues stack up on closer look.
Going through the issues in order. First, the neck looks shrugged. Comparing the head crop of the source and the first attempt makes the cause obvious: on the first attempt the shirt collar is biting into the neck and visually shortening it.
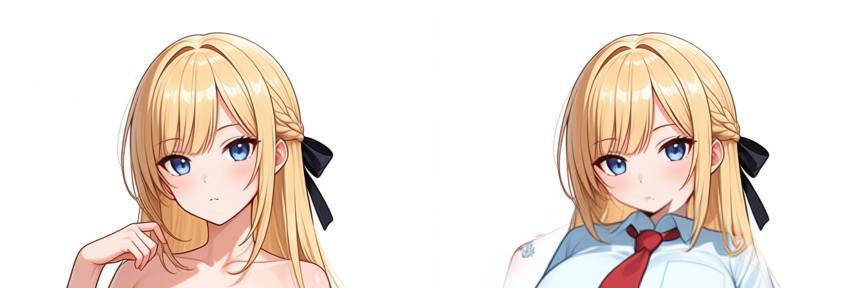
The ellipse mask’s top edge crossed the collarbone and reached near the base of the neck, so the inpaint stood the shirt collar up from that height. The skirt waistband starting just below the bust comes from the same cause. This is a mask-shape problem and disappears if the mask top is clearly below the collarbone.
On top of that, thighs and hip width are inflated by the anime-family model’s prior, and the pose carries contrapposto (weight on one leg, hip twist, shoulder tilt) plus a forward-leaning chest. These persist beyond the first attempt and sit in a different layer from the mask-shape issue.
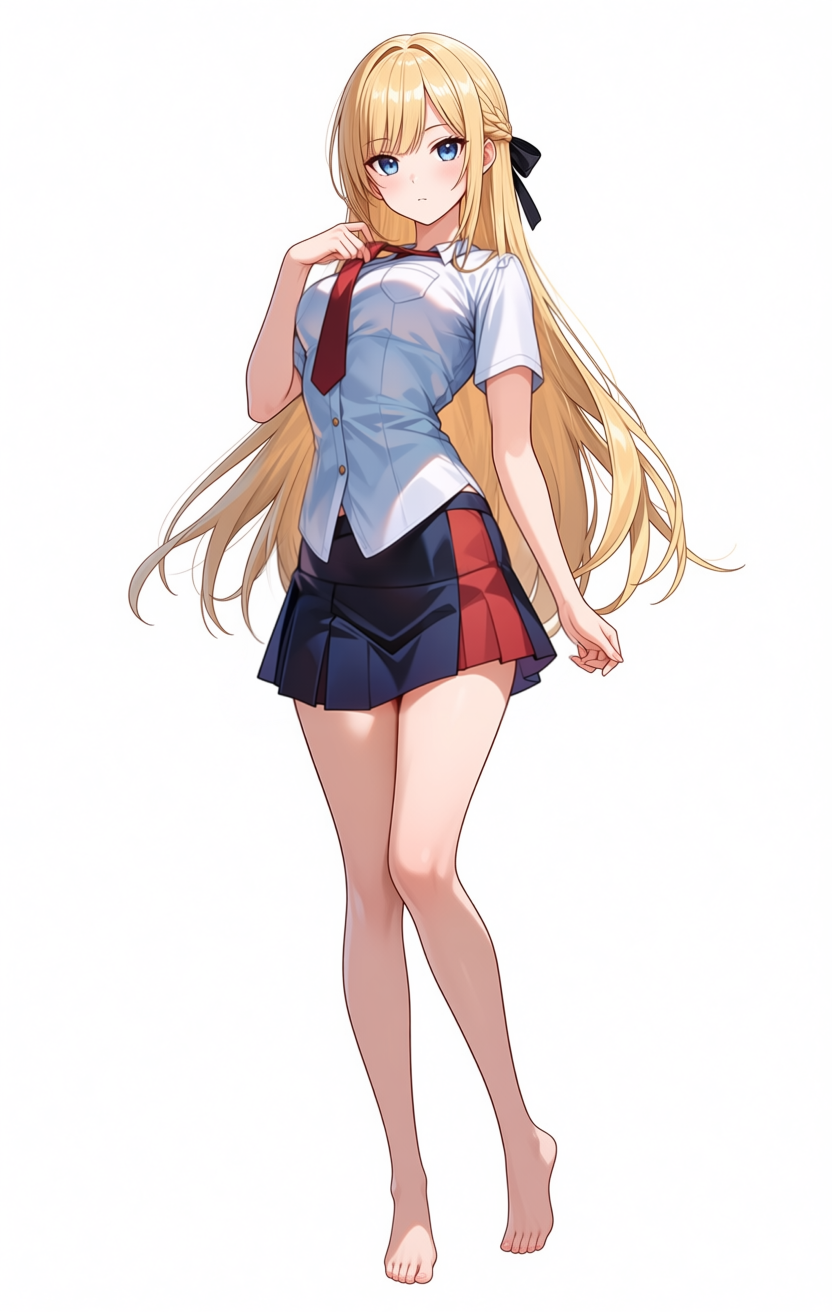
2nd attempt (hand-painted mask): neck and skirt position fix themselves, pose stays
The second attempt switched from the PIL ellipse to a hand-painted mask. There was no conscious “avoid the neck”; I just painted by hand, the mask naturally landed below the collarbone, and both the neck pinch and the high-skirt issue from the first attempt disappeared as a side effect.
The shirt collar now starts cleanly below the collarbone, and the skirt no longer starts under the bust. Thigh thickness, hip width, the contrapposto stance, and the forward-leaning chest are unchanged. Two layers separate cleanly here: problems that go away with a better mask shape, and problems that bleed in from the surrounding (unmasked) region of the source.
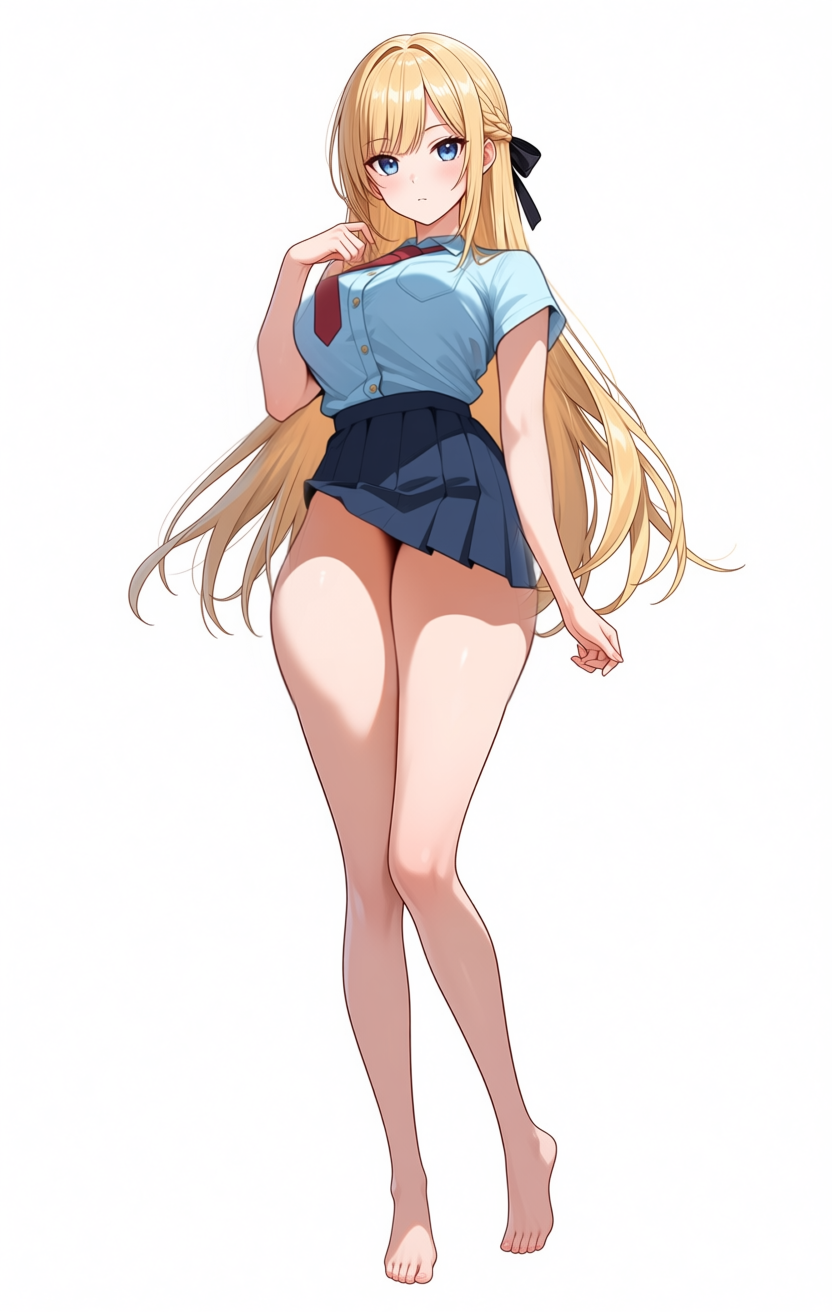
3rd attempt (hand-painted + slim modifiers): body slims down, pose still doesn’t move
To suppress the thigh/hip inflation from the anime-family prior, I added slim hips, slim thighs, slender figure, narrow waist to positive and thick thighs, wide hips, hourglass figure, voluptuous, curvy, large hips, thick waist to negative, then ran the third attempt.
The thighs and hip width clearly thinned out, but the contrapposto pose stayed. The “low-angle / looking-up” feel turns out to be the pose twist itself, not the thigh thickness. Prompt-side slim tokens trim the body but don’t move the pose.
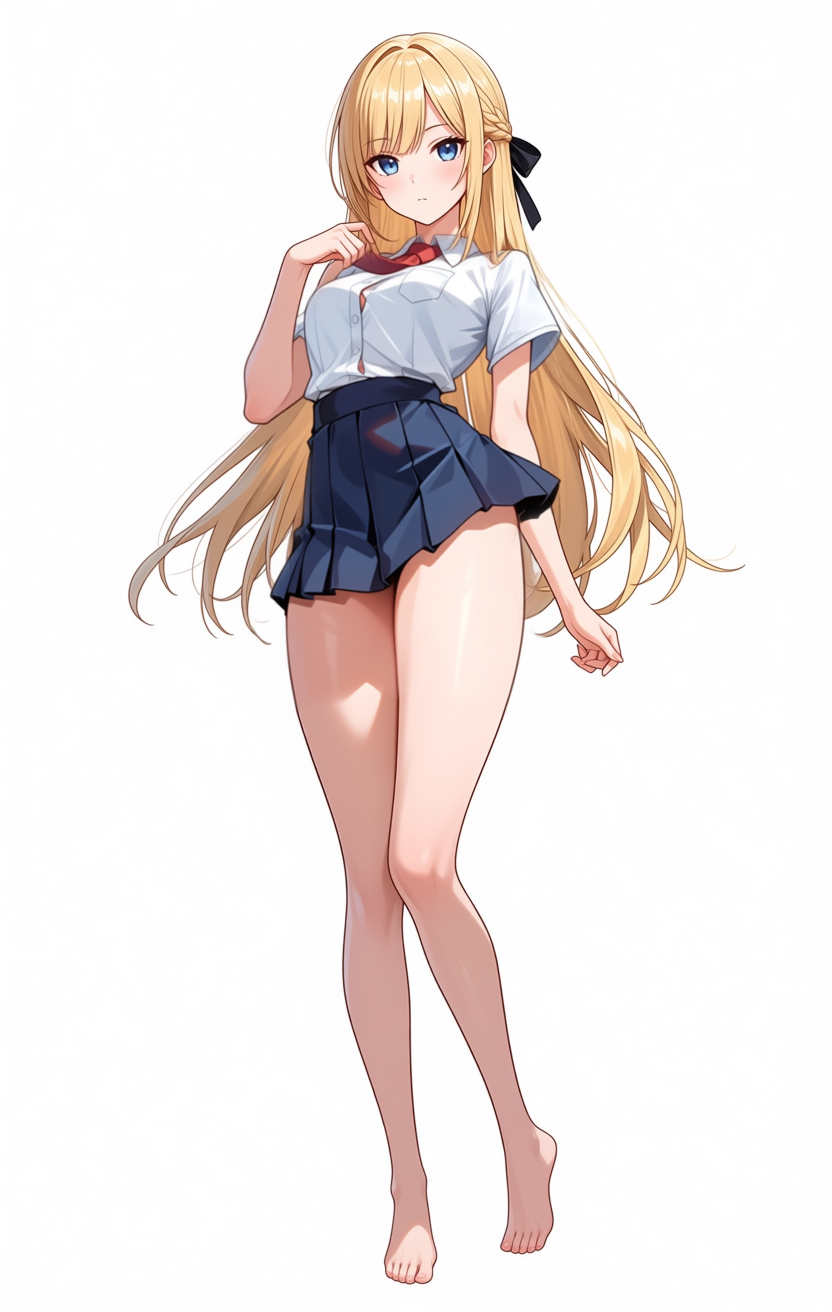
4th attempt (hand-painted + overloaded pose negatives): two small clothed figures appear on the chest
To try to clear contrapposto through prompts, I added standing straight, symmetrical pose, weight on both legs, facing forward to positive and contrapposto, hip out, twisted torso, weight on one leg, leaning, sexy pose, S-curve, hand on hip to negative.
Two small figures, both wearing the shirt, are stacked onto the chest of the main figure. Not a ghost, just an anatomical breakdown. Stuffing abstract phrases like sexy pose and S-curve into negative made the model try to satisfy mutually exclusive constraints (“don’t take a pose” plus “don’t put weight on one side”), and it broke the masked region. Heavier negatives make the behavior more erratic, not less.
Lined up side by side, only the thighs and hip width changed slightly between 2nd and 3rd; the pose and the forward-leaning chest are unchanged across 2nd through 4th. The 4th attempt also adds a new failure mode on top, so piling on countermeasures doesn’t pile on improvements — it adds new failure modes.
Left: source, middle: 3rd (slim added), right: 4th (overloaded pose negatives, ghost figures). Chest-forward and one-leg weight are the same in all three. To remove the contrapposto reliably you constrain the skeleton directly via ControlNet OpenPose. I did not bring in an Anima/Qwen-Image OpenPose ControlNet in this round, since prompt tuning had to be ruled out first.
Reducing variables: skirt-only test
“Put a full outfit on, all at once” and “replace nude with clothing” together have too many moving parts. So I split off a skirt-only variation: paint only the lower-body mask, narrow the prompt to skirt-only tokens, leave the upper body as-is.
First try, positive with the three “low” tokens stacked: low-rise skirt, skirt sitting at hip level, skirt below the navel.
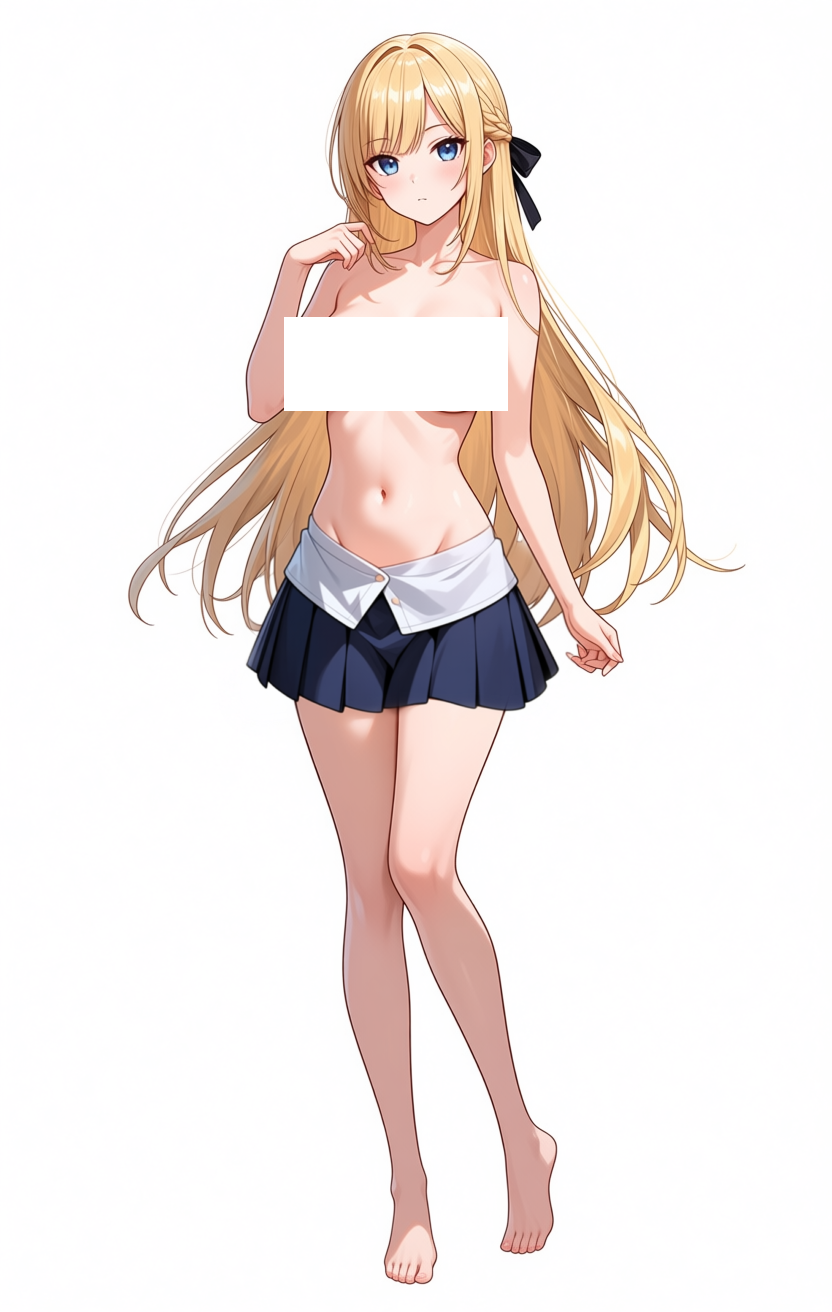
The skirt dropped all the way down to crotch level, the classic low-rise overshoot. Three “low” tokens at once over-pulled the model.
Pulling the “low” tokens out and clamping from both sides instead: positive mid-rise skirt, waistband at natural waist, waistband covering the navel, negative high-waisted skirt, low-rise skirt, hip hugger, micro skirt.
The waist position is fine now, but there’s a step on the flank, and an extra hand grows out of the right side of the waistband. The flank step is a misalignment between the masked-region silhouette and the unmasked silhouette right at the boundary, showing up as a fleshy ridge on the side. The extra hand is a separate problem — the model added an unrequested anatomical feature inside the mask. I fixed the flank step by bumping mask_blend_pixels 48 → 64 and mask_expand_pixels 0 → 8 to push the boundary slightly into the skin, and by dropping narrow waist from positive (it was thinning the torso only inside the mask, which made the step worse).
Result:
The flank and the extra hand are gone. The skirt itself drifted away from “pleated,” though, into something more like a short navy garment with vertical red trim — closer in design to Shimakaze’s outfit (Kantai Collection) than to a school-uniform pleated skirt. It looks like moving “waist position” in the prompt also moves “skirt type” in the model’s internal mapping. The waist is stable, but the design ended up elsewhere from the original target.
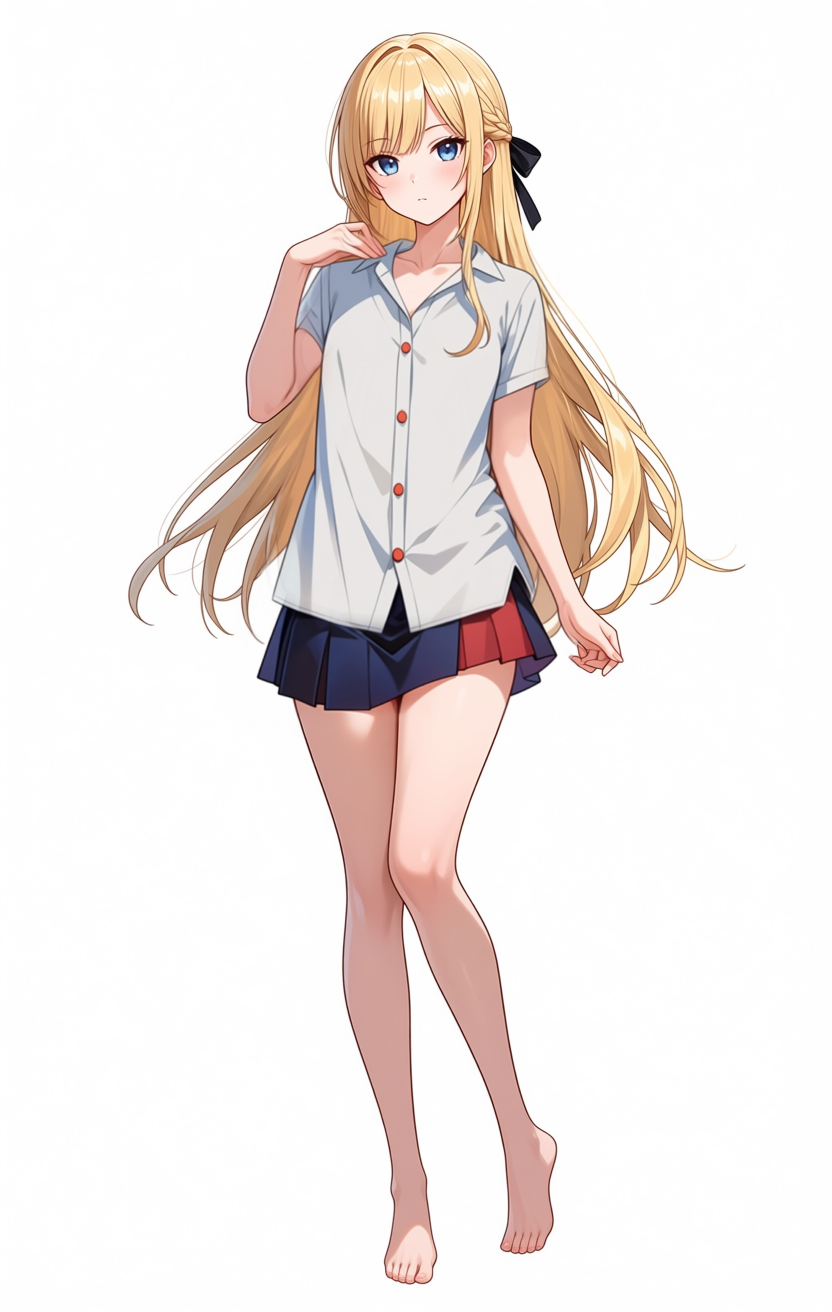
Second pass: add the upper body on top
The next step: paint just the upper body and add the white shirt and red necktie on top of the skirt-only output. With the skirt-only result (clothing_inpaint_00004) as input, I hand-painted the mask to cover only the upper body (from below the collarbone down to the existing skirt waistband) and trimmed the prompt to white shirt and red necktie. The skirt and lower body stay outside the mask and are preserved.
masterpiece, best quality, score_7, safe. 1girl, long blonde hair, slim figure,
standing pose, white collared button-up shirt with short sleeves,
red necktie tied neatly at collar, untucked shirt hem at hip,
white background, full body, slim figure, slender shoulders.

(negative)
worst quality, low quality, score_1, score_2, score_3, blurry, jpeg artifacts,
sepia, censor, nude, naked, topless, exposed breasts, nipples, school uniform,
sailor uniform, deep cleavage, see-through shirt, wet shirt, open shirt
768 crop / 15 steps / NumSteps=4 / cfg=4.0 ran in 413 seconds (6 min 53 sec).
No ghost on the torso, no flank step, the necktie knot and collar look plausible. The skirt and lower body from the first pass are preserved, thanks to hand-painted mask. The pose is unchanged from the 2nd through 4th attempts though — chest-forward composition, one-leg-weight contrapposto, both intact. Splitting the clothing into per-mask passes avoids the kind of token-collision damage that the overloaded-negative 4th attempt produced, but it doesn’t touch the underlying pose and chest-forward at all. Without ControlNet, the composition does not budge.
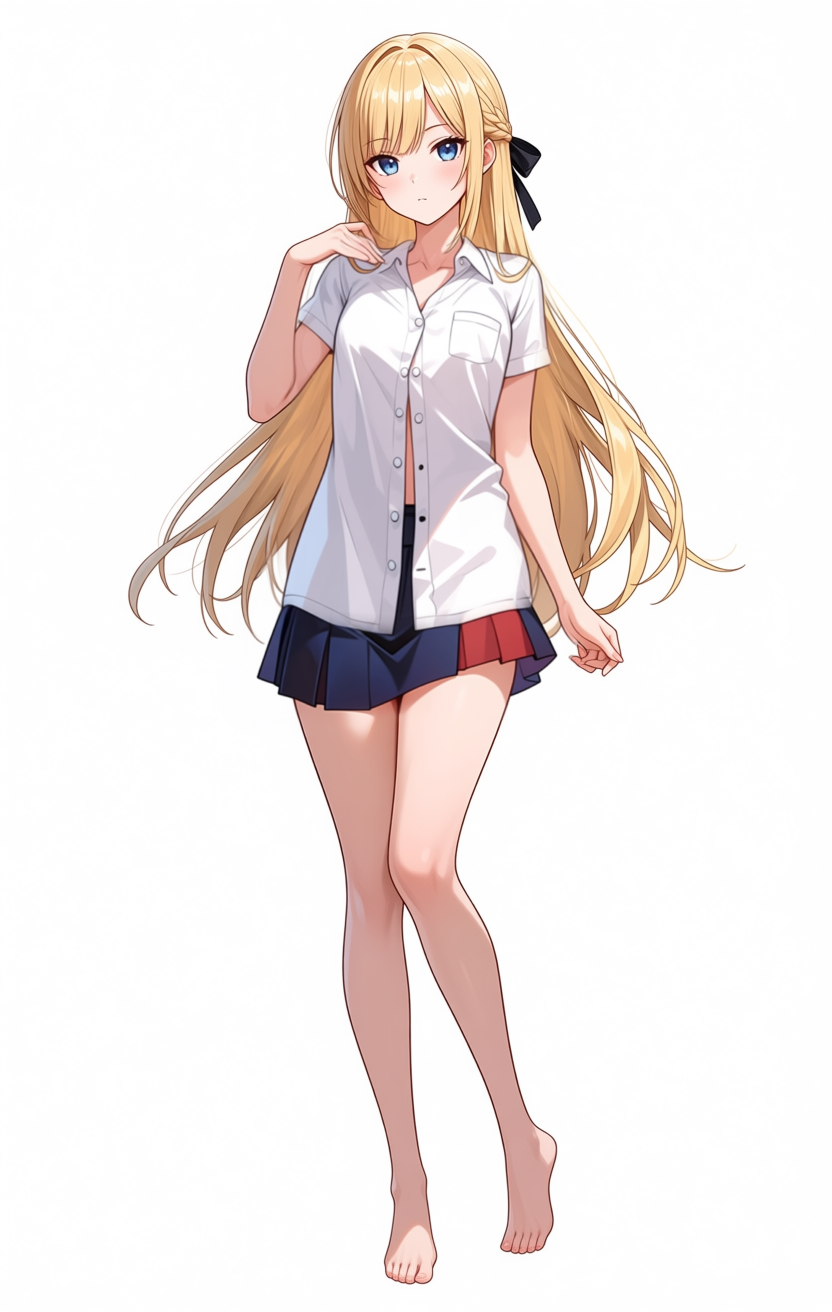
9th attempt (bra only): the chest-forward effect weakens; maybe the shirt prompt is the cause
So far I’d been chalking the pose up to “the source image’s unmasked region transmits it.” This attempt opens up the possibility that there is a second factor mixed in: the shirt + nude-body combination itself may be summoning an anime-family “shirt-wearing pose that emphasizes the chest.” To split it out, I tried inpainting just a plain bra over the chest instead of a shirt.
I pointed LoadImage back at the original genserver_00195_.png, narrowed positive to plain white bra, simple cotton bra, soft bra cups, natural breast shape, bare midriff only, and added push-up bra, padded bra, deep cleavage, pushed-up chest, voluptuous to negative to block the chest-emphasis priors. The mask was a small region around the chest.
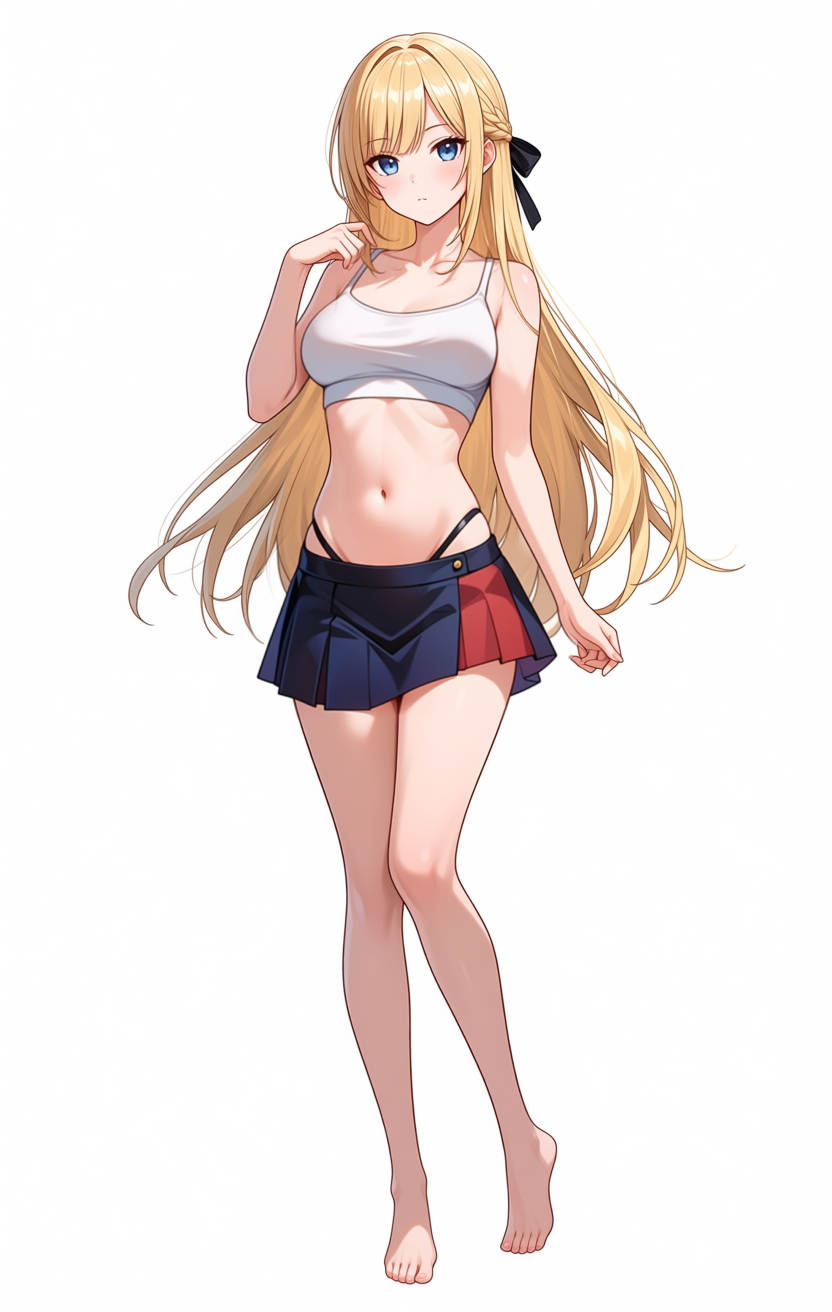
The output is a sports-bra-ish thin tank top. What is interesting: the chest-forward effect is visibly weaker than the shirt attempts (2nd through 4th), where the chest pushed strongly forward. With the bra, that lessens. It may just be that the bra band is hiding it visually, or the masked region may have actually been flattened. Either way I can’t tell from one image alone. At minimum the “bra” prompt and the “shirt” prompt pull the model in different directions inside the mask, which is something. The pose itself — one-leg weight, shoulder tilt, contrapposto — is unchanged because that’s the unmasked-region-transmitted part.
That suggests a strategy: layer bra → one-piece dress → white shirt so coverage expands gradually. If the one-piece extends fabric down through the belly, the final shirt swap becomes a “clothing → other clothing” swap rather than “bare body + shirt,” which might avoid whatever anime-family “putting a shirt on bare skin” bias is doing. Next pass tries the dress step.
10th attempt (one-piece dress): extending fabric coverage down to the belly
I switched LoadImage to the 9th attempt’s output (bra_pass_inpaint_00001_.png), changed positive to simple white sleeveless one-piece dress, plain cotton dress, knee length, casual sundress, covering torso and hip naturally, added tight dress, sexy dress, mini dress, see-through dress to negative, and ran the 10th attempt. The mask covered chest down past the waist and into the top edge of the existing skirt.
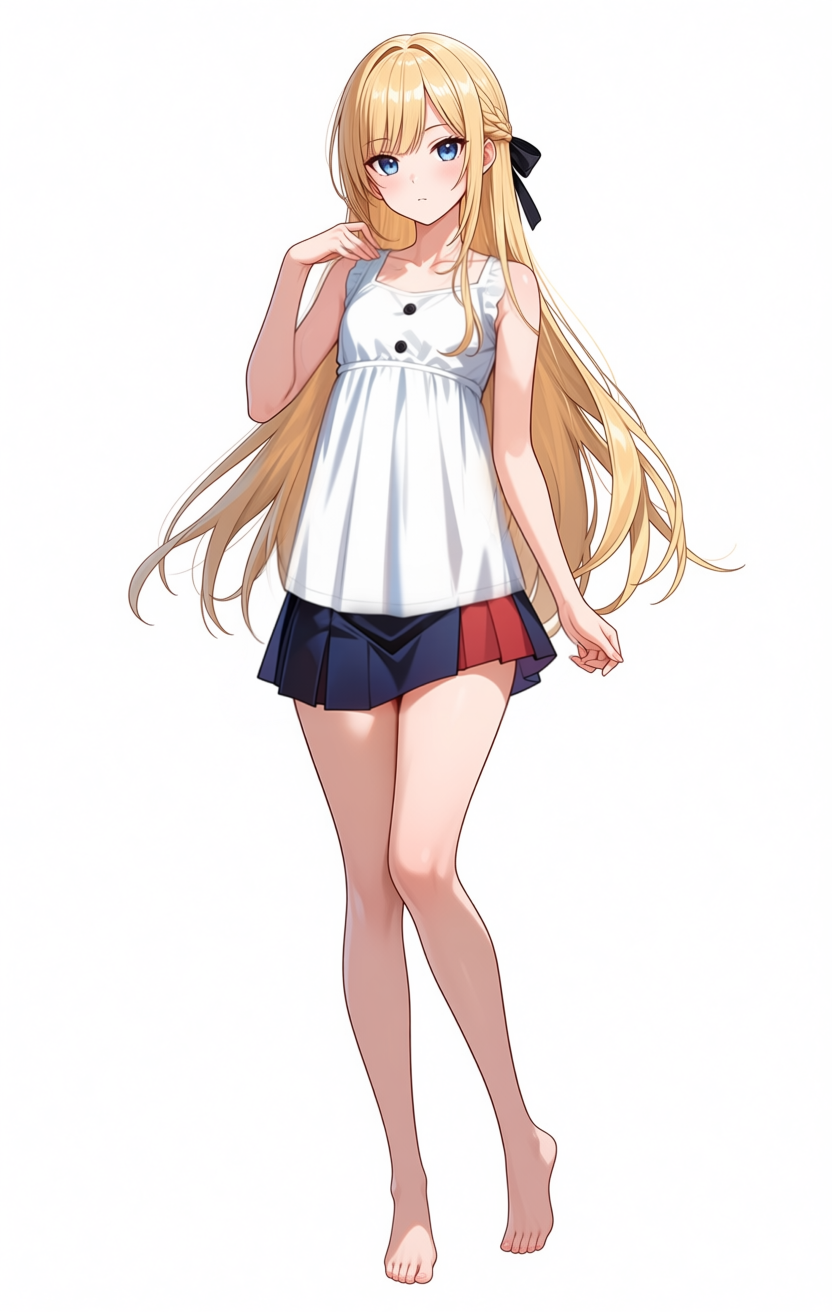
The output is not really a “one-piece dress” — more like a sleeveless tunic top combined with the existing skirt. The mask only nipped into the top of the existing skirt, so the model preserved that skirt as the unmasked-region context and only generated the upper-body cloth inside the mask. That matches the mask shape, so the behavior is consistent. Body shape stays calm, the chest-forward effect stays weak as it did in the bra pass. The important achievement is that the upper body is now covered by continuous cloth, which is the precondition for “clothing → clothing” rather than “bare skin + shirt” for the next step.
11th attempt (tunic → white shirt swap): broken result, but an observation lands
With the 10th attempt as input, I painted the mask only over the tunic area, set positive to white collared button-up shirt with short sleeves, red necktie tied neatly at collar, untucked shirt hem at hip, and negative to nude, naked, topless, exposed breasts, nipples, pushed-up chest, deep cleavage, voluptuous, see-through shirt, wet shirt, open shirt, dress, sundress, tunic. The intent was to avoid the chest-forward bias by making this a clothing-to-clothing swap.
The white shirt itself is there — the collar, button placket, and necktie are roughly where they should be. The problem: there’s an extra red cardigan-or-hoodie layer stacked on top, with the front open enough that the inner white shirt is visible. Vest-or-cardigan-worn-open, basically. The mask didn’t fully cover the previous tunic, so the upper-body color information from the prior step got re-interpreted as “another garment worn over the shirt.” I only asked for white shirt + red necktie; the outer layer was not requested.
A second observation: the body was at a slight 3/4 angle through attempts 9 and 10, but rotates to fully frontal in the 11th attempt. Whether the shirt + necktie prompt summoned a “stand so the tie is visible” prior, or another path moved the body, the rotation happened. With that, the apparent “chest-forward effect is weaker” may not be the layering strategy working at all — it might just be the body turned to face the camera, so the chest’s depth is no longer visible from this angle. The chest volume itself also looks smaller than the 10th attempt, as if pressed flat under shirt + cardigan. The layering strategy can’t be validated cleanly from this attempt.
12th–13th attempts (no-necktie shirts): isolating the necktie’s contribution
To split the 11th attempt’s full forward rotation, I removed the necktie and reran the same configuration. LoadImage stayed on the 10th attempt’s result (dress_pass_inpaint_00001_.png), I removed red necktie tied neatly at collar from positive and added open collar, top buttons unbuttoned, collar slightly spread, no necktie. Negative got necktie, tie, bow tie, neckwear, ribbon, cardigan, vest, jacket, hoodie to block both necktie re-emergence and the 11th attempt’s mystery overcoat.
At a glance the 12th attempt looks frontal, but looking at the collar’s left/right symmetry it’s asymmetric — the body is still at roughly the same 3/4 angle as the 10th attempt. The shirt’s open collar is close to bilaterally symmetric so the eye reads it as frontal, but the actual body orientation walked back from the 11th attempt.
Continuing from the observation that the vertical button line was still creating the frontal cue, the 13th attempt opens the front more aggressively: positive adds front buttons mostly unbuttoned down to chest, shirt front open, button placket spread apart, casually open shirt.
The opening is wider and fewer buttons are visible, but the remaining button line still goes straight down the center, so the overall frontal feel doesn’t fully clear. The body sits somewhere between frontal and partial 3/4.
A hypothesis settles in here: each of the shirt’s structural elements (collar, button row, necktie) independently summons a frontal-direction bias. A symmetric collar is more natural to render from the front, a button row lines up vertically and creates a frontal composition, a necktie wants to be visible so the body turns to face the camera. Each element contributes its own “stand facing forward” bias. Sleeves are irrelevant because the arms live outside the mask.
14th attempt (T-shirt): strip every shirt structure element
To test the hypothesis, I swapped the whole upper garment for a plain crew-neck T-shirt: positive plain white t-shirt with short sleeves, crew neck, no buttons, no collar, no necktie, negative additions button-up shirt, collared shirt, polo shirt, henley, v-neck to block shirt structure from coming back in.
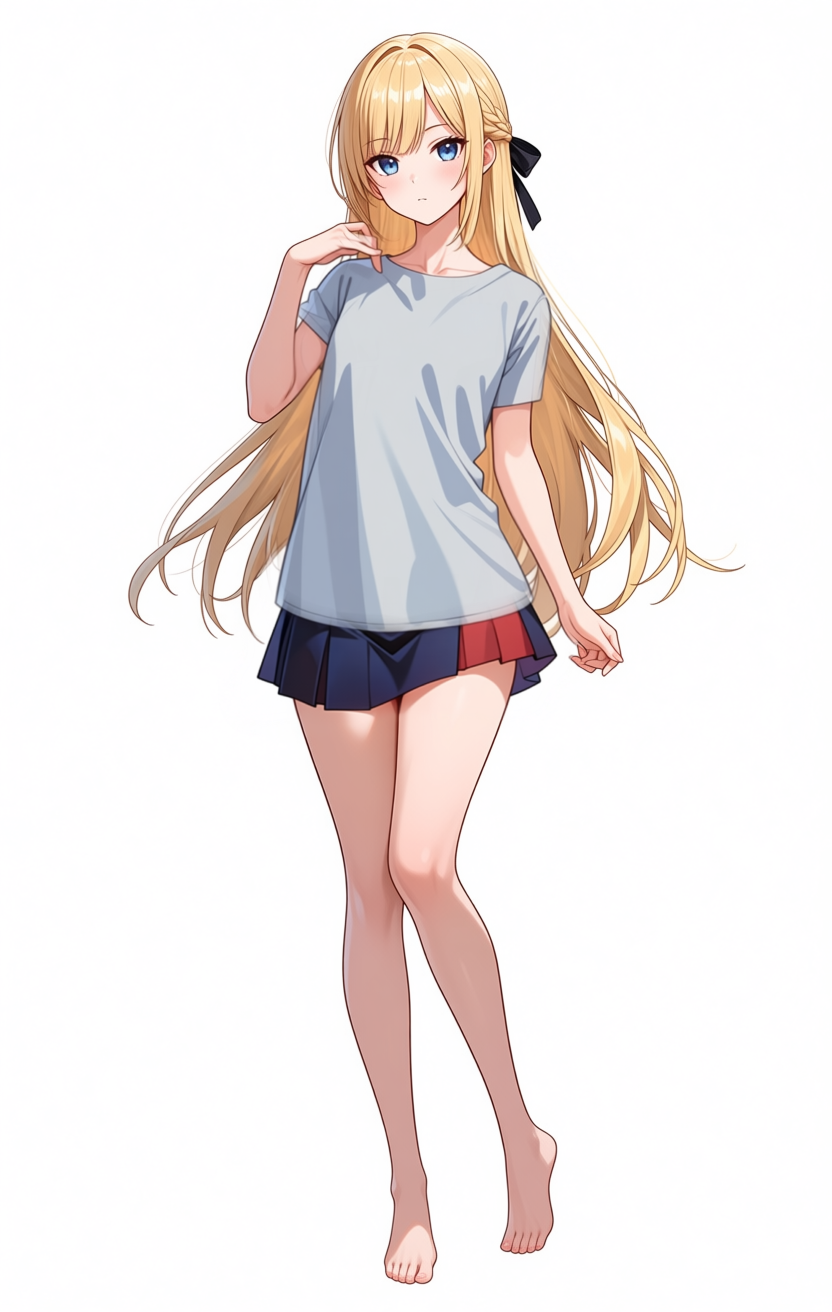
The output is a plain short-sleeve T-shirt. The chest depth is visibly weaker than the 11th–13th attempts, and the body shape is closer to the original. The flat, symmetric T-shirt has so little geometric information that the body’s facing direction is hard to read. Whether it has reverted to a 3/4 view or stayed frontal is not visually determinable from the result.
The hypothesis didn’t reach a clean verdict. Stripping all shirt structure elements does eliminate the chest-forward contribution at least to where it’s no longer dominant in the image, but whether a T-shirt restores a clean 3/4 view is masked by the T-shirt’s lack of orientation cues. Shadow direction suggests it isn’t perfectly frontal, but there’s no clearly asymmetric feature on screen to confirm it either. The “shirt-family prompts pull toward frontal bias” claim ends up weakly supported, not conclusively settled.
All attempts in one grid
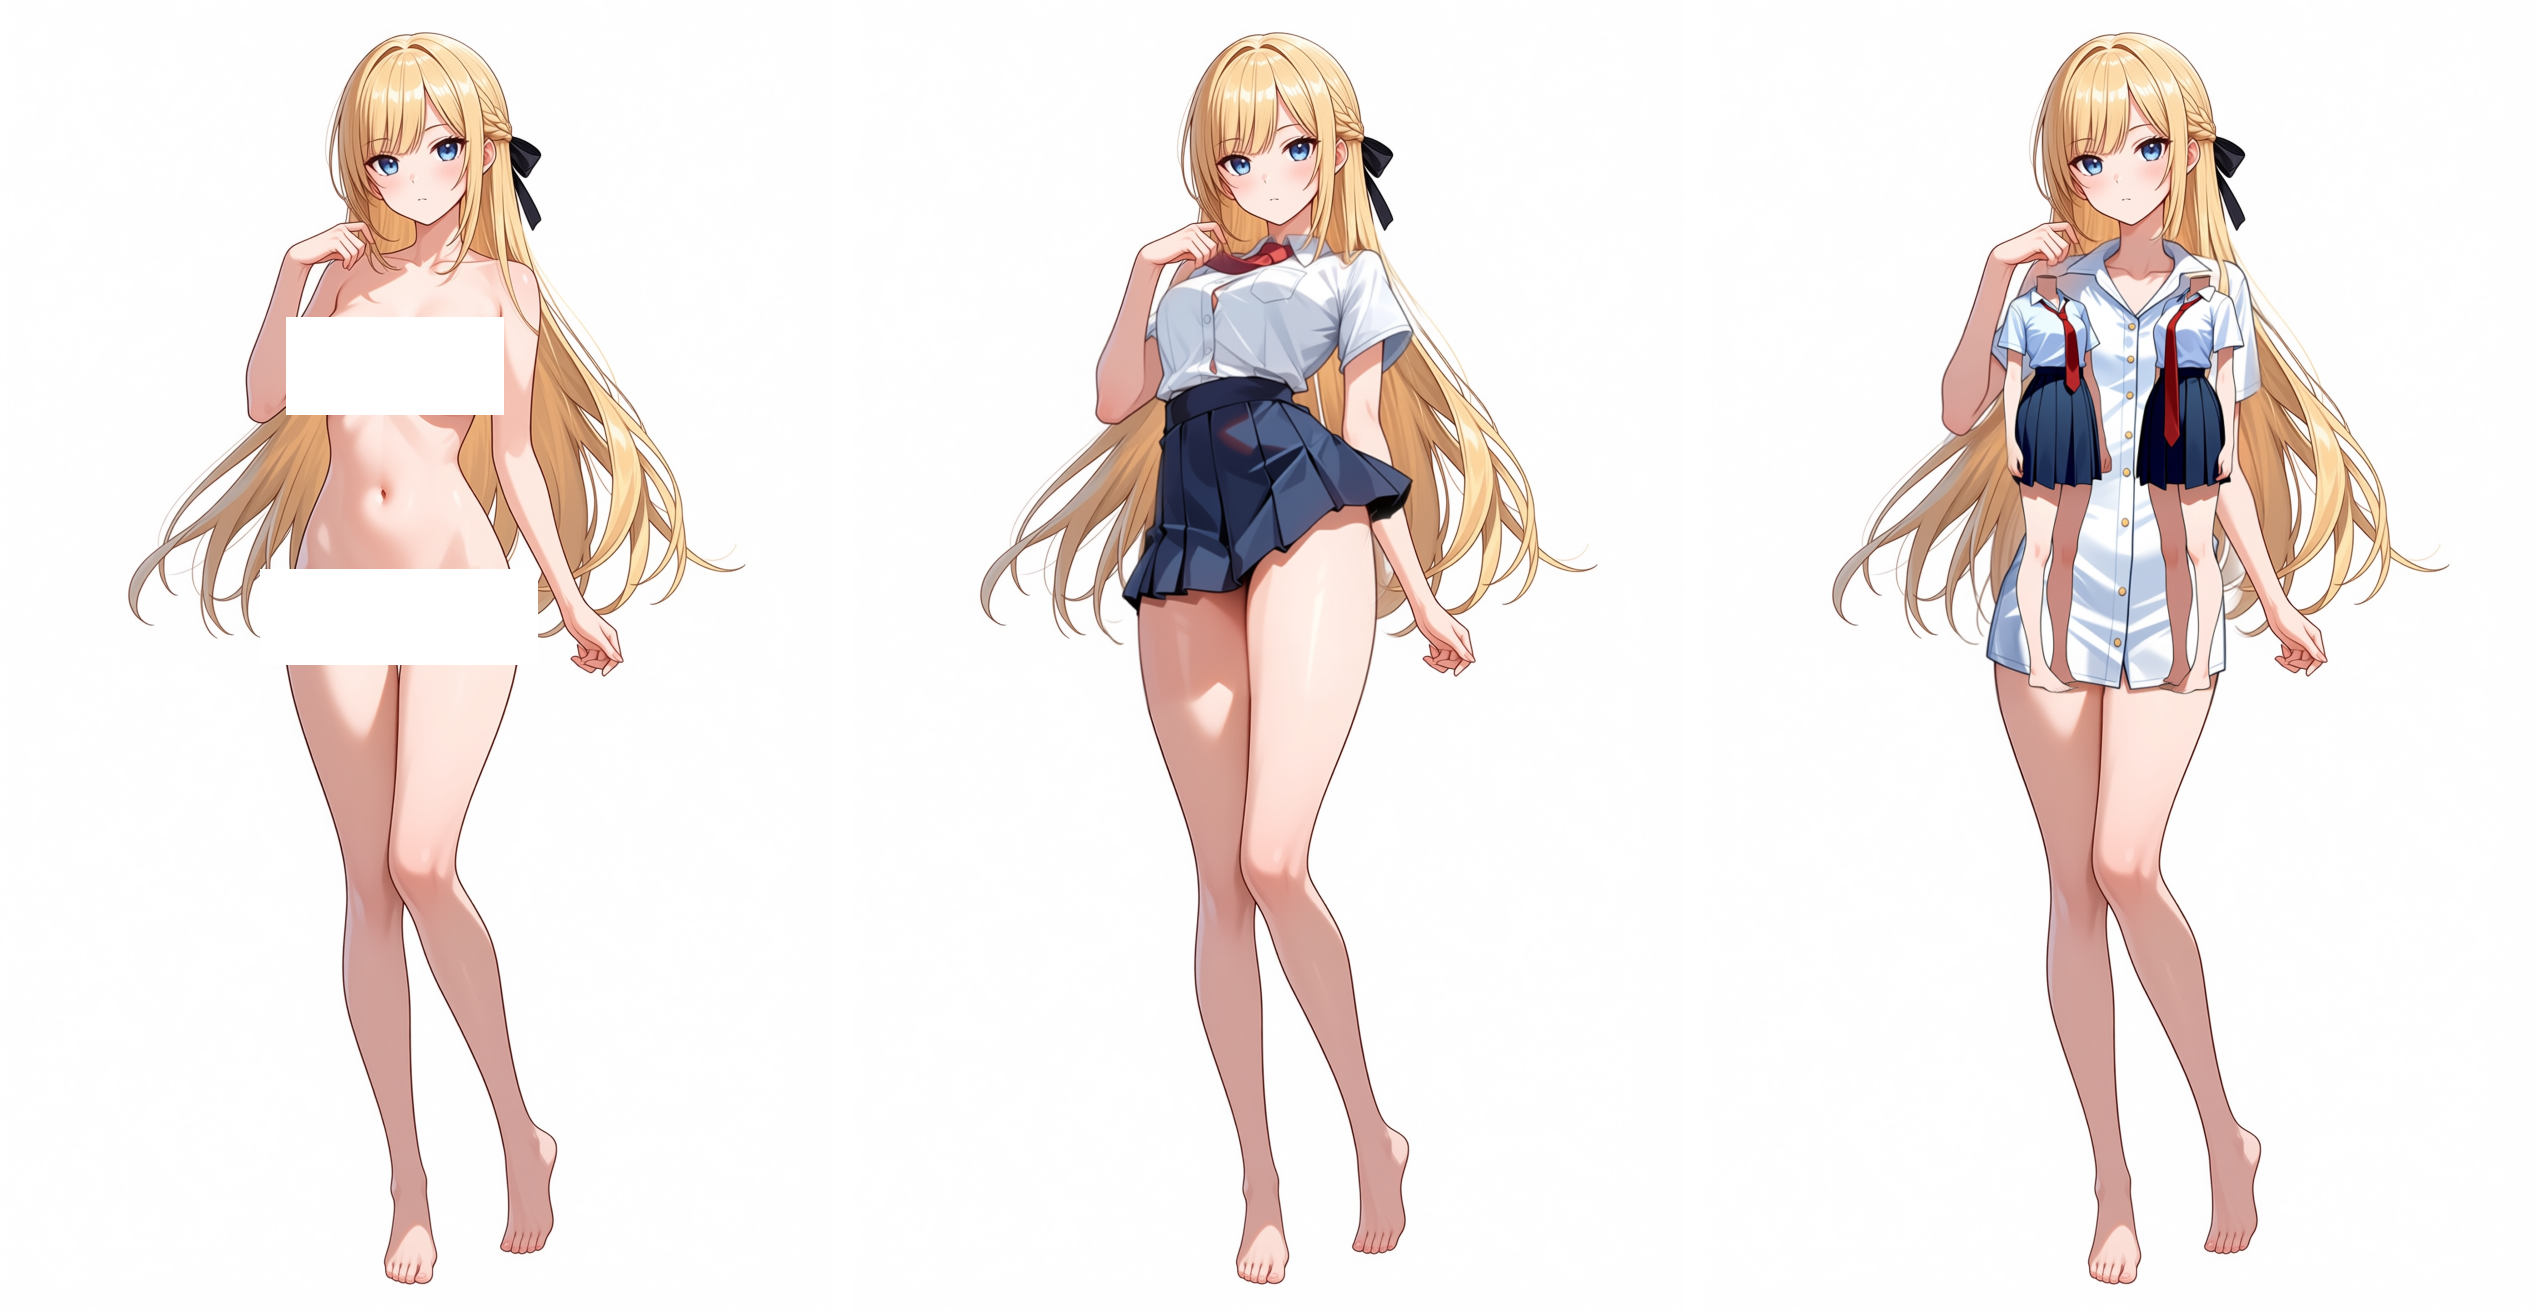
15 attempts, including the missteps, laid out in one image. Labels identify each cell.
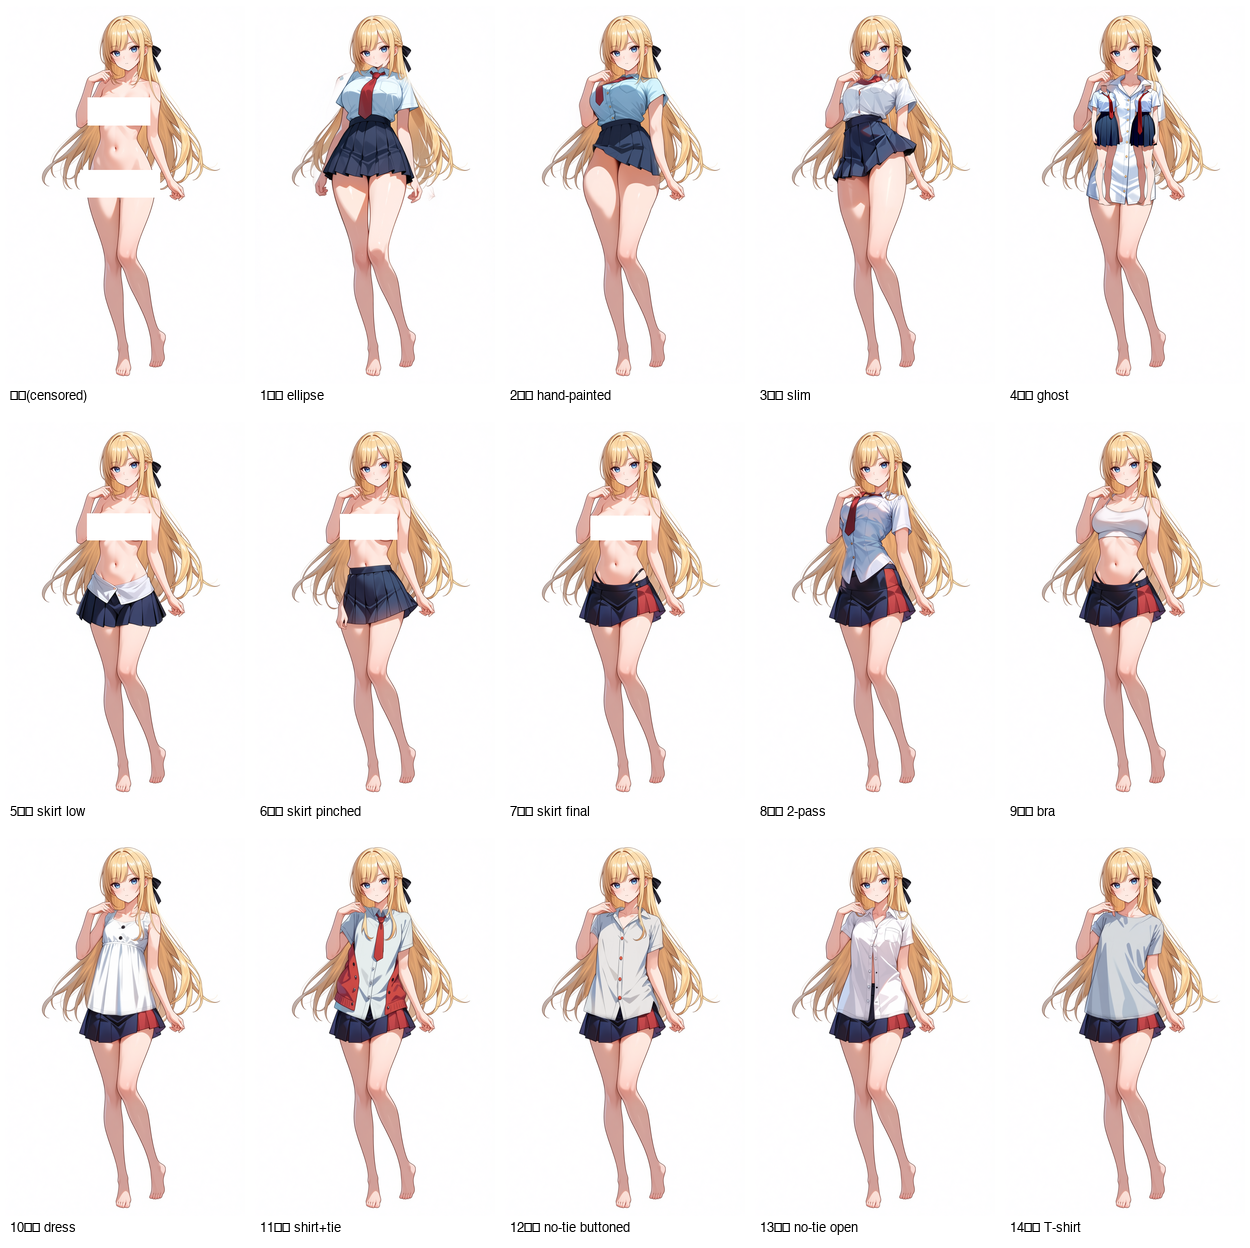
What the grid shows:
- Chest-forward intensity correlates strongly with shirt-family prompts (1st–4th, 8th, 11th–13th). The bra (9th), tunic (10th), and T-shirt (14th) all keep the chest-forward effect weak
- Arm positions are essentially identical across every image. The arms live outside the mask and are preserved, so sleeve presence doesn’t change the arm angle. The “short sleeves induce the chest-forward pose” hypothesis is not supported
- The source pose (contrapposto, one-leg weight, left hand at chest) is preserved in every image as well
- The hypothesis that lands is: each of the shirt’s structural elements (collar, button row, necktie) independently summons a frontal-direction bias. Symmetric collar → natural to draw frontally; button row → vertical center line that creates a frontal composition; necktie → wants to be visible so the body turns. Strip all of them with a T-shirt and the chest-forward contribution drops, but the T-shirt’s lack of orientation cues makes it impossible to confirm whether 3/4 view is fully restored
So the layering strategy is internally consistent as a way to avoid the “bare skin → shirt” trigger, but the structural-element biases that shirt-family prompts carry stay there on a separate path, and prompt-only tuning doesn’t fully strip them. Pushing this further on Mac would be a bad cost-benefit ratio; the realistic remaining option is locking the skeleton directly with ControlNet OpenPose.
Per-step times
Per-step and total times for the configurations I used.
| Configuration | Per-step | Total | Use case |
|---|---|---|---|
| Official Example_26 default (30 steps / NumSteps=5 / full image) | ~66 sec | 32 min 45 sec | Sanity check, reference template |
| crop+stitch (15 steps / NumSteps=3 / 512 crop / small mask) | ~10 sec | 2 min 31 sec | Text replacement, small hair tweaks |
| crop+stitch (15 steps / NumSteps=4 / 768 crop / large mask) | ~30 sec | ~7 min | Clothing replacement, costume parts |
Turbo LoRA is off by default on the inpaint path. The same machine runs txt2img with Turbo at 10 steps / cfg 1 / er_sde / simple in about 50 sec per image, so generation and inpaint run on completely different recipes.
MPS autocast limitation
A warning that prints on every LanPaint run:
UserWarning: In MPS autocast, but the target dtype is not supported. Disabling autocast.
MPS Autocast only supports dtypes of torch.bfloat16, torch.float16 currently.
LanPaint’s internal computation tries to autocast into torch.float32, but MPS doesn’t support fp32 autocast, so it falls back to plain fp32 execution. On CUDA the same code path runs under fp16/bf16 autocast and is much faster. PyTorch-on-MPS maturity is showing up directly in per-step time; this warning isn’t something you can fix today. There’s room for a future PyTorch / ComfyUI update to improve it.
While the run is going, Activity Monitor shows RAM usage around 30GB (half of unified memory) and GPU utilization at 80–95%. Memory is fine but per-step time still grows, which is a classic compute-bound pattern. M1 Max has 32 GPU cores and no tensor-core-equivalent matmul-specialized hardware, and diffusion compute is mostly matmul, so matmul throughput becomes the limiting factor. CUDA differences from M1 here are not memory capacity but matmul throughput plus fp16/bf16 autocast support. An RTX 3060 12GB (several times M1 Max’s matmul throughput, tensor cores, bf16 autocast support) should run the official Example_26 default at 3 to 5 minutes per image, with the crop+stitch tuning becoming unnecessary. This entire optimization round only exists because of M1 Max’s compute-bound profile; on CUDA most of it would be moot.
Things that weren’t in any existing docs
The points I hit during this run that weren’t in documentation, or that were in scattered docs but never connected:
- Anima/Qwen-Image + Anima-Turbo LoRA +
SetLatentNoiseMasksilently does nothing. The mask reaches the sampler correctly, but KSampler never updates the masked region. No error, no warning.denoise=1.0doesn’t change it - LanPaint works on ComfyUI + MPS against Anima. Example_26 runs as-is
- LanPaint’s default settings cost about 32 minutes per image on M1 Max, but Inpaint-CropAndStitch + step / NumSteps cuts pull that down into the 1–8 minute usable range
- Adding abstract phrases like
sexy poseorS-curveto LanPaint’s negative prompt produces “multiple anatomies overlaid” failures inside the mask. When you push aspect-rich prompts hard in the negative direction, the model overlays contradictory solutions - For skirt waistband position, specifying only one side of
low-rise/mid-rise/high-waistedcauses overshoot. Clamp both extremes in the negative so only the middle remains. Note that moving waist position also drags skirt design with it (pleated → wrap-style) - Silhouette steps at the mask boundary can be smoothed by raising
mask_blend_pixelsandmask_expand_pixels - The source image’s pose (contrapposto + chest-forward) propagates from unmasked body and arm positions, so even if you inpaint clothing inside the mask, the pose stays. Prompt-side
slimandposemodifiers don’t change it, and splitting masks into incremental passes doesn’t help either. The Mac-side optimization here solves the speed problem but not pose locking — ControlNet-style skeleton constraint is still required - Without
KMP_DUPLICATE_LIB_OK=TRUEas an environment variable,rembg-comfyui-node-better-family dependencies crash via OMP double-load
What this article establishes is “an inpaint pipeline that at least runs on a Mac” plus “the boundary line between problems that prompt tuning can fix and problems that it cannot.” Neither one is “best quality output.”
Conclusion and next step
What prompt-side tuning managed to compress: text inpaint from 66 sec/step to 10 sec/step, clothing replacement at about 7 min/image. What it never resolved: the output pose and the chest-forward effect. The cause is two-layered. The first layer is the source image’s pose preserved through the unmasked region (contrapposto, one-leg weight, arm positions). The second layer is a frontal-direction bias specific to shirt-family prompts, where collar, front button row, and necktie each summon their own “stand facing forward to display the garment” pull. Sleeve specification and per-piece incremental masks don’t cut through either layer.
To go further, the only remaining option is locking the skeleton directly with ControlNet OpenPose. Choosing an Anima/Qwen-Image-compatible OpenPose ControlNet model, the skeleton-extraction node, a skeleton editing UI — none of that is in scope for this article. That’s a separate write-up. This article stops at the limit of prompt-driven inpaint and the shape of the boundary that limit forms.
The same workflow ports to CUDA as-is. An RTX 3060 12GB class should drop per-step low enough that crop+stitch and the step / NumSteps cuts become unnecessary. For ongoing use, moving to a few-thousand-yen-per-month cloud GPU and putting ControlNet back into the workflow there is the more time-efficient route than continuing to tune Mac-side.
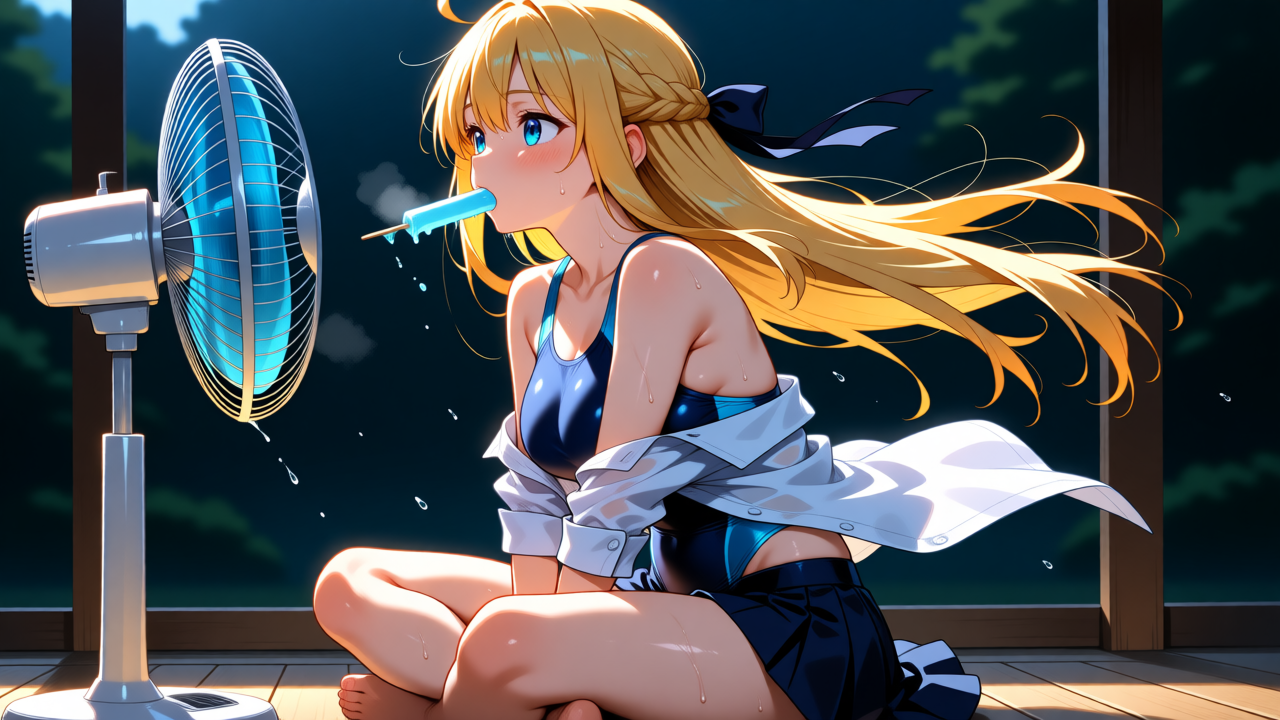
While working on this, both the Mac and the room kept heating up while the outside air was still cold — ended up turning on the fan for the first time this year.