Testing Live2D Face-Part Separation with Qwen-Image-Layered on RunPod
 Contents
Update 2026-04-29: I also tried a different model (See-through) for the same goal, decomposing a full body into 23 parts → Automatically Decomposing an Anime Character Illustration into 23 Layers with See-through
I want to give AI-generated character illustrations Live2D-like motion. To move the face, you need layers separated by part. With Qwen-Image-Layered and a LoRA by tori29umai, you can automatically split facial parts. Since I previously looked into the setup, this time I’ll actually run it on an RTX PRO 6000 (96 GB).
What is Qwen-Image-Layered?
It’s an image generation model released by Alibaba that can directly produce transparent layers. Typical image generation outputs a single flat image, but this model outputs layers separated by part.
Combined with tori29umai’s face-part-separation LoRA, it produces the following three layers:
- Layer 1: Face parts (eyes, mouth, nose)
- Layer 2: Face base (everything except face parts and hair)
- Layer 3: Hair only
References:
- LoRA distribution for Qwen-Image-Layered (tori29umai)
- Experiment on splitting facial parts with Qwen-Image-Layered (Yusaku)
Mapping to Live2D parts
To animate a face in Live2D, at minimum you need the following parts on independent layers.
| Live2D part | Correspondence with LoRA output |
|---|---|
| Left eye / right eye | Included in Layer 1 (face parts) → cut out individually |
| Eyebrows | Included in Layer 1 → cut out individually |
| Mouth | Included in Layer 1 → cut out individually |
| Nose | Included in Layer 1 |
| Face outline / skin | Layer 2 (face base) |
| Front hair / bangs | Layer 3 (hair) → split front/back manually |
| Back hair | Layer 3 (hair) → split front/back manually |
The LoRA output is split into three: “face parts”, “base”, and “hair”. To actually use it in Live2D, you’ll also need to cut out the eyes, mouth, and eyebrows individually from Layer 1. Since it outputs transparent PNGs, boundaries are clear and easy to cut.
How to create expression variants
Separating parts alone doesn’t create expression differences. You also need expression variants (closed eyes, open mouth, etc.). The flow is:
- Prepare images with changed expressions using Qwen-Image-Edit or similar
- Run each variant through Layered + LoRA to split parts
- Share the base (Layer 2) and swap only the face parts (Layer 1)
Because the base is fixed to one image and only the face parts are swapped, positional misalignment is the biggest risk. With the same face crop and composition, misalignment should be small, but this needs measurement.
If you already have the variation images, pre-upload them to the Network Volume via the S3 API, then batch them at once with a diffusers script after the GPU Pod starts. In practice I processed 28 images in a row at about 75 seconds per image (steps=50, resolution=640) and it was stable.
As of March 2026 I haven’t found examples where tori29umai or other LoRA users also show how to create expression variants. It’s mainly used as a part-separation tool; workflows for expression differences are still to be established.
Requirements for the input image
This is the input image used here. White background, face crop, front view, anime-style—meets the conditions.

The LoRA by tori29umai has explicit input conditions.
| Condition | Details |
|---|---|
| Background | White background (required) |
| Composition | Crop around the face (no full-body) |
| Resolution | 1024x1024 recommended (match the training resolution) |
| Orientation | Straight-on to slight angle is safe (profile not tested) |
| Style | Anime/illustration style yields the best results |
| Prompt | Describe the image content in natural English |
If you use full-body shots or non-white backgrounds, separation quality drops. Preprocess to a white background and face crop before input.
GPU choice: Why RTX PRO 6000 (96 GB)
In my previous investigation I recommended the RTX 6000 Ada (48 GB), but if you’re actually going to run it with a LoRA attached, 96 GB is safer.
| Component | VRAM usage (rough) |
|---|---|
| BF16 base model | 40 GB |
| VAE + Text Encoder | A few GB |
| LoRA | Hundreds of MB+ |
| ComfyUI overhead | A few GB |
| Total | Around 45 GB |
With 48 GB it’s tight and you risk OOMs midway through the workflow. With 96 GB you won’t even use half, so batching and switching LoRAs is comfortable.
| GPU | VRAM | Cost guide | Verdict |
|---|---|---|---|
| RTX 6000 Ada | 48 GB | $0.8–1.2/h | Barely enough |
| RTX PRO 6000 | 96 GB | $1.5–2.0/h | Plenty — use this |
The price gap is about ¥100 per hour. Considering the time you’ll spend fiddling with OOM crashes, this is cheaper overall.
Choosing the LoRA version
There are two variants on HuggingFace:
| File | Size | Notes |
|---|---|---|
QIL_face_parts_V3_dim16_1e-3-000056.safetensors | 295 MB | Standard version; distributed in the note article |
QIL_face_parts_V3_dim4_1e-3_remove_first_image-000060.safetensors | 74 MB | Lightweight version; trained excluding the first image |
Since VRAM isn’t a problem here, I used the dim16 version. Dim4 is lighter but the quality difference is unclear, so start with the standard one.
Download source: tori29umai/Qwen-Image-Layered
Persist models with a Network Volume
If you use the Pod’s attached Volume Disk, the models disappear when you delete the Pod. A Network Volume is kept independently, so you don’t need to re-download even if you recreate the Pod.
| Volume Disk | Network Volume | |
|---|---|---|
| When you delete the Pod | Disappears | Stays |
| Attach to a different Pod | Not possible | Possible |
| Upload from outside the Pod | Not possible | Possible via S3 API |
| Cost | Included in Pod price | $0.07/GB/month |
You can increase the size later (but not decrease). Models in diffusers format total about 57.7 GB (larger than roughly 48 GB in ComfyUI format because the Text Encoder is full bf16, not fp8). Considering filesystem overhead, 60 GB isn’t enough. 100 GB is recommended. You’ll also store LoRAs, input images, and outputs, so leave headroom.
| Format | Base model | Text Encoder | Total |
|---|---|---|---|
| ComfyUI (split files) | 40 GB | fp8: 8.74 GB | ~48 GB |
| diffusers (from_pretrained) | 40 GB | bf16: ~14 GB | ~57.7 GB |
Cost guide: ~$7/month for 100 GB (about ¥1,050). Delete it when you’re done to stop being charged.
Create
RunPod → Storage → + Network Volume → choose DC → 100 GB → Create.
Pick a DC that supports the S3 API (US-KS-2, US-CA-2, EU-RO-1, etc.) so you can operate files later without a Pod. See the official docs for supported DCs.
Preload files via the S3 API
You can upload files to a Network Volume without starting a GPU Pod. Useful for pre-placing LoRAs and expression-variant images.
Setup
- RunPod → Settings → S3 API Keys → Create new
- Note the Access Key (
user_***) and Secret (rps_***) - Configure the keys with
aws configure
Upload
# Network Volume上のパスはPodの /workspace/ に対応
aws s3 cp local-file.safetensors \
  s3://VOLUME_ID/ComfyUI/models/loras/ \
  --endpoint-url https://s3api-us-ks-2.runpod.io/ \
  --region us-ks-2
Over 500 MB automatically uses multipart upload.
Uploading the 40 GB base model from a local line can take a long time. For big files, it’s faster to download on a CPU Pod (see below). The S3 API is best for small to medium files like LoRAs and images.
Pre-download models on a CPU Pod
If you download models on a GPU Pod, you waste $1.5–2.0/h. It’s also terrible if the template’s automatic setup fails and you have to debug while the GPU is billing.
Attach the Network Volume to a cheap CPU Pod and place all models there first.
- RunPod → Pods → + Deploy
- CPU Pod → the cheapest $0.06/h (2 vCPU / 4 GB RAM) is enough
- Network Volume: choose the one you created
- Deploy
Run in the Web Terminal:
# ディレクトリ作成
mkdir -p /workspace/ComfyUI/models/diffusion_models
mkdir -p /workspace/ComfyUI/models/vae
mkdir -p /workspace/ComfyUI/models/text_encoders
mkdir -p /workspace/ComfyUI/models/loras

# ベースモデル BF16(約40GB)
cd /workspace/ComfyUI/models/diffusion_models
wget https://huggingface.co/Comfy-Org/Qwen-Image-Layered_ComfyUI/resolve/main/split_files/diffusion_models/qwen_image_layered_bf16.safetensors

# VAE
cd /workspace/ComfyUI/models/vae
wget https://huggingface.co/Comfy-Org/Qwen-Image-Layered_ComfyUI/resolve/main/split_files/vae/qwen_image_layered_vae.safetensors

# Text Encoder
cd /workspace/ComfyUI/models/text_encoders
wget https://huggingface.co/Comfy-Org/Qwen-Image_ComfyUI/resolve/main/split_files/text_encoders/qwen_2.5_vl_7b_fp8_scaled.safetensors

# LoRA(tori29umai版 dim16)
cd /workspace/ComfyUI/models/loras
wget https://huggingface.co/tori29umai/Qwen-Image-Layered/resolve/main/QIL_face_parts_V3_dim16_1e-3-000056.safetensors
In my measurements the 40 GB base model took about 12 minutes; all models finished in about 15 minutes total. At $0.06/h that’s roughly ¥2.
After download completes, terminate the CPU Pod. The models remain on the Network Volume.
ComfyUI does not work on Blackwell
RTX PRO 6000 is the Blackwell architecture (sm_120). When running Qwen-Image-Layered via ComfyUI, NaNs occur during VAE decode and the output becomes a transparent image. The Blackwell Edition template (runpod/comfyui:latest-5090) shows the same behavior. --force-fp32 and --fp32-vae don’t fix it.
The cause is ComfyUI’s Blackwell support; the GPU itself is fine. Using the diffusers Python pipeline on the same RTX PRO 6000 works without issues (there are multiple reports on Reddit as well).
Run with diffusers
Use the Hugging Face diffusers library instead of ComfyUI. QwenImageLayeredPipeline supports Qwen-Image-Layered.
1. Download the models (CPU Pod)
Don’t waste GPU time downloading; use a $0.06/h CPU Pod and place them on the Network Volume.
Models in diffusers format differ from ComfyUI: the Text Encoder is full bf16 (~14 GB), so the total size is larger. snapshot_download won’t run in a 4 GB memory CPU Pod, so use wget directly.
mkdir -p /workspace/models/Qwen-Image-Layered/{transformer,text_encoder,vae,scheduler,tokenizer,processor}

cd /workspace/models/Qwen-Image-Layered
BASE=https://huggingface.co/Qwen/Qwen-Image-Layered/resolve/main

# config類(小さいファイル)
wget -q $BASE/model_index.json
wget -q $BASE/transformer/config.json -P transformer/
wget -q $BASE/transformer/diffusion_pytorch_model.safetensors.index.json -P transformer/
wget -q $BASE/text_encoder/config.json -P text_encoder/
wget -q $BASE/text_encoder/generation_config.json -P text_encoder/
wget -q $BASE/text_encoder/model.safetensors.index.json -P text_encoder/
wget -q $BASE/vae/config.json -P vae/
wget -q $BASE/scheduler/scheduler_config.json -P scheduler/
# tokenizer / processor(省略、同じ要領でwget)

# transformer(5シャード、合計約41GB)
wget $BASE/transformer/diffusion_pytorch_model-00001-of-00005.safetensors -P transformer/
wget $BASE/transformer/diffusion_pytorch_model-00002-of-00005.safetensors -P transformer/
wget $BASE/transformer/diffusion_pytorch_model-00003-of-00005.safetensors -P transformer/
wget $BASE/transformer/diffusion_pytorch_model-00004-of-00005.safetensors -P transformer/
wget $BASE/transformer/diffusion_pytorch_model-00005-of-00005.safetensors -P transformer/

# text_encoder(4シャード、合計約17GB)
wget $BASE/text_encoder/model-00001-of-00004.safetensors -P text_encoder/
wget $BASE/text_encoder/model-00002-of-00004.safetensors -P text_encoder/
wget $BASE/text_encoder/model-00003-of-00004.safetensors -P text_encoder/
wget $BASE/text_encoder/model-00004-of-00004.safetensors -P text_encoder/

# VAE(約254MB)
wget $BASE/vae/diffusion_pytorch_model.safetensors -P vae/
2. Create a GPU Pod
- RunPod → Pods → + Deploy
- GPU: RTX PRO 6000
- Template: ComfyUI - Blackwell Edition (PyTorch already supports sm_120)
- Network Volume: select the one where you placed the models
- Volume Disk: 0 GB (Network Volume is enough)
- Deploy
3. Install diffusers
pip install git+https://github.com/huggingface/diffusers accelerate peft4. Run
from diffusers import QwenImageLayeredPipeline
from PIL import Image
import torch

pipeline = QwenImageLayeredPipeline.from_pretrained(
    "/workspace/models/Qwen-Image-Layered",
    torch_dtype=torch.bfloat16,
)
pipeline = pipeline.to("cuda")

# LoRA読み込み
pipeline.load_lora_weights("/workspace/input/QIL_face_parts_V3_dim16_1e-3-000056.safetensors")

image = Image.open("input.png").convert("RGBA")

with torch.inference_mode():
    output = pipeline(
        image=image,
        prompt="",
        negative_prompt=" ",
        generator=torch.Generator(device="cuda").manual_seed(777),
        true_cfg_scale=4.0,
        num_inference_steps=50,
        layers=3,
        resolution=640,
        cfg_normalize=True,
        use_en_prompt=True,
    )
    for i, layer in enumerate(output.images[0]):
        layer.save(f"layer_{i}.png")
5. Parameters
| Parameter | Value | Notes |
|---|---|---|
| layers | 3 | When using the LoRA. Use 4 without the LoRA |
| resolution | 640 | Only 640 or 1024 are allowed |
| num_inference_steps | 50 | |
| true_cfg_scale | 4.0 |
Results
On an RTX PRO 6000 (96 GB), pipeline loading took about 90 seconds and inference about 75 seconds per image (steps=50, resolution=640). VRAM usage was about 65 GB.
Below are actual outputs. The input is one of 28 expression variations (angry). It is a different image than the input sample at the top of the article.
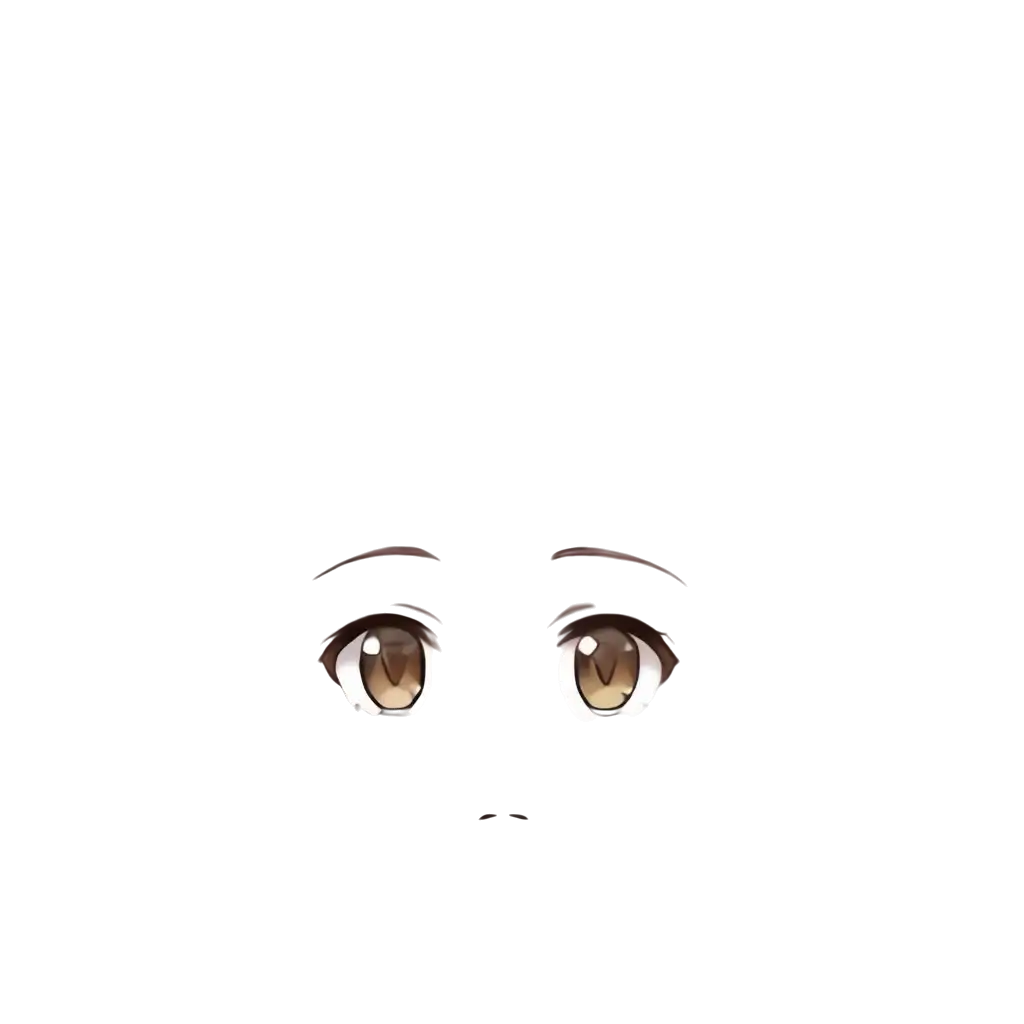
face_parts (face parts)
Eyes, eyebrows, nose, and mouth are output on a transparent background. Since parts are spaced apart, cropping them individually is easy.

face_base (face base)
Skin with face parts and hair removed. Smooth skin is generated where the eyes and mouth used to be. This can serve as the underside that shows through when parts move in Live2D.

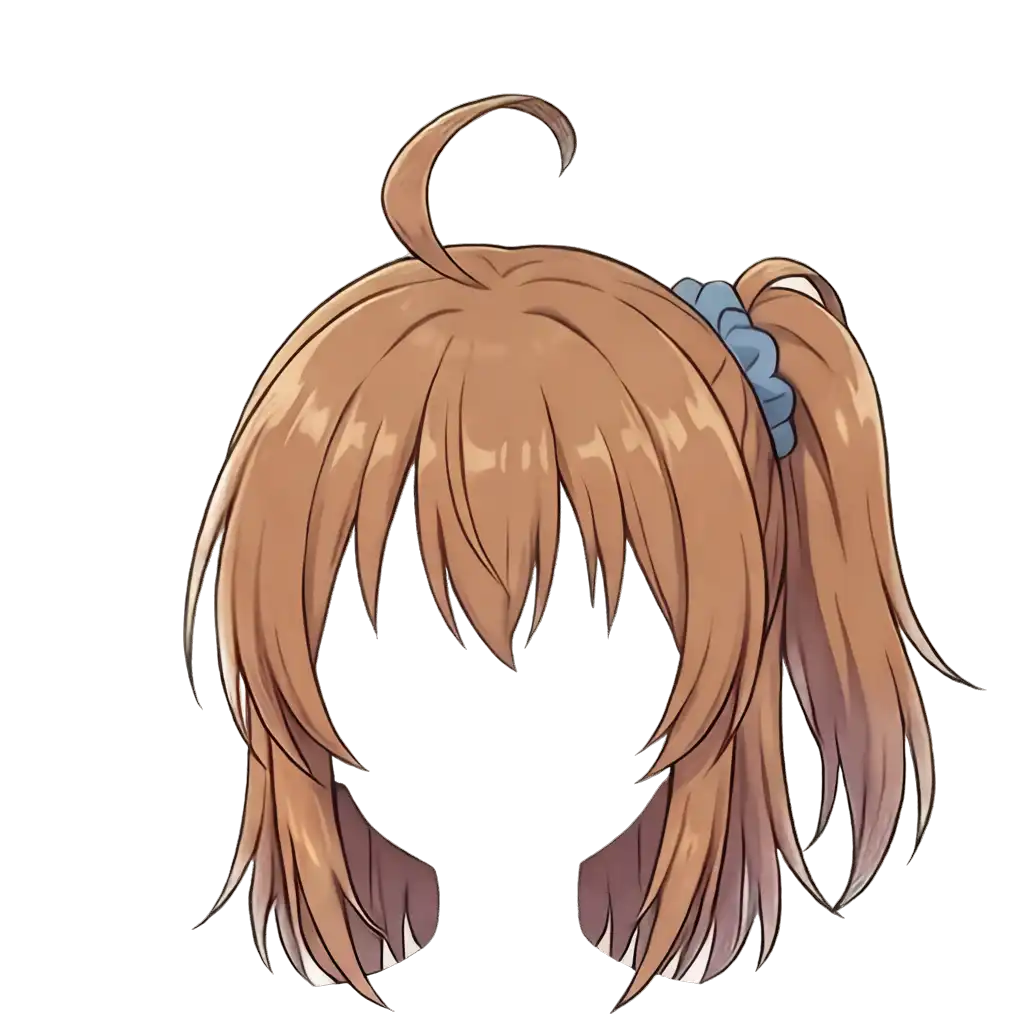
hair (hair)
All hair is output as one layer. It includes the ahoge, side ponytail, bangs, and back hair.

Issues for Live2D
Separation between face parts and the base works for Live2D. Since face_base generates the skin under the parts, moving parts won’t leave holes.
However, hair comes as one combined layer. To use it in Live2D, you need to split front hair, back hair, side ponytail, and ahoge into separate layers. The LoRA doesn’t support finer hair separation, so a different approach is required.
Separating hair: No LoRA + more layers
Qwen-Image-Layered lets you set the number of layers via the layers parameter. Without the LoRA, increasing the layer count can split hair across multiple layers.
Results
Using the same input image (angry), I tested different layer counts without the LoRA.
| layers | Result |
|---|---|
| 5 | Almost identical to the original. No meaningful separation |
| 6 | Side ponytail splits front/back; ahoge and eyebrows separate. Best result |
| 8 | Too fine and breaks down; many junk layers |
Six layers worked best. The side ponytail + scrunchie ended up on layer_3, and the rear side of the side ponytail (back hair) on layer_4.
Re-decomposing the hair layer doesn’t work
A GIGAZINE article mentioned “decomposing once, then further decomposing a specific layer”, so I tried feeding just the LoRA output’s hair layer back into the model. The result: the original hair remained in a single layer and the rest were transparent. Feeding a hair-only image also didn’t produce meaningful decomposition.
Combination strategy
- Face parts and base: use the LoRA 3-layer output (precise separation)
- Hair: take it from the 6-layer output without the LoRA (side ponytail separation, etc.)
You run the pipeline twice on the same input image and pick layers depending on the use case.
Notes for a 28-image batch
Long runs in the Web Terminal are risky
When I ran a batch (28 images × 75 seconds ≈ 35 minutes) in RunPod’s Web Terminal, the process died partway through the first image. When the Web Terminal disconnects, foreground processes get killed by SIGHUP.
Use direct SSH
RunPod provides two kinds of SSH.
| Method | Command | Interactive shell | SCP/SFTP |
|---|---|---|---|
| Via ssh.runpod.io | ssh <pod-id>@ssh.runpod.io | No (no PTY) | No |
| Direct TCP | ssh root@<ip> -p <port> | Yes | Yes |
The ssh.runpod.io method does connect, but since no PTY (pseudo-terminal) is allocated, you can’t operate an interactive shell. It looks connected but you can’t type commands, which is confusing.
Connect directly using the IP and port shown in the Pod dashboard under “SSH over exposed TCP”, and you can use it like a normal VPS.
# ssh.runpod.io経由(接続はできるがインタラクティブ操作不可)
ssh <pod-id>@ssh.runpod.io -i ~/.ssh/id_ed25519

# TCP直接接続(推奨。普通のシェルが使える)
ssh root@<ip> -p <port> -i ~/.ssh/id_ed25519
You need to register your public key in RunPod (Settings → SSH Public Keys).
Run in the background with nohup
Once you’re connected via direct SSH, use nohup to run in the background. The process keeps running even after you disconnect.
nohup python3 /workspace/scripts/run_face_parts.py > /workspace/output/log.txt 2>&1 &
tail -f /workspace/output/log.txt
Don’t use the Web Terminal’s nohup for long runs—unlike SSH, SIGHUP handling is unreliable there.
Results from the 28-image batch
Using direct SSH + nohup, all 28 images completed. Stable at ~75 seconds per image, no errors. Each expression produced three layers: face_parts, face_base, and hair.
face_parts were mostly good
Out of 28 images, splitting expression parts (eyes, eyebrows, mouth, nose) worked in most cases. As source for switching expressions in Live2D, it’s usable as-is.
Variation in face_base quality
Results for face_base (face base) varied significantly by expression.
Pattern 1: A trace of the mouth remains (hair is extracted cleanly)

smile. A faint trace remains around the mouth. If you overlay the mouth from face_parts on this, you get a double mouth. On the other hand, the hair is perfectly extracted, which is ideal for a “bald base”.

The hair layer of the same “smile”. It contains the ahoge, bangs, side ponytail, and back hair.
Pattern 2: The mouth disappears (back hair remains on the sides)

surprised. Almost no trace of mouth or nose. As a base, this is the cleanest. However, some back hair remains at the sides.

closed_eyes. Likewise, no mouth trace, with back hair remaining at the sides.
Pattern 3: The mouth remains clearly

laughing. The open mouth remains on the base as-is. Not usable as a base.
The “failure” is actually a bangs separation
If back hair remains on the base, that means the hair layer contains only the front hair.

The “closed_eyes” hair layer. Only the bangs + ahoge + scrunchie are extracted, with no back hair. If you want separate layers for front and back hair in Live2D, this “failed output” is directly useful.
Trade-offs
| Tendency | Mouth trace | Hair separation | How to use the base |
|---|---|---|---|
| Hair is extracted cleanly | Tends to remain | All in one layer | Manually erase the mouth trace |
| Back hair remains | Disappears | Only front hair separates | Use as-is (handle back hair separately) |
You won’t get perfect separation for every expression. Suggested usage:
- Base: pick one output without a mouth trace (e.g., “surprised”) and use it across all expressions
- Front hair: take it from a hair layer where back hair remained
- Back hair: either cut it from the base separately, or re-input face_base to Layered and split
- Expression parts: use face_parts per expression
Note on output resolution
Because the script specified resolution=640, outputs were 640×640 for 1024×1024 inputs. For Live2D you’ll need to upscale. Running an upscaler in your local ComfyUI is the easiest.
Does resolution=1024 improve quality?
With the 640 batch, overall detail was soft. I upscaled the input to 1340×1340 and re-ran with resolution=1024.
LoRA + resolution=1024 greatly improves face-part separation
Ran with LoRA + layers=3 + resolution=1024. On the RTX PRO 6000 this took about 4 minutes (~4.8 s/step × 50 steps).
face_parts. Compared to 640, edges around eyes and eyebrows are much crisper.

face_base. At 640 there was a trade-off between mouth trace remaining vs. back hair remaining. At 1024, there’s no mouth trace, no hair left behind, and clean ears—the perfect bald base.
hair. The tips are much more detailed than at 640. However, bangs, back hair, side ponytail, and ahoge are still combined in one layer; the 3-layer LoRA output doesn’t split inside the hair.
| resolution=640 | resolution=1024 | |
|---|---|---|
| Inference time | ~75 s/image | ~240 s/image |
| face_parts | Usable | Crisp |
| face_base | Trade-off between mouth trace/hair remaining | Perfect |
| hair | One layer | One layer (but more detailed) |
For face parts and the base, running at 1024 is worth it.
Hair subdivision: many attempts, but no
To animate hair in Live2D you need separate layers for bangs, back hair, ahoge, and side ponytail. I tried the following:
LoRA off + layers=6 + resolution=1024:
Since at 640 with layers=6 I got front/back split for the side ponytail and an independent ahoge, I expected 1024 to improve.
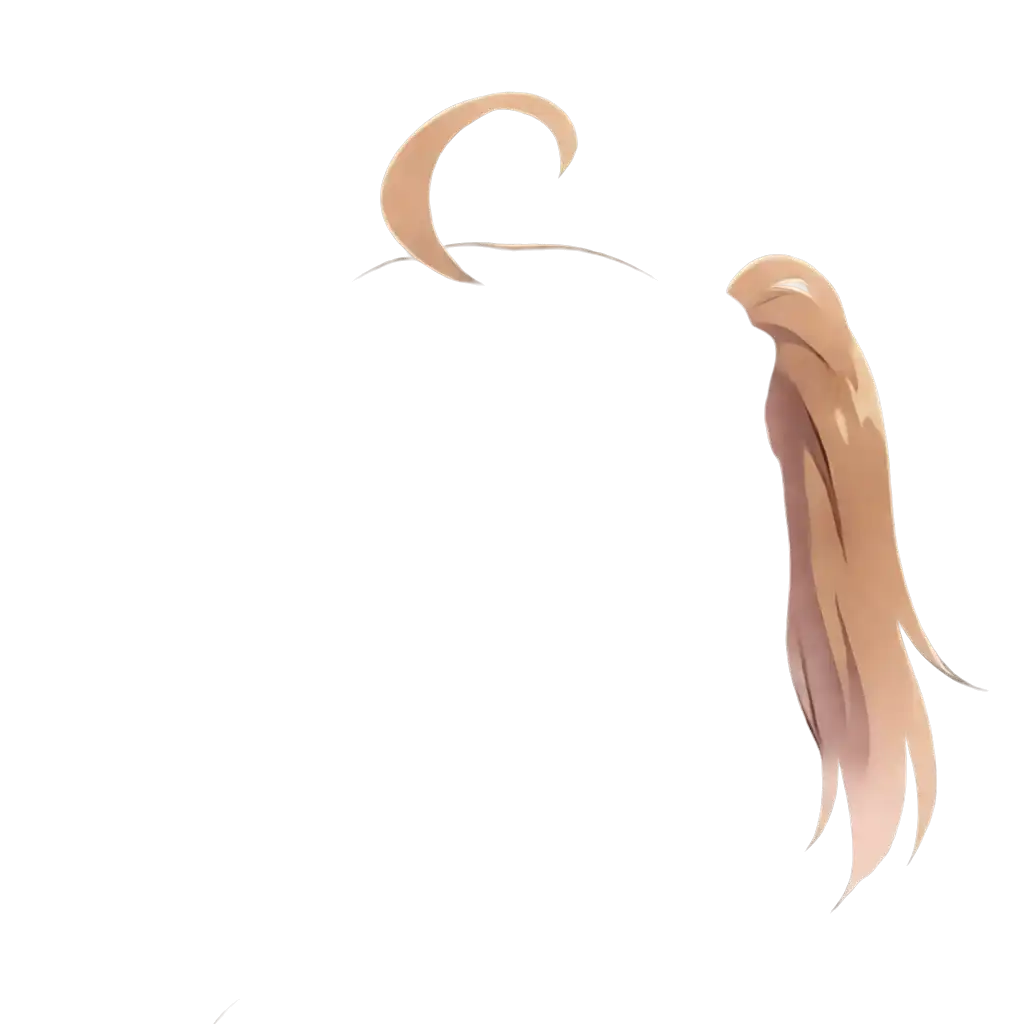
layer_1. The ahoge and the right side ponytail are extracted independently.

layer_4. Outputs a line-art version of the hair—different behavior from true separation.

layer_5. Almost the original image as-is; not separated.
Some parts (ahoge, side ponytail) occasionally separate by chance, but I couldn’t achieve a front/back split for bangs and back hair.
Prompting the layer contents:
prompt = "Separate into 6 layers: 1) front bangs hair, 2) ahoge cowlick, "
         "3) right side ponytail with blue scrunchie, 4) left side hair, "
         "5) back hair, 6) face and skin"
Even when specifying the contents of each layer via the prompt, the model didn’t comply. Prompts in Qwen-Image-Layered are for describing the image, not for controlling layer separation.
Asking Gemini to split hair layers:
I gave a multi-modal LLM (Gemini) the hair image and asked it to “separate front and back hair”, but it couldn’t edit or split the image.
Fundamentally, Qwen-Image-Layered is designed for “character vs. background” and “large-part” separation. It doesn’t assume fine-grained separation within parts that share the same texture. The LoRA by tori29umai is likewise specialized for the three-way split of face parts/base/hair and doesn’t support splitting inside hair. To separate hair by part, you’ll need to draw masks manually or use a segmentation model like SAM (Segment Anything Model).
Cost management
Stop the Pod as soon as you’re done. Since models remain on the Network Volume, you can restart in minutes next time without re-downloading.
| Operation | Effect |
|---|---|
| Stop | Stops the Pod. The Network Volume remains (the $0.07/GB/month storage charge continues) |
| Terminate | Deletes the Pod. The Network Volume remains |
| Delete Network Volume | Deletes all data and stops storage charges |
A Network Volume doesn’t disappear even if you terminate the Pod. You can attach it to a different Pod, so you don’t need to re-download models when you want to change GPUs.
Delete the Network Volume when you no longer need it. If you leave it, the storage fee quietly adds up.