日本語プロンプトをOllamaで英訳してComfyUIとmfluxに投げるFastAPIラッパでAnima・WAI-IL・FLUX.2 KleinをまとめてWebUI化
 目次
目次
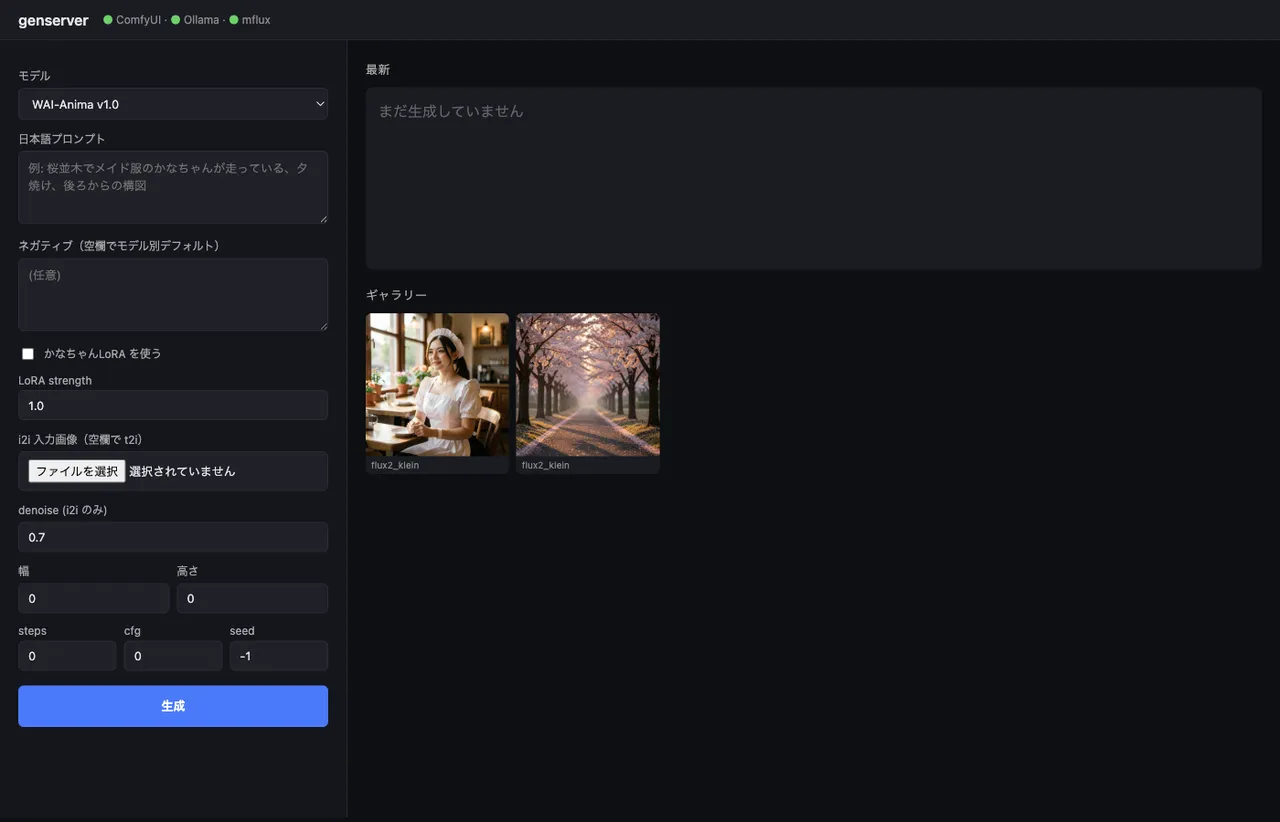
画像生成、仕事ではほぼ使わない。日記の挿絵かテスト用アセットを作るくらいの軽い用途。それでも waiANIMA_v10・waiIllustriousSDXL_v170・flux2-klein-4b と気付いたら3エンジン手元にあって、しかも ComfyUI だけで完結しない(FLUX.2 は mflux CLI)。たまに使うたびに「ComfyUI のUI開いて」「英語プロンプト考えて」「mflux のCLI思い出して」とやるのが地味に面倒なので、入口だけ揃えた。350行のFastAPIアプリで、日本語投げると画像が返ってくる。Tailscale で iPhone からも開ける(が、結局 Mac の前で打つことが多い)。
下敷きはWAI-Anima v1をComfyUI APIで叩いた記事とmflux vs iris.cでFLUX.2 Klein 4Bをベンチした記事。今回はそれを束ねる。
構成
flowchart LR
    Browser[ブラウザ<br/>iPhone / Mac] -->|Tailscale<br/>:7860| FastAPI[FastAPI<br/>genserver]
    FastAPI -->|/api/chat| Ollama[Ollama<br/>gemma3:12b<br/>JP→EN]
    FastAPI -->|model type 分岐| Branch{type?}
    Branch -->|comfy_anima<br/>comfy_sdxl| ComfyUI[ComfyUI :8188<br/>API endpoint]
    Branch -->|mflux| MFlux[mflux-generate-flux2<br/>subprocess]
    ComfyUI --> Out[(outputs/<br/>YYYY-MM-DD/)]
    MFlux --> Out
    Out -->|/outputs/...| Browser
ポイントは「ComfyUIに寄せず、ComfyUIとmfluxを並列に扱った」こと。
mfluxをComfyUIのカスタムノードに乗せる手もあるが、依存が増えるしバージョン管理も面倒なので、subprocessで呼ぶだけに留めた。
ComfyUIは既にAPIサーバを持っているので、そのまま使うほうが素直。
モデル設定をdictで定義する
3モデル分の差分を1箇所にまとめる。コード内でこれを見れば、どこに何があるか分かる形にした。
MODELS = {
    "anima": {
        "type": "comfy_anima",
        "checkpoint": "waiANIMA_v10.safetensors",
        "text_encoder": "qwen_3_06b_base.safetensors",
        "vae": "qwen_image_vae.safetensors",
        "lora": "kanachan-waianima-rework-v4_epoch150.safetensors",
        "lora_trigger": "kanachan",
        "default_steps": 30, "default_cfg": 4.0,
        "sampler": "er_sde", "scheduler": "simple",
        "default_w": 832, "default_h": 1216,
    },
    "wai_il": {
        "type": "comfy_sdxl",
        "checkpoint": "waiIllustriousSDXL_v170.safetensors",
        "lora": "kanachan-waiv16-05.safetensors",
        "lora_trigger": "kanachan",
        "default_steps": 30, "default_cfg": 5.5,
        "sampler": "euler_ancestral", "scheduler": "normal",
        "default_w": 832, "default_h": 1216,
    },
    "flux2_klein": {
        "type": "mflux",
        "default_steps": 4, "default_cfg": 1.0,
        "default_w": 1024, "default_h": 1024,
    },
}
LoRAは「かなちゃん」のみで、Anima向け(rework-v4 ep150 がsweet spot)と WAI-IL 向け(waiv16-05)を分けて持つ。
FLUX.2 Klein 向けの kanachan LoRA は未学習なので、UI側でトグルが自動で無効化される。
日本語プロンプトをOllamaで英訳する
ここが一番悩んだ部分。
Anima は自然言語キャプションで学習されているので英文が向く。
WAI-IL は SDXL 系なので Danbooru タグ(1girl, solo, long hair, school uniform)の方が安定する。
FLUX.2 Klein は写真寄りで、自然言語でフレーミングを書く方が出力品質が安定する。
つまり同じ日本語入力でも、モデルによって生成すべき英語の形が違う。これを Ollama 側のシステムプロンプトでスタイルヒントを切り替えて吸収した。
async def translate_to_prompt(text: str, model_key: str) -> str:
    style_hint = {
        "anima": "Use natural English with comma-separated descriptive phrases. The model is an anime DiT trained with natural language captions.",
        "wai_il": "Use Danbooru-style comma-separated English tags (e.g., '1girl, solo, long hair, school uniform').",
        "flux2_klein": "Use natural English describing the scene, subject, lighting, and style as flowing comma-separated phrases.",
    }[model_key]
    sys_prompt = (
        "You convert a Japanese image description into an English prompt for an image diffusion model. "
        + style_hint +
        " Output ONLY the prompt, no explanation, no quotes."
    )
    payload = {
        "model": "gemma3:12b", "stream": False,
        "messages": [
            {"role": "system", "content": sys_prompt},
            {"role": "user", "content": text},
        ],
        "options": {"temperature": 0.4},
    }
    async with httpx.AsyncClient(timeout=120) as cli:
        r = await cli.post("http://127.0.0.1:11434/api/chat", json=payload)
        return r.json()["message"]["content"].strip()
gemma3:12b は M1 Max 64GB で1〜3秒で返ってくる。3B クラスのモデル(qwen2.5vl:7b)でも動くが、構図描写を端折る癖があったので 12B にした。
実際の翻訳結果。日本語入力の メイド服を着た女性、カフェの店内、自然光、ボケ味、写真風 がそのまま叩いた英語より明らかに密度の高い英文に展開される。
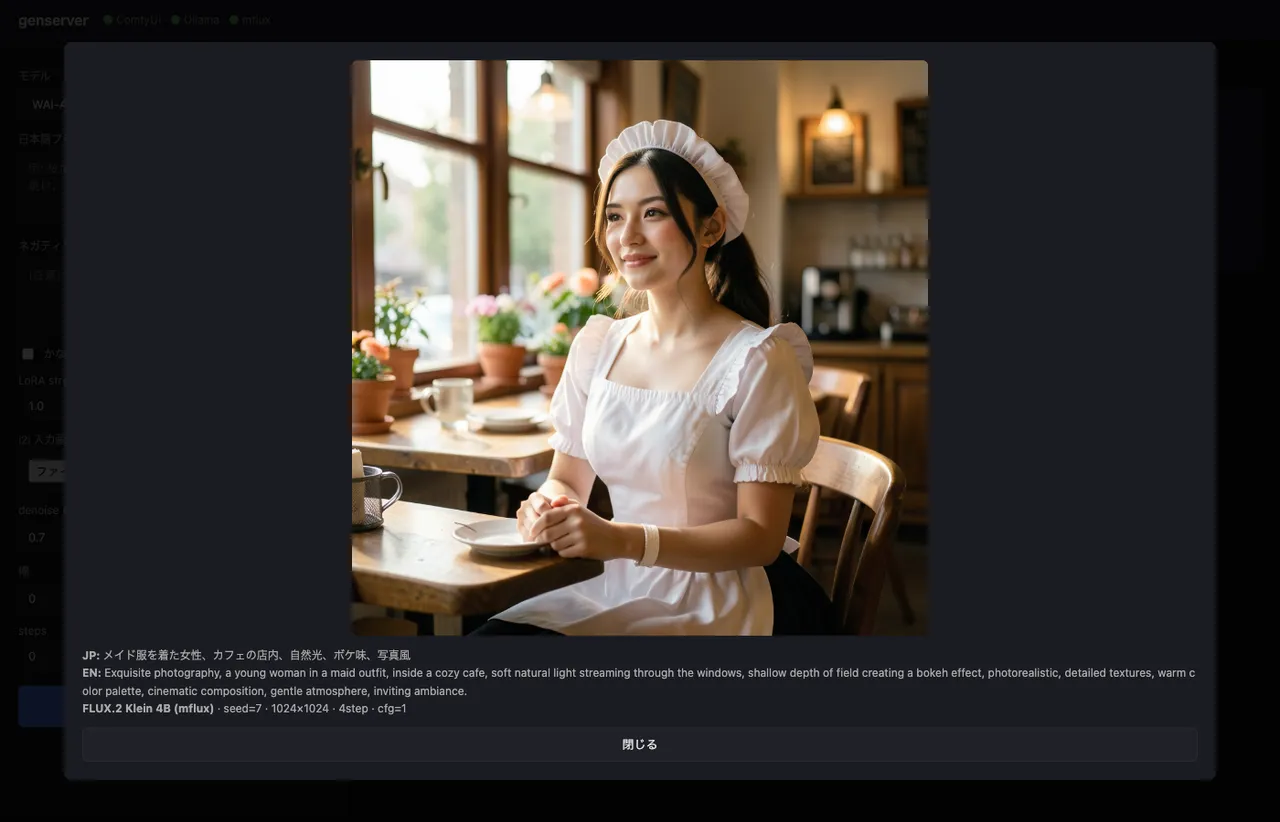
shallow depth of field creating a bokeh effect のような、日本語の「ボケ味」を英語のフォトグラファー語彙に開いてくれるのが gemma3:12b の効きどころ。元の日本語を直訳した bokeh 単独だと FLUX.2 の写真モードでうまく解釈されないことがある。
LoRAトグルがONなら、結果の冒頭にトリガー語(kanachan)を自動で差し込む。LLMがトリガーを忘れるリスクをコード側で潰す。
if use_lora and cfg.get("lora_trigger"):
    trig = cfg["lora_trigger"]
    if trig.lower() not in en_prompt.lower():
        en_prompt = f"{trig}, {en_prompt}"
ComfyUI APIワークフローをPythonから動的構築する
ComfyUI の /prompt エンドポイントは、ノードを {node_id: {class_type, inputs}} の dict で受け取る。
JSON ファイルとして保存して読み込む方式が一般的だが、t2i / i2i / LoRA有無 の組み合わせでテンプレートが4つ要るのが嫌だったので、Python で組み立てた。
def build_anima_workflow(cfg, prompt, negative, seed, width, height,
                         steps, cfg_scale, use_lora, lora_strength,
                         init_image=None, denoise=1.0):
    nodes = {}
    nodes["loader_unet"] = {"class_type": "UNETLoader",
        "inputs": {"unet_name": cfg["checkpoint"], "weight_dtype": "default"}}
    nodes["loader_clip"] = {"class_type": "CLIPLoader",
        "inputs": {"clip_name": cfg["text_encoder"], "type": "qwen_image"}}
    nodes["loader_vae"] = {"class_type": "VAELoader",
        "inputs": {"vae_name": cfg["vae"]}}

    model_node, clip_node = ["loader_unet", 0], ["loader_clip", 0]
    if use_lora:
        nodes["lora"] = {"class_type": "LoraLoader", "inputs": {
            "lora_name": cfg["lora"],
            "strength_model": lora_strength,
            "strength_clip": min(lora_strength, 0.8),
            "model": model_node, "clip": clip_node,
        }}
        model_node, clip_node = ["lora", 0], ["lora", 1]

    nodes["pos"] = {"class_type": "CLIPTextEncode",
                    "inputs": {"text": prompt, "clip": clip_node}}
    nodes["neg"] = {"class_type": "CLIPTextEncode",
                    "inputs": {"text": negative, "clip": clip_node}}

    if init_image:  # i2i
        nodes["loadimg"] = {"class_type": "LoadImage",
                            "inputs": {"image": init_image}}
        nodes["enc"] = {"class_type": "VAEEncode",
                        "inputs": {"pixels": ["loadimg", 0],
                                   "vae": ["loader_vae", 0]}}
        latent = ["enc", 0]
    else:  # t2i
        nodes["empty"] = {"class_type": "EmptyLatentImage",
                          "inputs": {"width": width, "height": height,
                                     "batch_size": 1}}
        latent = ["empty", 0]

    nodes["sampler"] = {"class_type": "KSampler", "inputs": {
        "model": model_node, "positive": ["pos", 0], "negative": ["neg", 0],
        "latent_image": latent, "seed": seed, "steps": steps,
        "cfg": cfg_scale, "sampler_name": cfg["sampler"],
        "scheduler": cfg["scheduler"], "denoise": denoise,
    }}
    nodes["decode"] = {"class_type": "VAEDecode",
                       "inputs": {"samples": ["sampler", 0],
                                  "vae": ["loader_vae", 0]}}
    nodes["save"] = {"class_type": "SaveImage",
                     "inputs": {"images": ["decode", 0],
                                "filename_prefix": "genserver"}}
    return nodes
ノード名は文字列の任意ID。ComfyUIブラウザUIから書き出すワークフローJSONは数値IDだが、API投入時は何でもいい。
["loader_unet", 0] のような [node_id, output_index] で接続を張る。
WAI-IL は CheckpointLoaderSimple で model/clip/vae を1ノードから取れるので、上の関数のパターンを少し変えるだけで作れる。
/upload/image でi2i用の画像を流し込む
i2i の入力画像は、ComfyUI の input/ ディレクトリに置かれている前提でワークフローが解釈される。
/upload/image エンドポイントがあるので、これに multipart で叩き込めば LoadImage から見える。
async def comfy_upload(image_path: Path) -> str:
    async with httpx.AsyncClient(timeout=60) as cli:
        with open(image_path, "rb") as f:
            files = {"image": (image_path.name, f, "image/png")}
            r = await cli.post("http://127.0.0.1:8188/upload/image",
                               files=files, data={"overwrite": "true"})
            return r.json()["name"]
返ってくる name をそのまま LoadImage の image パラメータに渡す。
生成結果は /history ポーリングで拾う
/prompt を叩くと prompt_id が返るが、生成は非同期。WebSocketで進捗を受けるルートもあるが、polling の方が単純で十分速い。
async def comfy_run(workflow: dict, timeout: int = 600) -> Path:
    async with httpx.AsyncClient(timeout=timeout) as cli:
        r = await cli.post(f"{COMFYUI_HOST}/prompt",
                           json={"prompt": workflow,
                                 "client_id": uuid.uuid4().hex})
        prompt_id = r.json()["prompt_id"]

        deadline = time.time() + timeout
        while time.time() < deadline:
            await asyncio.sleep(1.0)
            data = (await cli.get(f"{COMFYUI_HOST}/history/{prompt_id}")).json()
            if prompt_id in data:
                for node_out in data[prompt_id].get("outputs", {}).values():
                    for img in node_out.get("images", []):
                        src = COMFYUI_OUTPUT_DIR / img.get("subfolder", "") / img["filename"]
                        if src.exists():
                            return src
        raise HTTPException(504, "ComfyUI generation timed out")
FLUX.2 Klein は mflux CLI を subprocess で呼ぶ
mflux 側はAPIを持たないので、CLIを叩く。
前回記事で踏んだ罠(mflux-generate ではなく mflux-generate-flux2、i2iは -edit が別CLI、--image-paths の複数形)はそのまま分岐に閉じ込めた。
async def mflux_run(prompt, seed, width, height, steps, init_image, dest):
    if init_image:
        cmd = [MFLUX_I2I, "--model", "flux2-klein-4b",
               "--prompt", prompt, "--steps", str(steps),
               "--seed", str(seed), "--output", str(dest),
               "--image-paths", str(init_image)]
    else:
        cmd = [MFLUX_T2I, "--model", "flux2-klein-4b",
               "--prompt", prompt, "--steps", str(steps),
               "--width", str(width), "--height", str(height),
               "--seed", str(seed), "--output", str(dest)]
    proc = await asyncio.create_subprocess_exec(
        *cmd, stdout=asyncio.subprocess.PIPE,
        stderr=asyncio.subprocess.STDOUT,
    )
    stdout, _ = await proc.communicate()
    if proc.returncode != 0 or not dest.exists():
        raise HTTPException(500, f"mflux failed: {stdout.decode()[-2000:]}")
    return dest
asyncio.create_subprocess_exec を使って、複数リクエストが来ても他のリクエストをブロックしないようにしている。
ただし mflux は GPU を専有するので、同時実行で速くなるわけではない。1リクエストずつ捌かれる。
i2iの挙動はモデルで結構違う
3エンジンとも i2i はサポートしているが、挙動が違うので UI上は「画像をアップロードして denoise を指定するだけ」に揃えたうえで、結果は別物になる前提で使う。
| モデル | i2iの動き |
|---|---|
| Anima | denoise 0.5〜0.75 で衣装の細部が変わる程度。構図ジャンプは弱い。ControlNet未対応 |
| WAI-IL (SDXL) | 標準的なSDXL i2i。denoise 0.4〜0.6 で画風変換、0.7+ で構図も寄せられる |
FLUX.2 Klein (-edit) | omni-modelなので、構図ごと書き換わる。「桜並木で走る」みたいなプロンプトで、立ち姿入力からフルランニングポーズに飛ぶ |
UIで denoise の数字を入れる箱は同じだが、-edit 系の FLUX.2 はそもそもlatent denoise方式ではなく in-context image editing なので、数値の意味は違う。3者まとめて「強さ」のスライダー的に使う割り切り。
Tailscale経由でiPhoneから叩く
既に Tailscale が入っているので、uvicorn --host 0.0.0.0 で外向きにバインドするだけで Tailnet 内から見える。
python -m uvicorn app:app --host 0.0.0.0 --port 7860tailscale ip -4 で出てくる IPv4(100.x.y.z)を控えて、iPhone の Safari から http://100.x.y.z:7860 を開けば同じ画面が出る。
プロンプトを iPhone から打ち込んで、Mac の M1 Max で生成、結果が iPhone に返ってくる。
「ベッドの中で寝る前に1枚回しておく」みたいな運用ができるようになった。
ファイアウォールは特に開ける必要なし(Tailscaleが上に被さるので公開ポートにはならない)。WAN側からは見えない。
起動・停止のzshエイリアス
3つのプロセスを毎回手で立てるのが面倒なので、zsh エイリアスにまとめた。
既に立っているサービスは二重起動しない判定を入れている。Ollama は他用途(マルチモーダル日本語RAG等)でも使うので、down では止めずに残す。
genserver-up() {
  # ComfyUI
  if ! lsof -iTCP:8188 -sTCP:LISTEN >/dev/null 2>&1; then
    ( cd "$GENSERVER_COMFYUI" && \
      nohup "$GENSERVER_PY" main.py --listen 0.0.0.0 --port 8188 \
        > /tmp/comfyui.log 2>&1 & echo $! > /tmp/comfyui.pid )
  fi
  # Ollama
  pgrep -x ollama >/dev/null || \
    (nohup ollama serve > /tmp/ollama.log 2>&1 & echo $! > /tmp/ollama.pid)
  # genserver (FastAPI)
  if ! lsof -iTCP:7860 -sTCP:LISTEN >/dev/null 2>&1; then
    ( cd "$GENSERVER_DIR" && \
      nohup "$GENSERVER_PY" -m uvicorn app:app --host 0.0.0.0 --port 7860 \
        > /tmp/genserver.log 2>&1 & echo $! > /tmp/genserver.pid )
  fi
  echo "  tailnet: http://$(tailscale ip -4 | head -1):7860"
}

genserver-down() {
  for f in /tmp/genserver.pid /tmp/comfyui.pid; do
    [ -f "$f" ] && kill "$(cat $f)" 2>/dev/null && rm "$f"
  done
  lsof -tiTCP:7860 -sTCP:LISTEN 2>/dev/null | xargs -r kill 2>/dev/null
  lsof -tiTCP:8188 -sTCP:LISTEN 2>/dev/null | xargs -r kill 2>/dev/null
}

genserver-down-all() {
  genserver-down
  [ -f /tmp/ollama.pid ] && kill "$(cat /tmp/ollama.pid)" && rm /tmp/ollama.pid
}

genserver-status() {
  lsof -iTCP -sTCP:LISTEN 2>/dev/null | grep -E '7860|8188|11434'
}

genserver-logs() { tail -f /tmp/genserver.log /tmp/comfyui.log; }
genserver-up で3つ立つ → ブラウザで開いて生成 → 終わったら genserver-down で止める。
ComfyUI は起動だけで5GB超のVRAMを掴むので、使わない時は明示的に落としたい。
過去記事の罠の回収
このラッパを書く中で、過去記事で踏んだ地雷をそのまま回避ロジックに変えていた。書いておくと再発防止になる。
- CLIPLoaderの type は
qwen_image: Anima のテキストエンコーダは Qwen3 0.6B ベースで、ComfyUI内部ではqwen_imageとして認識される(該当記事)。animaを渡すと弾かれる - mflux は
-flux2付きCLIを呼ぶ:mflux-generate --model flux2-klein-4bだとtext_encoder_2が無くて死ぬ。FLUX.2 Klein は Qwen3 単体の構成で、CLI が分かれている - mflux のi2iは
-edit別CLI、--image-paths複数形: 普通の--image-pathで投げると latent denoise の弱いi2iが走って背景が変わらない - ComfyUI はGUIで起動してAPIを叩く: ヘッドレス起動だと tqdm の
flush()がLogInterceptor経由で[Errno 22]を吐く(該当記事)。--listen 0.0.0.0でブラウザUIを残したまま、手元のWebUIからはAPIだけ叩けばいい
3エンジン束ねるだけなら200行で書けるが、これらを踏まずに動く状態にするのが地味に時間を食う。今回はそこを記事ベースで全部回収できた。
残すかどうか迷ったところ
- WebSocketで進捗バー: ComfyUI の
/wsから進捗イベントが取れるので、UIにステップ進捗を出すこともできる。やったが、polling のシンプルさを潰すほどの価値はなかったので削った。生成は数十秒〜数分で終わるので、スピナーだけで十分 - モデル設定の YAML 外出し:
MODELS = {...}をmodels.yamlに切り出したくなるが、自分用なので Python の dict のままにした。モデル追加時に1ファイル開けば全部見える方が早い - Web経由でLoRA選択: かなちゃん固定で十分。複数LoRAが必要になったらドロップダウンを足す