TRELLIS.2 trellis-mac port tested on M1 Max 64GB: setup, generation time, MPS bottlenecks
 Contents
Since I covered the CUDA-free port of TRELLIS.2 the other day, I wanted to verify whether it actually runs on the M1 Max 64GB I have on hand.
The benchmark in the original article was about 3.5 minutes on an M4 Pro 24GB. The M1 Max is a generation behind, but it has 32 GPU cores and 400 GB/s of memory bandwidth, so it should hold its own — that was the premise going in. It did run, but whether the speed is practical is a separate question.
Test environment
- MacBook Pro (Apple M1 Max, 32 GPU cores, 64GB unified memory)
- macOS Darwin 25.3.0
- Python 3.11.14 (auto-installed via uv)
- PyTorch 2.11.0 (MPS available)
- 124GB free disk (model weights are about 15GB)
The system only had Python 3.13 and 3.12, but setup.sh specifies uv venv .venv --python python3.11, so uv downloaded 3.11.14 automatically and put it inside the venv. The system Python wasn’t touched.
Setup
Clone the repo and run setup.sh.
cd ~/projects
git clone https://github.com/shivampkumar/trellis-mac.git
cd trellis-mac
bash setup.sh
The script does the following.
- Creates a venv with
uv venv .venv --python python3.11(downloads 3.11 if missing) - Batch-installs torch, torchvision, transformers, kornia, trimesh, xatlas, etc.
- Installs
utils3dfrom a pinned git commit - Shallow-clones upstream
microsoft/TRELLIS.2 - Runs
patches/mps_compat.pyto apply MPS-compatibility patches - Checks HuggingFace auth status
The whole thing takes about 4 minutes. Total dependency download is under 1GB, and the venv including Python 3.11 fits in about 800MB.
Patches applied
mps_compat.py rewrites 8 files in the upstream code and adds 2 new ones.
Patched: trellis2/modules/sparse/config.py
Patched: trellis2/modules/sparse/attention/full_attn.py
Patched: trellis2/modules/image_feature_extractor.py
Patched: trellis2/pipelines/rembg/BiRefNet.py
Patched: trellis2/representations/mesh/base.py
Patched: trellis2/models/sc_vaes/fdg_vae.py
Patched: trellis2/pipelines/trellis2_image_to_3d.py
Patched: trellis2/pipelines/base.py
Installed: trellis2/modules/sparse/conv/conv_none.py
Installed: stubs/o_voxel/convert.py
As described in the original article, sdpa and naive are added as sparse attention backends and flash_attn calls are rerouted to torch.nn.functional.scaled_dot_product_attention. The new conv_none.py is the gather-scatter implementation of sparse 3D convolution, and stubs/o_voxel/convert.py is a Python-dict replacement for the CUDA hashmap.
One thing that changed since the original article: nvdiffrast (texture baking) was stubbed out back then, but the current trellis-mac ships with backends/texture_baker.py, a pure-PyTorch implementation that actually bakes PBR textures.
HuggingFace auth and gated models
TRELLIS.2 inference needs access to two gated models.
facebook/dinov3-vitl16-pretrain-lvd1689m(image feature extraction)briaai/RMBG-2.0(background removal)
If your environment can’t take hidden password input at the CLI prompt, it’s easier to create a token up front and pass it as an argument.
hf auth login --token <HF-token>Access requests are made by clicking “Request access” on each model page. RMBG-2.0 is gated: auto and was approved instantly. DINOv3 is gated: manual, so Meta has to review the request by hand. The form asks for name, date of birth, country, affiliation, and job title.
You can check approval by trying to download via huggingface_hub.
from huggingface_hub import hf_hub_download
for repo in ['facebook/dinov3-vitl16-pretrain-lvd1689m', 'briaai/RMBG-2.0']:
    try:
        hf_hub_download(repo_id=repo, filename='config.json')
        print(f'[OK] {repo}')
    except Exception as e:
        print(f'[NG] {repo}: {type(e).__name__}')
Manual review for DINOv3 takes a few hours on the fast side and up to a day in my experience. Mine came back in a few hours.
Test plan
I ran three input images back-to-back, to see how input affinity to the 3D model affects output quality.
① Official sample (baseline)
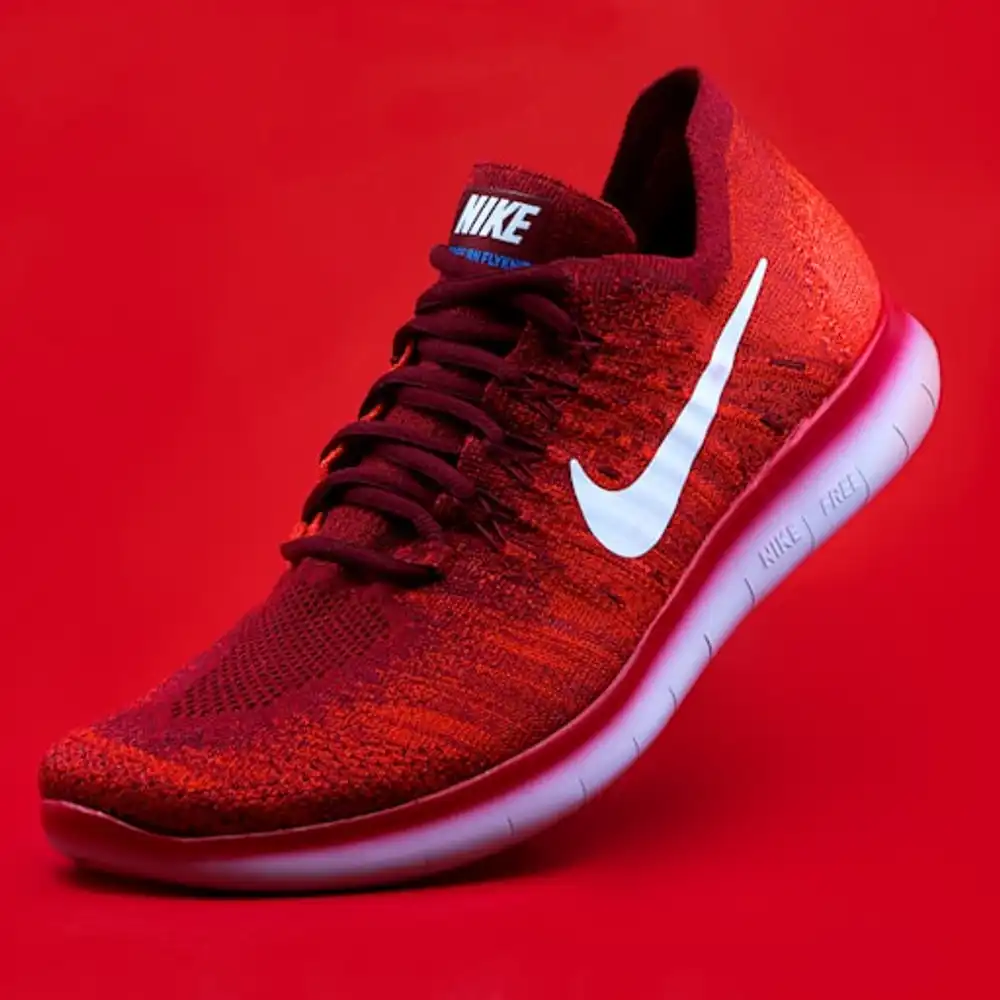
assets/shoe_input.png. A photo-like shoe, firmly in the training distribution. Start here to confirm the pipeline runs.
② Anime illustration (Kanachan in a swimsuit)
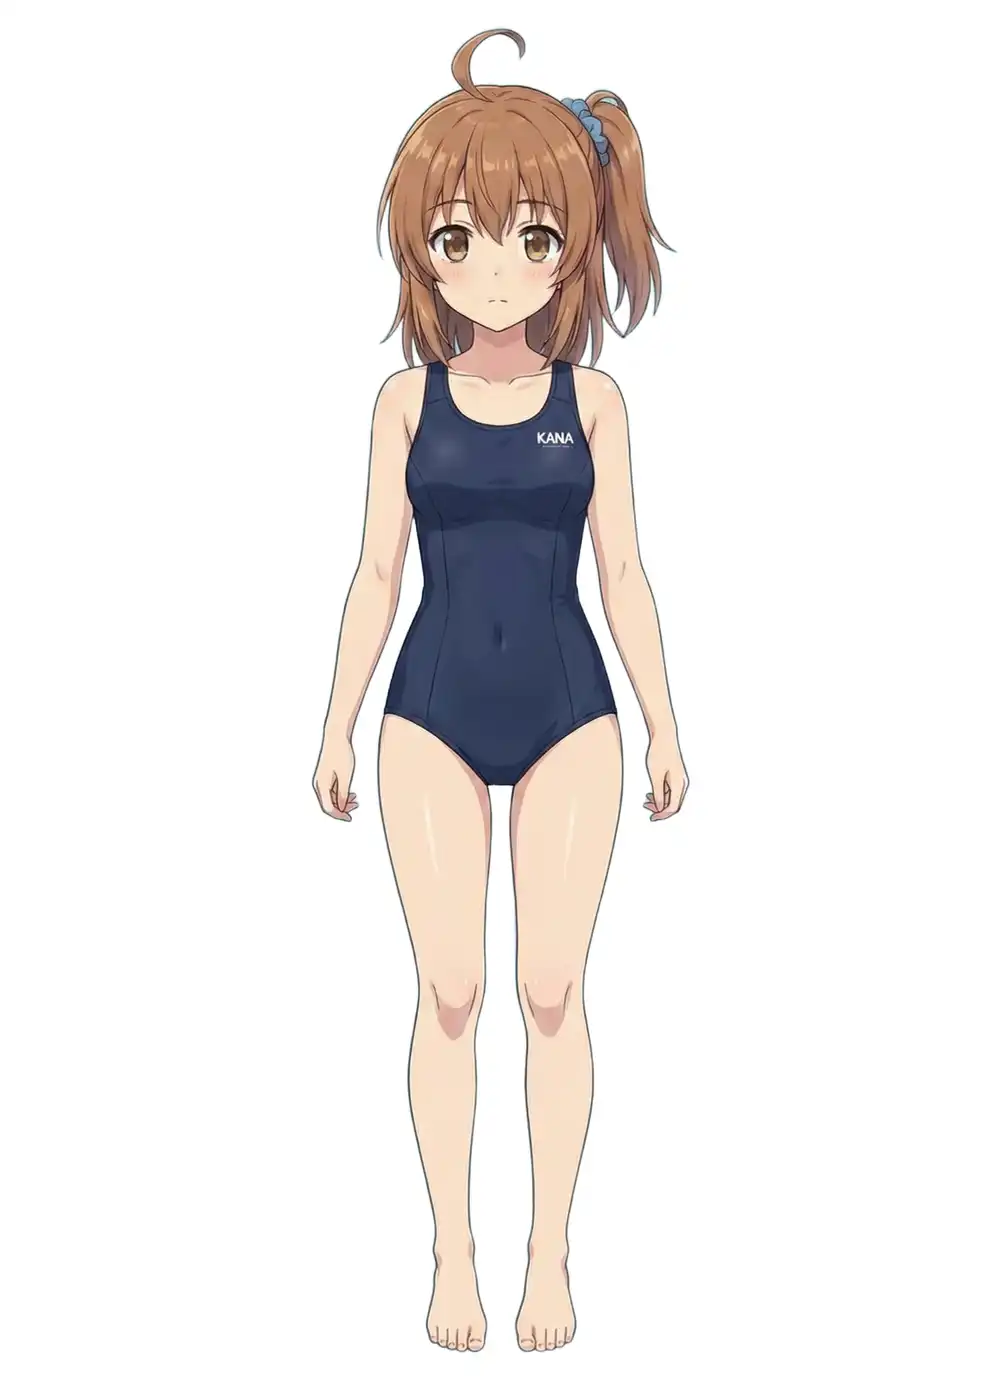
A 1760x2432 high-res anime illustration. Full-body front, limbs not overlapping. Good conditions for shape inference. The interesting parts are how the hair strands and facial features (especially the eyes) get interpreted.
Before feeding it in, I ran RMBG-2.0 to remove the background. TRELLIS.2 calls RMBG-2.0 internally as well, so it goes through the same model either way, but removing it ahead of time lets you eyeball the intermediate. Running RMBG-2.0 standalone on MPS finished the 1760x2432 image in a few seconds.
③ Pixel-art chibi (Kanachan Pixel)
![]()
256x256 pixel art, chibi proportions, completely flat shading. Almost no shading cues, and about as far from the training distribution of a 3D generation model as you can get. I expected it to fall apart — the question is how.
②③ are “Kanachan”, the character that shows up on this blog. I’ve run several 3D experiments with her before.
- Blender MCP for AI-driven 3D modeling — setup for driving Blender from Claude
- Image-to-3D with Blender MCP and Hyper3D Rodin — Kanachan’s bikini standing art, 3D-ified via Rodin, with textures
- Multi-image accuracy bump with Blender MCP — front/side/back three-view input to improve shape fidelity
- AI 3D generation tool comparison, 2026 edition — an overview of TRELLIS, Hunyuan 3D, Tripo AI, Hyper3D Rodin, etc.
- ActionMesh — Meta AI’s video-to-animated-3D-mesh — a different route via video instead of stills
Up to now the options have been cloud services (Rodin, Hunyuan 3D) or local runs on an NVIDIA GPU. Running locally without NVIDIA is new territory that TRELLIS.2 MPS opens up. Having the same Kanachan inputs across all of these makes cloud vs. local and CUDA vs. MPS comparisons easier.
3D generative models are trained on inputs that have clear shading and perspective — photos, painted illustrations. Flat anime-style coloring, and pixel art especially, sit outside that distribution. That makes them useful for probing “how much does the input have to look like a training example.”
Generation results
Every run used python generate.py <image> --output <out> with defaults (pipeline-type=512, texture-size=1024, seed=42). Each run ran in its own process, and I sampled RSS via ps every 10 seconds to capture memory peaks.
① Shoe (baseline)
| Item | Value |
|---|---|
| Model load | 340s (first run, includes ~15GB download) |
| Sparse structure sampling | 84s |
| Shape SLat sampling | 26s |
| Texture SLat sampling | 14s |
| Mesh decode + generation total | 201s |
| PBR texture bake | 3954s (~66 min) |
| Total | ~75 min |
| Output mesh | 427,543 verts / 865,462 tris |
| GLB file | 27MB |
| Memory peak | 18.47GB |
Generation itself (201s) was roughly on par with the M4 Pro numbers from the original article (sparse + Shape + Texture + mesh-decode totalled 185s).
PBR texture baking completely dominated the wall time: 201s of generation vs. 3954s of baking, with baking taking 95% of the total. The original article assumed nvdiffrast was stubbed and baking was skipped, but backends/texture_baker.py now has a pure-PyTorch baking implementation, and that’s what ran here.
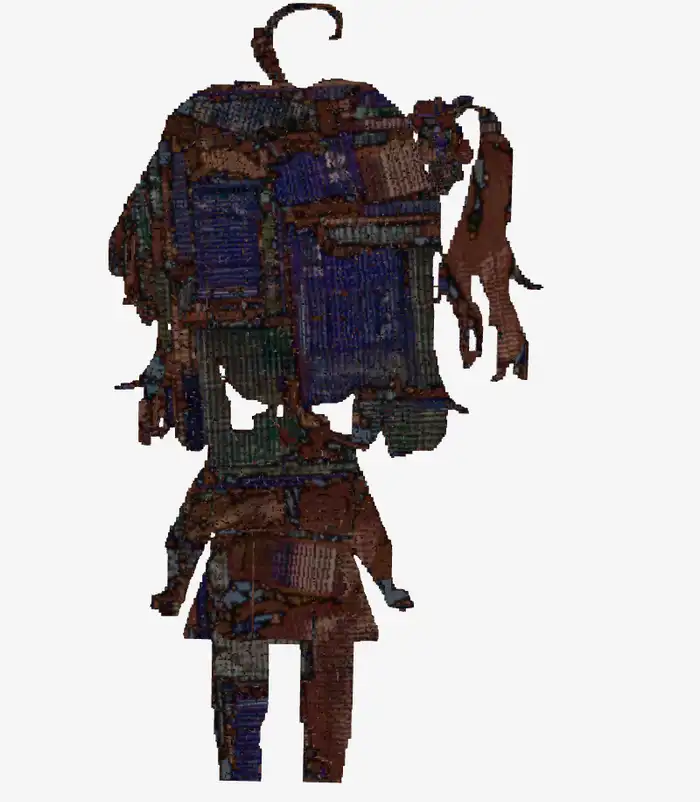
Dropping the output into the lab’s 3D model viewer confirms the shape is recognizably a shoe, but the baked texture is covered in bright-red noise.
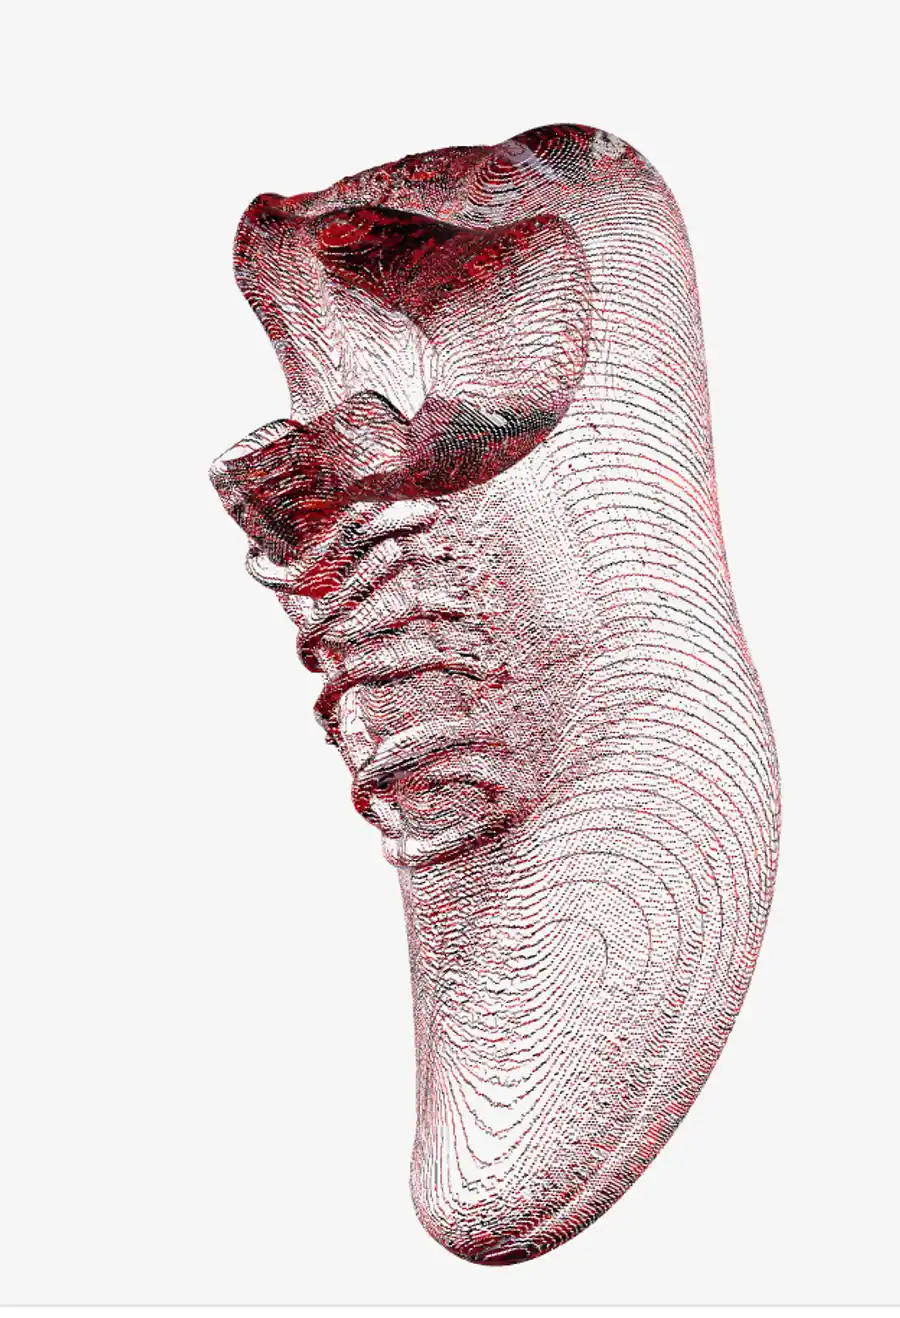
Opening the raw base color image out_shoe_basecolor.png directly shows it even more clearly: the red accents from the input are picked up but scattered randomly across the UV sheet instead of landing on meaningful surface regions.

The pure-PyTorch implementation in backends/texture_baker.py is a straightforward UV unwrap (via xatlas) plus voxel-based attribute sampling. Compared to CUDA’s nvdiffrast (a differentiable rasterizer), the bake quality just isn’t there yet. Even after paying the long bake time, the resulting texture isn’t usable.
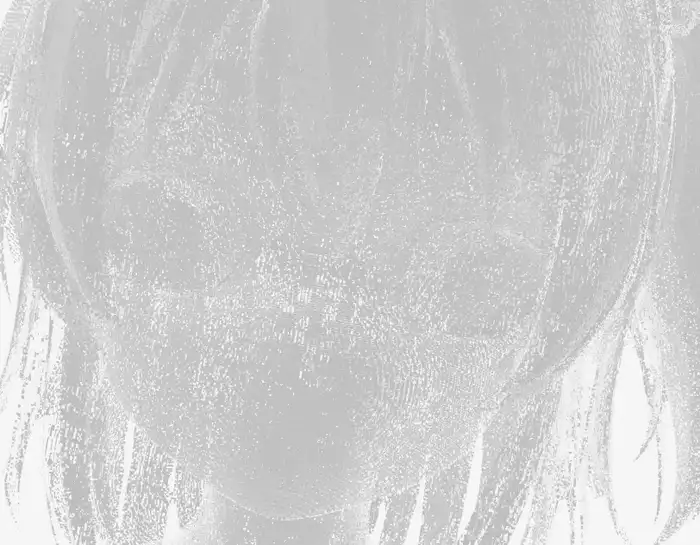
② Kanachan in a swimsuit (with texture)
| Item | Value |
|---|---|
| Model load | 128s (cached) |
| Generation total | 152s |
| PBR texture bake | 5024s (~84 min) |
| Total | ~88 min |
| Output mesh | 300,373 verts / 671,142 tris |
| GLB file | 22MB |
| Memory peak | 17.77GB |
The model cache cut load time from 340s to 128s (about 2.6x).
An interesting point: generation took 152s, faster than the shoe’s 201s. The input is 1760x2432 but TRELLIS.2 resizes internally, so the real driver is the voxel density of the sparse structure.
TRELLIS.2 represents 3D space as a collection of small cubes called “voxels”. The space is divided dice-style, and only cells with something inside are selected for computation — those “has something” cells are the active voxels. The more active voxels, the more points the convolutions have to chew through. A full-body anime silhouette seen head-on occupies less 3D volume (fewer active voxels) than a shoe, so it finished faster.

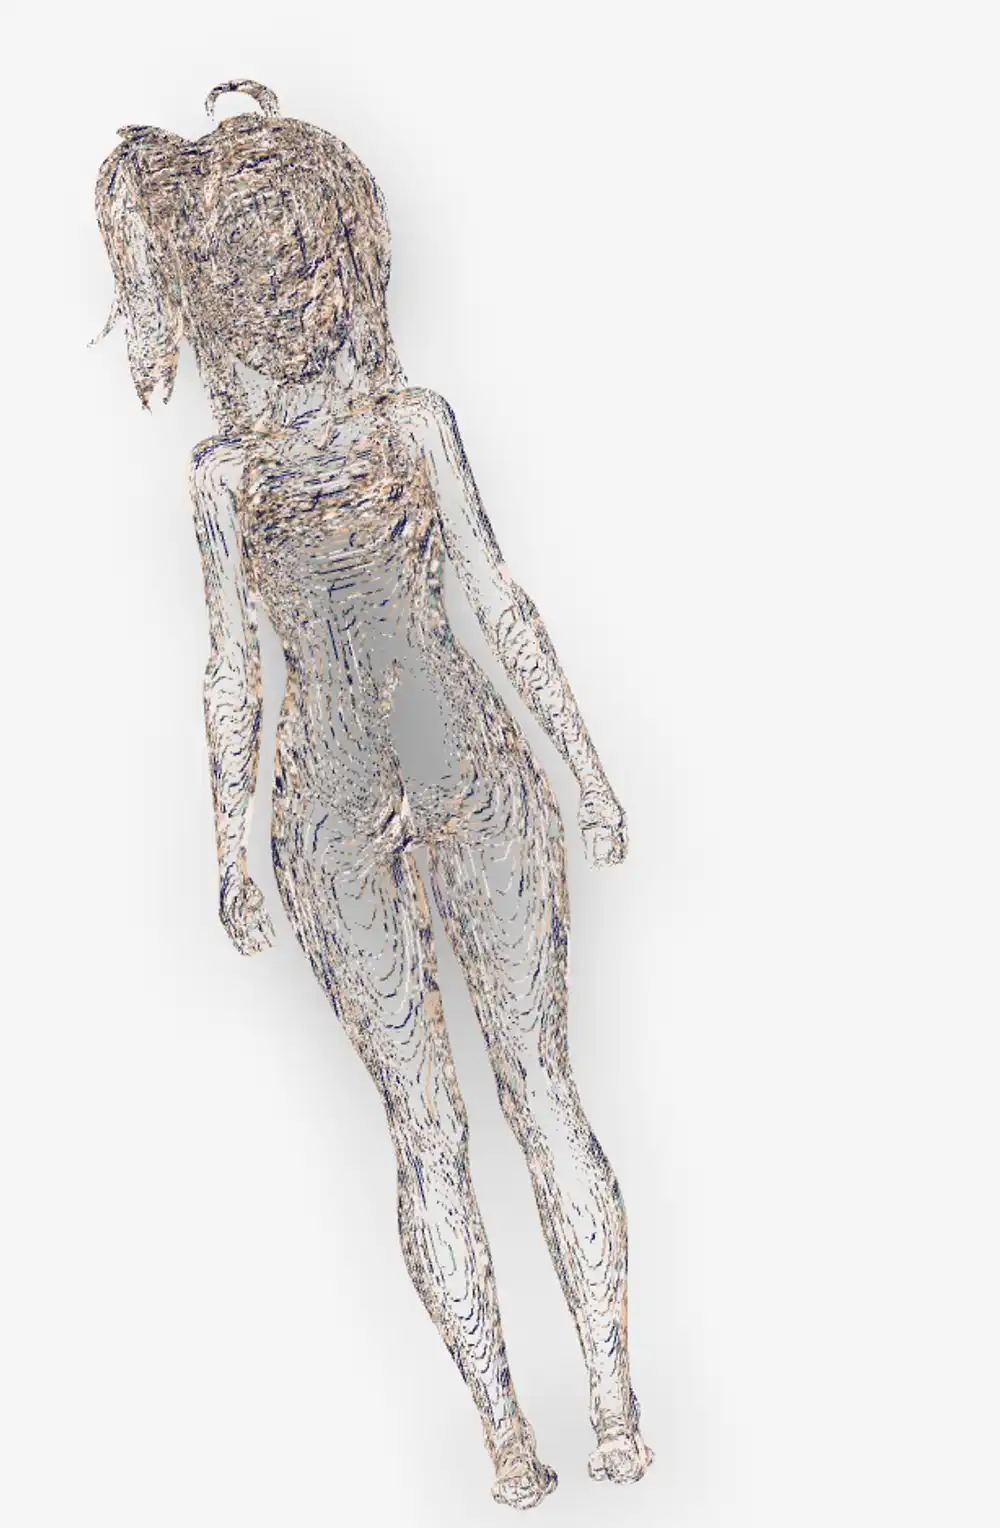
The texture is noisy, same as the shoe, but the shape was genuinely surprising. From a single 2D anime illustration, the hair, limbs, and ponytail were all correctly lifted into 3D. Facial details (eyes, nose, mouth) are too smoothed to read from these screenshots, but the silhouette and body proportions hold together. The back is absent from the input, so it’s inferred, and yet comes out without obvious breakage. Watching TRELLIS.2’s shape inference work reasonably on an input that isn’t at the center of its training distribution was the most unexpected finding of this run.
③ Chibi pixel-art Kanachan (with texture)
| Item | Value |
|---|---|
| Model load | 126s (cached) |
| Generation total | 166s |
| PBR texture bake | 13429s (~224 min) |
| Total | ~229 min (3h 49m) |
| Output mesh | 415,433 verts / 1,055,998 tris |
| GLB file | 28MB |
A 256x256 pixel art input produced a mesh with over a million triangles: 1.2× the shoe (865K) and 1.6× the swimsuit (671K). The bake time scaled with it and hit the longest 224 minutes.
Completely broken, as expected. The first thing that came to mind was “this looks like Gekidan Inu Curry art” — the collage-style imagery Gekidan Inu Curry did for the witch-realms in Puella Magi Madoka Magica has exactly this otherworldly noise texture. Pixel art has lots of “boundaries” (sharp color jumps), and the 3D model reads those as fine surface relief, resulting in an over-noisy mesh. You can’t recognize the character. We’re outside the training distribution, and probably DINOv3’s feature extraction can’t meaningfully structure pixel art in the first place.
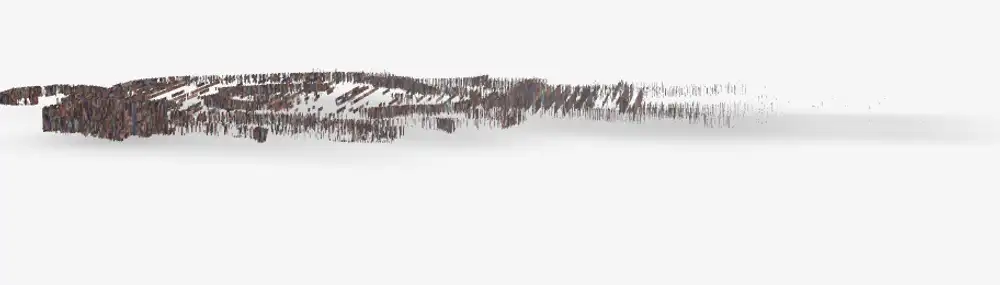
Viewed from the side, the mesh turns out to have almost no thickness at all. It’s more like a flat wall with noise stuck on it than a 3D object — “2D crushed into the height axis” would be a fair description. A front-facing pixel-art image gives the model nothing to infer the back from, and the depth axis essentially gets abandoned.
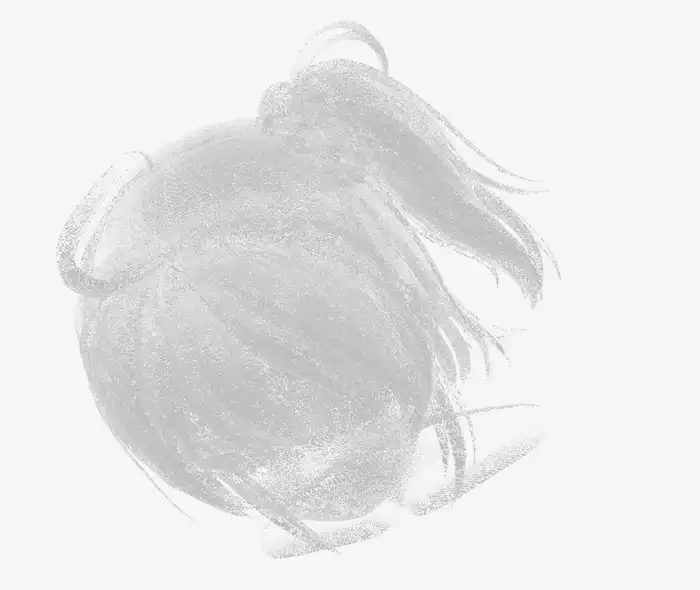
④ Shoe (rerun with --no-texture)
To verify that baking really was the dominant cost, I reran the shoe with --no-texture.
| Item | Value |
|---|---|
| Model load | 133s |
| Generation total | 191.6s |
| PBR texture bake | 0s (skipped) |
| Total | 325s (~5.4 min) |
| Output mesh | 427,543 verts / 865,462 tris (identical to ①) |
| GLB file | 15MB (vs. ①’s 27MB, vertex colors only) |
Same seed, so the mesh matches ① exactly. Skipping texture baking alone dropped the total from 75 min to 5.4 min.
In the viewer, the red texture noise is gone and the shoe’s form reads cleanly. Same mesh as ①, yet skipping the bake made the output look dramatically better. With the current bake quality where it is, --no-texture and vertex colors are the more practical default.
⑤ Kanachan swimsuit (rerun with --no-texture)
From ②’s result I got the impression of “shape is good but the texture noise ruins it”, so I reran the same image with --no-texture.
| Item | Value |
|---|---|
| Model load | 132s |
| Generation total | 167.4s |
| PBR texture bake | 0s |
| Total | 299s (~5 min) |
| Output mesh | 300,373 verts / 671,142 tris (identical to ②) |
| GLB file | 11MB |
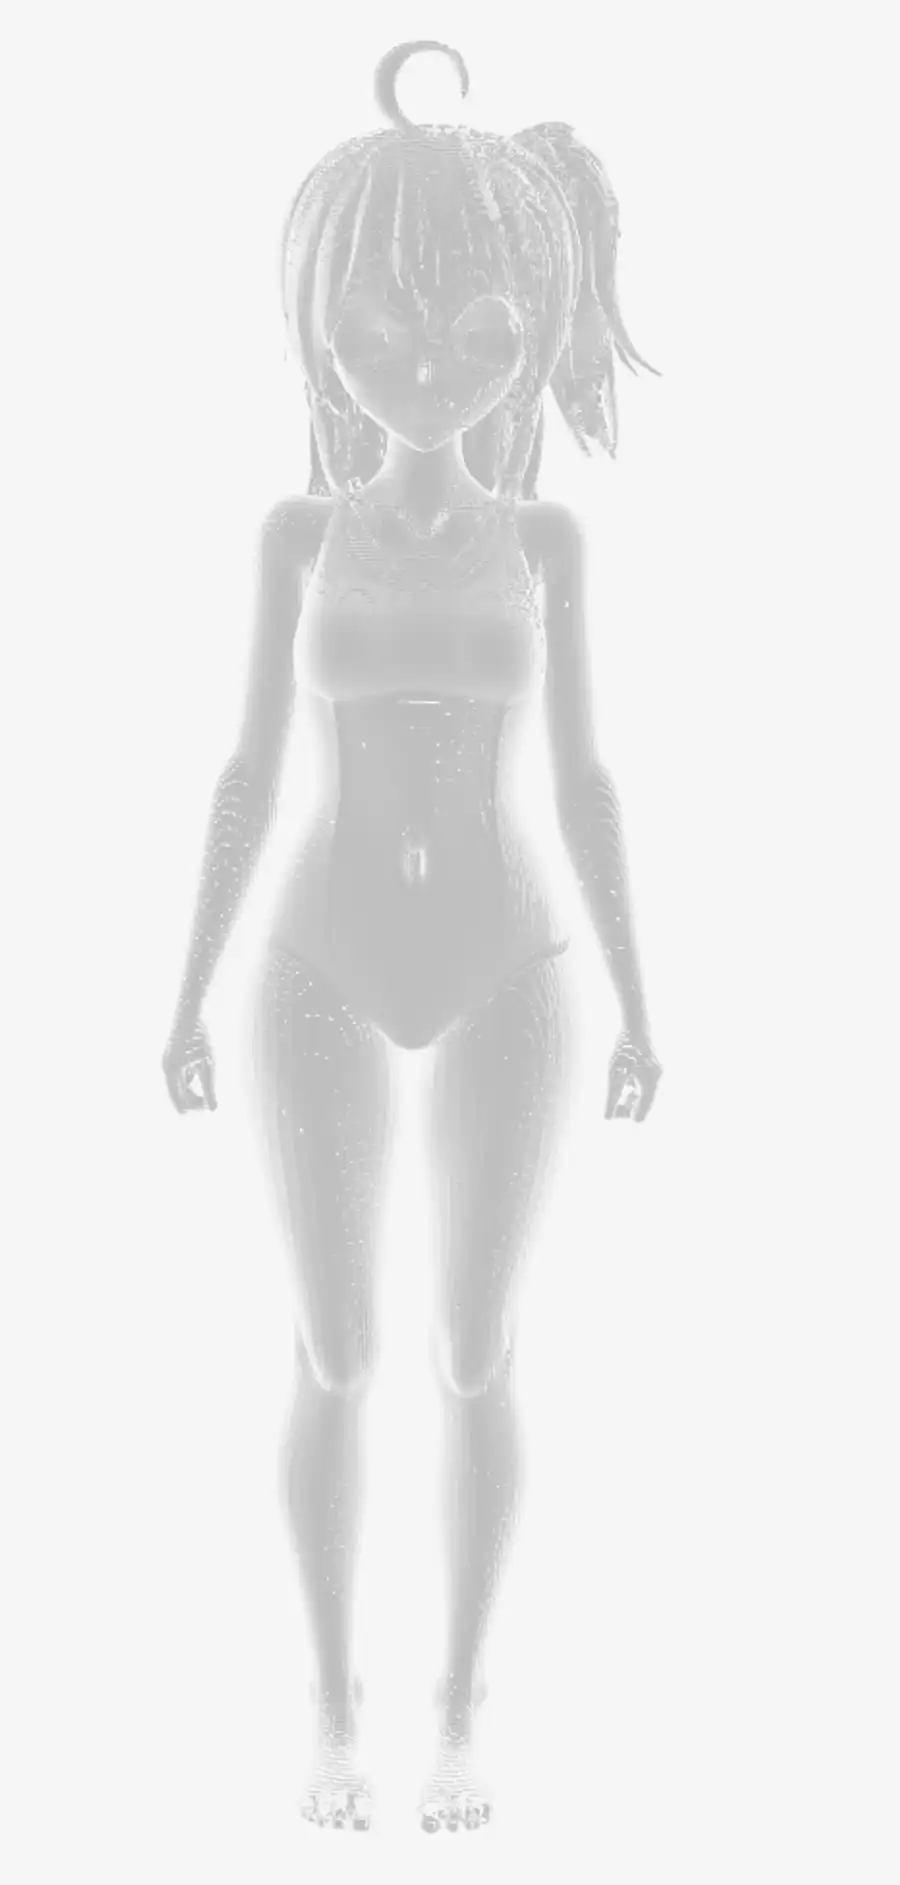
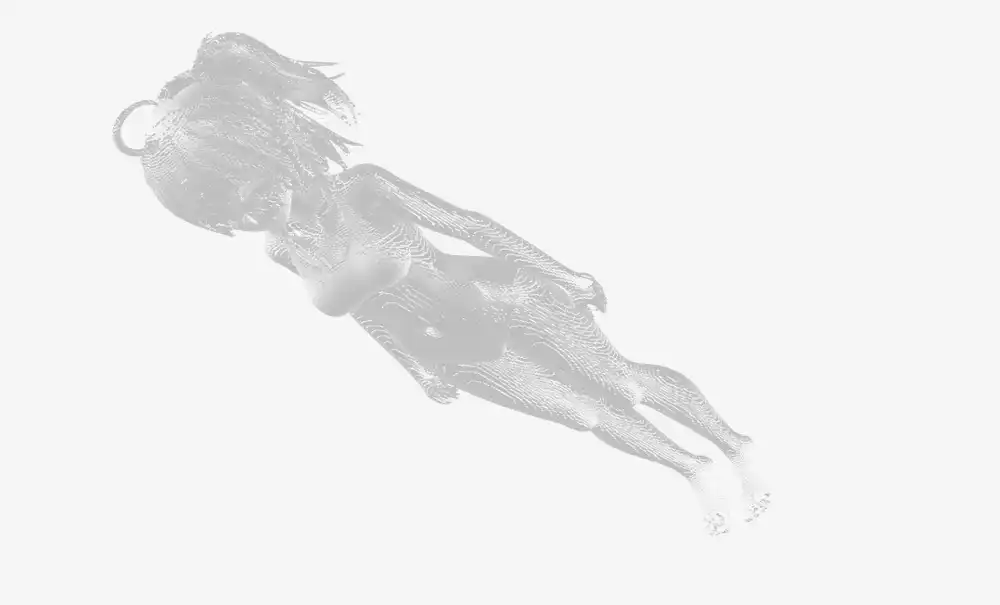
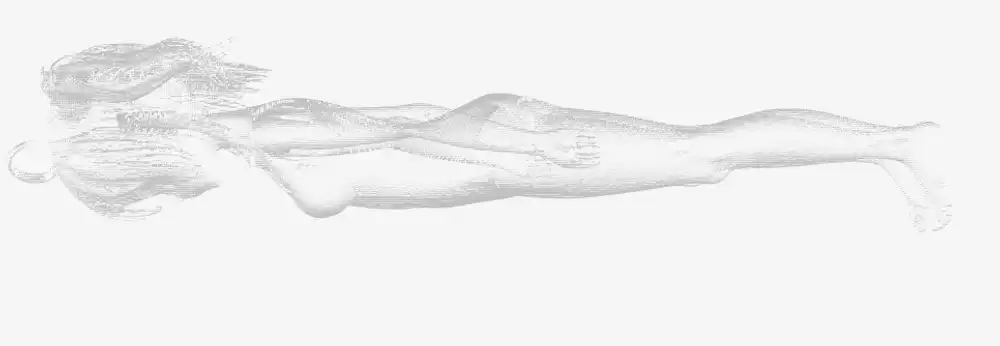
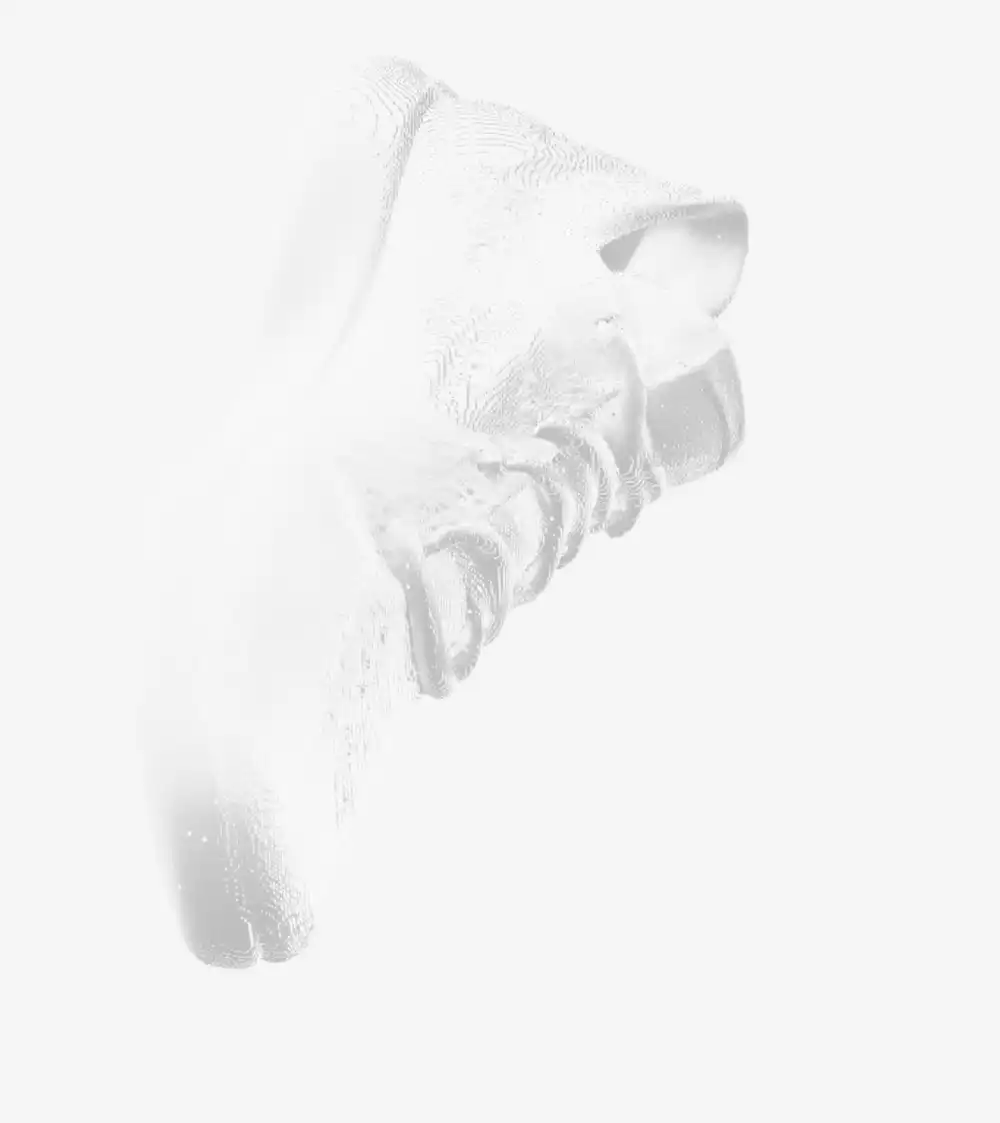
This was the best result of the whole experiment. The antenna hair tuft on top, the ponytail, the swimsuit’s neckline and leg line — all come through as legitimate mesh relief. The back view isn’t broken either. Up close, the face shows faint depressions for the eyes and slight relief for the nose and mouth — not enough to call it “reads as the character at a glance”, but it’s the most face-like output of any 3D experiment I’ve done.
The texture noise on ② was hiding how good the underlying shape was. Getting a non-broken humanoid 3D mesh from a single anime illustration in about 5 minutes is more than enough for what the M1 Max can do locally. If vertex colors are fine for the use case, this path could actually show up in a real workflow.
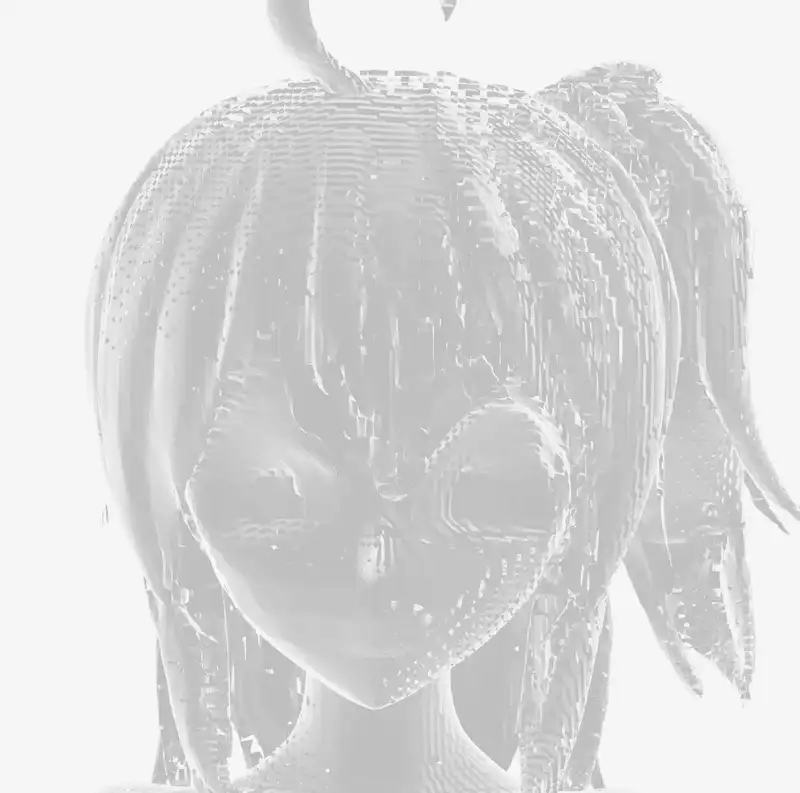
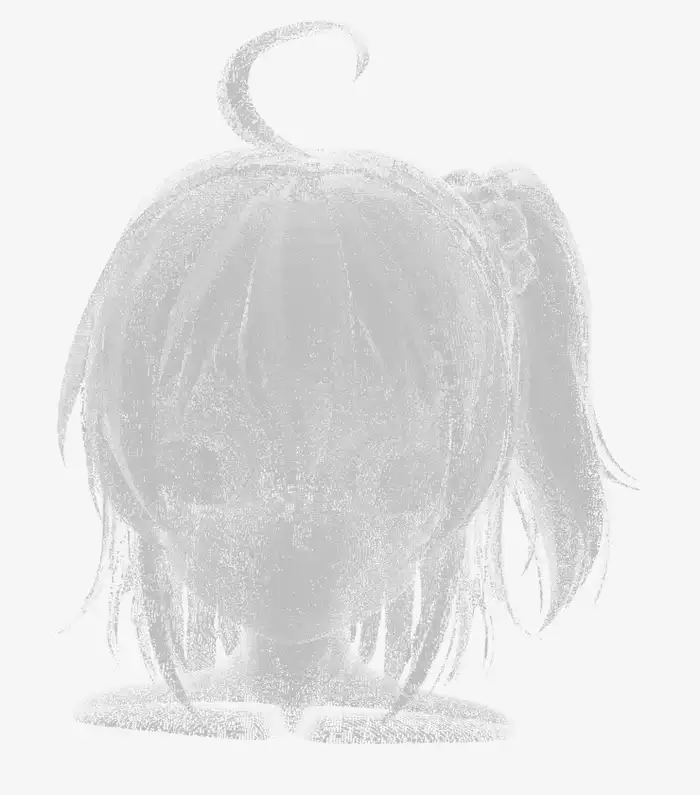
⑥ Feeding in a cropped face
To push more of the vertex budget toward the face, I cropped just the head out of the original and fed that in. With the full body, vertices spread across body/clothes/limbs; feed just the head and the same budget should concentrate around the face — that was the hypothesis.
| Item | Value |
|---|---|
| Model load | 133s |
| Generation total | 539.2s (~9 min) |
| Total | ~11 min |
| Output mesh | 2,002,285 verts / 2,705,690 tris |
| GLB file | 53MB |
Vertex count did indeed shoot up — 2M vertices against the swimsuit’s 300K, a 6.7× jump.
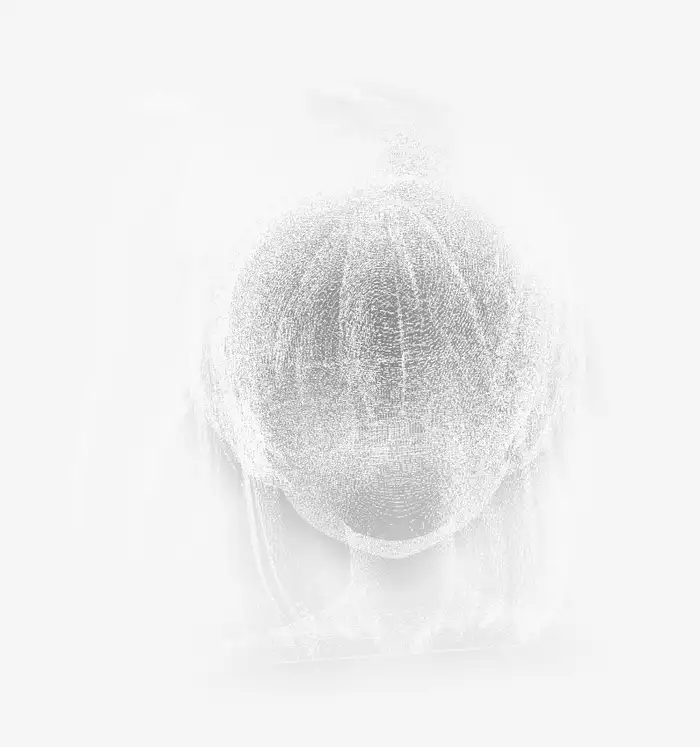
But the “eyes/nose/mouth pop” effect I was hoping for barely materialized. The 6.7× of extra vertices spread out across hair strands and general surface noise, and the eye/nose/mouth relief reads about the same as it did in the full-body version.
The back view is also visibly sparser. The model has to guess information that isn’t in the input, and the back of the head has essentially no cues, so fewer vertices land there than on the front. A single 2D image input inherently leaves the back underfed.
It shouldn’t really be surprising that vertex count doesn’t track semantic importance. From the model’s perspective, “how many points you need to reproduce the surface” is driven by surface area and the complexity of the relief. A face is relatively smooth as a curved surface, so it doesn’t need many vertices; hair tufts and unruly strand tips demand more. The model spends its budget there instead.
If the goal is a crisp face, bumping vertex count isn’t the right lever. The real lever would be adding more input information — multi-view input, for instance. But TRELLIS.2’s run() is designed around a single image; it isn’t trained to fuse multi-view inputs. I’ve used multi-image input with Hyper3D Rodin in the past, but that works because Rodin supports multi-view on the server side. TRELLIS.2 doesn’t give you that option. As of now, I don’t see a realistic path to push face detail higher on the TRELLIS.2 Mac port.
⑦ The high-resolution (1024) pipeline didn’t run
I tried the same Kanachan swimsuit input with --pipeline-type 1024 --no-texture to see if more resolution would surface more face detail. Shape SLat (109s) and Texture SLat (63s) both completed, but it crashed right at mesh decoding.
File ".../trellis2/modules/sparse/conv/conv_none.py", line 117
  t_idx = tgt_idx[mask]
torch.AcceleratorError: index 17020172 is out of bounds: 0, range 0 to 17020172
The gather-scatter sparse 3D convolution (conv_none.py) that is the core of the CUDA-free port is mishandling a bounds check on the larger tensors the 1024 pipeline produces. An off-by-one takes the index just past the end. The 512 pipeline runs the same code path without crashing, so this is presumably a bug that only triggers at specific voxel-grid sizes.
For now, the 512 pipeline is effectively the only one you can run on trellis-mac. The face-detail push hit its ceiling here.
Performance comparison
Versus M4 Pro 24GB (numbers quoted from the original article).
| Stage | M4 Pro 24GB | M1 Max 64GB | Ratio |
|---|---|---|---|
| Model load | 45s | 128–133s (cached) | 2.8× slower |
| Sparse structure sampling | 15s | 84s | 5.6× slower |
| Shape SLat sampling | 90s | 26s | 3.5× faster |
| Texture SLat sampling | 50s | 14s | 3.6× faster |
| Mesh decode | 30s | ~80s (estimated from totals) | 2.7× slower |
| Generation total | ~3.5 min | ~3.2–3.4 min | roughly equal |
| PBR texture bake | (not implemented at article time) | 66–224 min | — |
Looked at purely as generation, the M1 Max matches the M4 Pro, and on Shape/Texture SLat it’s over 3× faster. Those two stages are dominated by sparse tensor math, and the M1 Max’s 400 GB/s memory bandwidth (vs. M4 Pro’s 273 GB/s) looks like the reason.
Sparse structure sampling and mesh decoding are slower on the M1 Max. These stages run backends/conv_none.py’s gather-scatter sparse 3D convolution, which has a lot of Python-layer loop and index work, so the hardware bandwidth doesn’t get to shine. The original article put it bluntly: “pure-PyTorch sparse convolution is about 10× slower than CUDA’s flex_gemm kernel.” That’s the bottleneck.
Memory and MPS fallback notes
Memory peaks across all three runs stayed in the 17.5–18.5GB range, matching the original article’s “~18GB peak”. With 64GB you can generate without closing other apps.
The important line here is that 16GB Macs don’t run this model. An M4 mini (16GB) can’t cover the 18GB peak and will start swapping, which takes it out of practical use. 24GB is the real minimum — M2/M3/M4 Pro-tier hardware is the usable floor.
On the MPS side, there’s exactly one CPU-fallback warning, for aten::segment_reduce.
UserWarning: The operator 'aten::segment_reduce' is not currently supported
on the MPS backend and will fall back to run on the CPU.
This may have performance implications.
This is a PyTorch MPS backend coverage gap, not a generation-specific thing. Running on an M4 Pro would hit the same warning and the same fallback. The question is whether PyTorch ships the op — it’s not a hardware issue.
M1 Max vs. M4 Pro outlook
Separating hardware differences from software differences to think about whether M4 Pro would close the gap.
Hardware-side:
| Metric | M1 Max | M4 Pro |
|---|---|---|
| Memory bandwidth | 400 GB/s | 273 GB/s |
| GPU cores | 32 | 20 |
| GPU generation | older | newer (better per-core efficiency) |
| Native BF16 | ✗ (emulated) | ✓ |
| Unified memory (top tier) | 64GB | 48GB |
Memory bandwidth favors the M1 Max. Native BF16 favors the M4 Pro, but TRELLIS.2 doesn’t depend on BF16 (the original article says so), so it doesn’t hit this workload.
On the software side, missing ops like segment_reduce are a PyTorch MPS coverage gap — the M4 Pro would hit the same CPU fallback. So the story isn’t “optimized for M4”, it’s “undercovered everywhere in equal measure”.
If PyTorch’s MPS coverage filled in and sparse 3D convolution got an MPS-native implementation, the M1 Max could actually come out ahead thanks to its bandwidth advantage. Right now the software bottleneck is doing most of the work, and hardware differences are a secondary concern.
Texture baking is the practical wall
Organized by the numbers, baking takes 90%+ of the total.
| Run | Generation | Bake | Total | Bake ratio |
|---|---|---|---|---|
| ① Shoe | 201s | 3954s | 4155s | 95% |
| ② Swimsuit | 152s | 5024s | 5176s | 97% |
| ③ Chibi | 166s | 13429s | 13595s | 99% |
④ Shoe --no-texture | 192s | 0s | 325s | — |
Baking is heavy because texture_baker.py runs UV unwrap → voxel attribute sampling → texel write in a Python loop over every triangle. Time scales roughly with triangle count, which is how the million-triangle chibi ended up at 224 minutes.
And the baked result at the end isn’t even usable. Opening the shoe’s _basecolor.png shows that the input’s color information didn’t map correctly onto the UV sheet — what gets baked is noise. Shape generation works and the quality is fine; PBR texture baking is unusable on both time and quality. If your use case is OK with vertex colors, --no-texture drops the total to about 5 minutes, and the output actually looks better.
Practicality and use cases
The fair read is that this MPS port genuinely does something new — it removes the “needs an NVIDIA GPU” precondition. That’s a real unlock.
That said, compared to cloud services like Hyper3D Rodin that complete in tens of seconds to a few minutes, or CUDA setups that do the same in a few minutes, TRELLIS.2 on the M1 Max is workable in about 5 minutes with vertex colors, but becomes 66–224 minutes with PBR textures — too heavy for everyday use.
For vertex-color workflows, this port is a real option when you prefer not to ship your inputs to a cloud service. If you need PBR textures, a cloud service or a CUDA box is still the realistic answer.
There’s a lot of room for software-side improvement. If PyTorch’s MPS op coverage progresses or texture_baker.py gets optimized, the picture changes meaningfully. Down the line, an MLX reimplementation or native Apple sparse-tensor APIs could tilt things considerably.
All screenshots in this article were taken by dropping the GLB files into the lab’s 3D model viewer. If you have the GLB output from a run, you can inspect it the same way.
References: