Building a Local OCR Hot Folder for Confidential Documents with ScanSnap + NDLOCR-Lite
 Contents
In a previous article, I wrote about the concept of a Raspberry Pi + Samba shared hot folder OCR station. Since I don’t own a Pi and couldn’t connect to a LAN in the environment I was working in, I decided to make everything run locally on Mac.
Setup
A monitoring script detects images scanned by the ScanSnap iX100 (portable scanner), runs OCR via NDLOCR-Lite CLI, and moves the results to a separate folder. Everything runs locally with no cloud involvement.
| Item | Spec |
|---|---|
| Mac | Apple M1 Max / 64GB RAM |
| OS | macOS Tahoe 26.2 |
| Scanner | ScanSnap iX100 (USB wired) |
| OCR | NDLOCR-Lite CLI |
| LLM | Qwen 3.5 35B (ollama v0.17.1-rc2) |
flowchart LR
    A["ScanSnap iX100"] -->|USB| B["~/Scans/"]
    B -->|watch| C["hot_ocr.py"]
    C -->|run OCR| D["NDLOCR-Lite<br/>CLI"]
    D -->|output| E["~/Scanned/<br/>txt / json / xml"]
Security Design
Designed with confidential documents in mind.
Network isolation: Turning off Wi-Fi creates an air gap. Cloud OCR services (Google Cloud Vision, etc.) are a compliance problem in some contexts — this sidesteps that entirely.
Scanner also wired via USB: The iX100 supports Wi-Fi, but if you’re claiming air-gap operation, wireless is out. USB wired is the only option.
Not opening full disk access: I initially tried ~/Documents/Scans/ as the save location, but macOS privacy protection blocked terminal access. Granting full disk access to Terminal would fix it, but expanding app permissions in a sensitive document environment is contradictory. Changed the save location to ~/Scans/ to work around this.
ScanSnap Home Configuration
Settings for ScanSnap iX100. No management features needed — file save only.
- Profile: Mac (file save only)
- Save location:
~/Scans/ - File format: JPEG
- Linked app: None (disabling this removes the post-scan confirmation dialog and saves directly to the folder)
The iX100 is single-sided only. Double-sided documents need two passes (front then back).
Monitoring Script
Written using only Python’s standard library — no external dependencies like watchdog. Polls ~/Scans/ every 3 seconds; when an image file is detected, calls the NDLOCR-Lite CLI.
#!/usr/bin/env python3
"""
Usage:
    python hot_ocr.py              # start with default settings
    python hot_ocr.py --viz        # also output visualization images
"""

import argparse
import subprocess
import time
from datetime import datetime, timezone, timedelta
from pathlib import Path

JST = timezone(timedelta(hours=9))
IMAGE_EXTENSIONS = {".jpg", ".jpeg", ".png", ".tif", ".tiff", ".bmp", ".jp2", ".pdf"}

DEFAULT_NDLOCR_DIR = Path.home() / "projects" / "ndlocr-lite"
DEFAULT_SCANS_DIR = Path.home() / "Scans"
DEFAULT_SCANNED_DIR = Path.home() / "Scanned"

STABLE_WAIT = 2.0
POLL_INTERVAL = 3.0
The key is wait_until_stable(), which confirms the file size hasn’t changed for 2 seconds before processing — a guard against reading files that ScanSnap is still writing.
def wait_until_stable(path: Path, wait: float = STABLE_WAIT) -> bool:
    """Wait until file size is stable."""
    try:
        size1 = path.stat().st_size
        time.sleep(wait)
        if not path.exists():
            return False
        size2 = path.stat().st_size
        return size1 == size2 and size2 > 0
    except OSError:
        return False
NDLOCR-Lite lives in a separate repo (~/projects/ndlocr-lite/), so its venv Python is called via subprocess. No need to install OCR dependencies in the hot-ocr environment, and git pulls to ndlocr-lite won’t affect this.
def run_ocr(image_path, output_dir, ndlocr_dir, viz):
    ocr_script = ndlocr_dir / "src" / "ocr.py"
    venv_python = ndlocr_dir / ".venv" / "bin" / "python"
    python_cmd = str(venv_python) if venv_python.exists() else "python3"

    cmd = [
        python_cmd, str(ocr_script),
        "--sourceimg", str(image_path),
        "--output", str(output_dir),
    ]
    if viz:
        cmd.extend(["--viz", "True"])

    result = subprocess.run(cmd, cwd=str(ndlocr_dir / "src"),
                            capture_output=True, text=True, timeout=300)
    return result.returncode == 0
After processing, the original image is moved to Scanned. The OCR results (txt, json, xml) and original image end up in a single folder.
def process_file(image_path, scanned_dir, ndlocr_dir, viz):
    timestamp = datetime.now(JST).strftime("%Y-%m-%d_%H%M%S")
    result_dir = scanned_dir / f"{timestamp}_{image_path.stem}"
    result_dir.mkdir(parents=True, exist_ok=True)

    success = run_ocr(image_path, result_dir, ndlocr_dir, viz)
    if success:
        image_path.rename(result_dir / image_path.name)
The main loop is simple. Existing files are processed first on startup, then polling begins. Ctrl+C to exit.
def main():
    # process existing files on startup
    scan_and_process(scans_dir, scanned_dir, ndlocr_dir, viz)
    # polling loop
    while True:
        time.sleep(POLL_INTERVAL)
        scan_and_process(scans_dir, scanned_dir, ndlocr_dir, viz)
Full code in the hot-ocr repository (※ repository not yet public).
Real-World Test
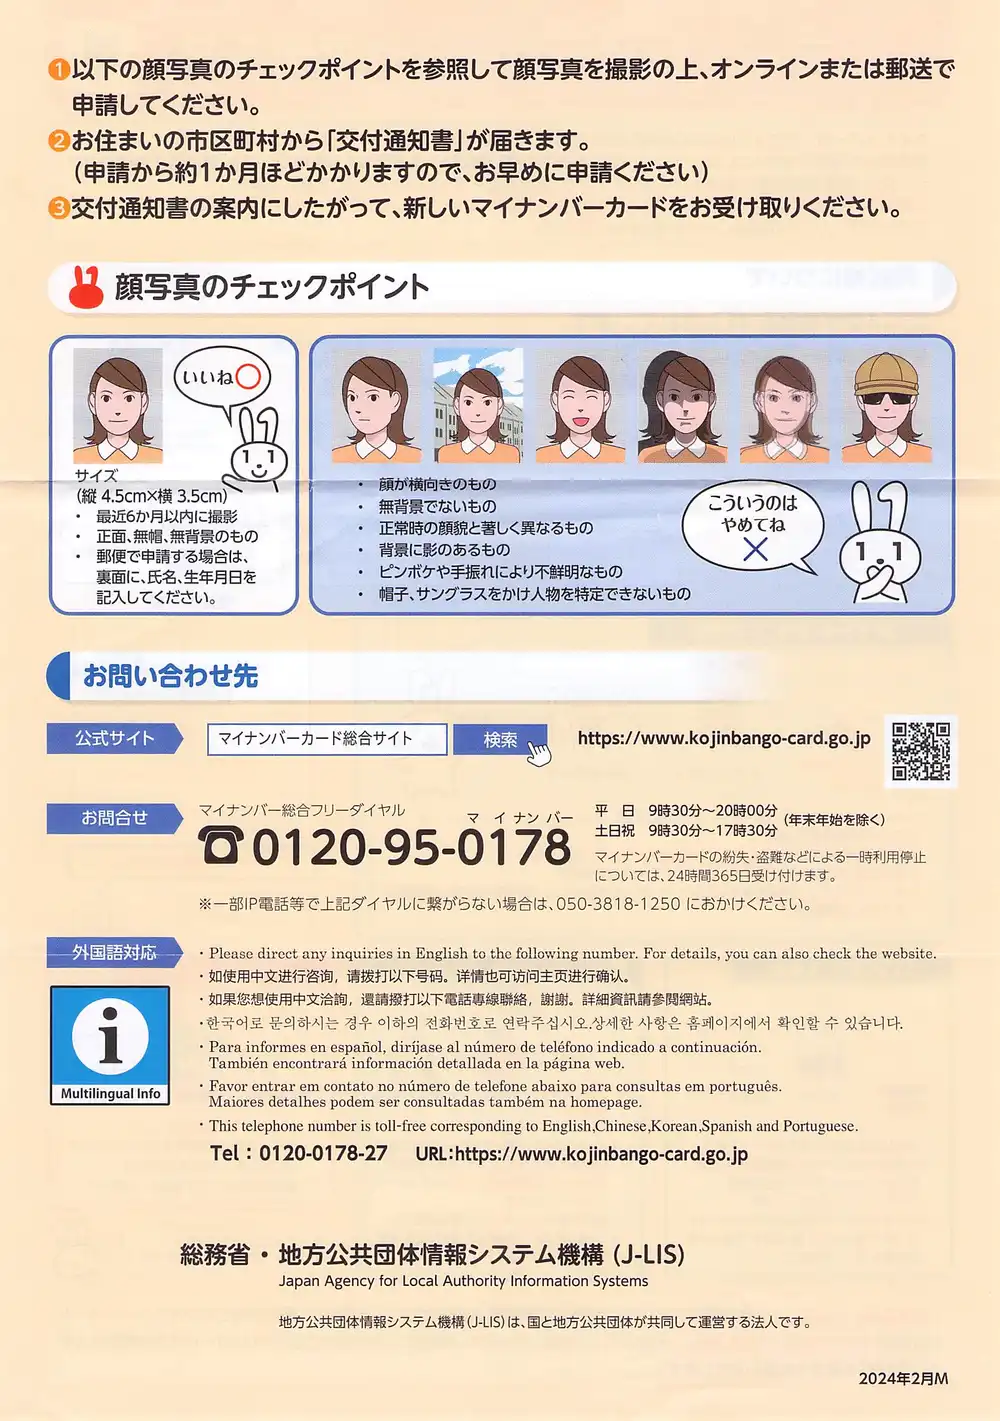
I scanned a My Number Card renewal notice. It’s a generic document sent to everyone, so no personal information. Multi-column with QR codes and illustrations mixed in — a good test of OCR accuracy.

Starting the script and scanning produced OCR results within seconds. CPU inference on M1 Max was fast enough. The iX100 is manual-feed, so OCR finishes while you’re scanning the next page.
OCR Results
Reading order was accurate and layout recognition worked. A few misreads:
- “マイナンパーカード” → should be “マイナンバーカード” (P vs B in katakana)
- “住上がり” → should be “仕上がり” (wrong kanji)
- “すすめ” → should be “おすすめ” (missing prefix)
The interesting one was decorative element misrecognition. A dashed border in the document was read as !!!!!!!!!!!!!!!!!. The original document has only one exclamation mark.
There was also “カードの住上がりが早いすすめ!!!!!” in the OCR output that I couldn’t locate anywhere in the actual image. The document features a mascot rabbit character “Maina-chan,” and it seems the layout detection mistook an area near the illustration for a text region, either generating nonexistent text or combining decorative elements as characters. Maina-chan has a hallucinogenic effect.
Multilingual Test
The back is in multiple languages (English, Chinese, Korean, Spanish, Portuguese). NDLOCR-Lite is a Japanese OCR system so this is unexpected input, but I wanted to see how it breaks.
Processing time: 1.9 seconds. Japanese sections were read almost correctly. Multilingual results:
- English: Mostly readable but
direet(direct),nmero(número) errors - Simplified Chinese: Nearly collapsed.
迸行咨洵,清拔打,洋情也可妨向. Being dragged toward Japanese kanji - Traditional Chinese: Better than simplified but
悠想,遺請撥打and similar oddities - Spanish/Portuguese: Accent marks completely missing.
espafiol(español),portugus(português) - Korean: Completely consumed. Hangul became an infinite loop of
会社会社会社会社会社会社...
The Korean failure is the most interesting. NDLOCR-Lite’s character recognition model (PARSeq) was trained on Japanese character sets, so it force-mapped Hangul glyphs to “the closest Japanese characters,” resulting in everything becoming “会社” (company).
For practical use, reading only the Japanese sections is fine.
LLM Correction
I fed the OCR output to Qwen 3.5 (35B) for correction. The previous article also tested Swallow (Qwen3-Swallow-30B-A3B), but since this is a modern government document, a Japan-specific model isn’t necessary. Qwen 3.5 also has the advantage of being able to disable thinking with ollama’s --think=false flag (Swallow can’t disable thinking due to GGUF conversion issues).
ollama run qwen3.5:35b --think=false "The following text was read by OCR.
Please correct any typos or misreads. Do not change the content at all,
only fix obvious character recognition errors.
Output only the corrected text, no explanations needed.

---
(paste OCR text here)
---"
Checking correction results with diff:
- マイナンパーカードを本人確認書類として使えなくなるほか、e-Tax等の電子申請やコン
- ビニ交付・健康保険証等にも使えなくなりますので、
+ マイナンバーカードを本人確認書類として使えなくなるほか、e-Tax等の電子申請やコンビニ交付・健康保険証等にも使えなくなりますので、

- カードの住上がりが早いすすめ!!!!!!!!!!!!!!!!!!!!!!!!
+ カードの仕上がりが早いおすすめ!!!!!!!!!!!!!!!!!!!!!!!
Character misreads (パ→バ, 住→仕, すすめ→おすすめ) were corrected. “コン/ビニ” split across lines was also joined. Confirmation is just reviewing the diff.
What couldn’t be fixed were decorative misrecognitions. The ! spam looks like either a border line or an exclamation mark from text alone — impossible to tell. The [ → 「 misread was also missed. This is a structural limitation of text-only correction: anything requiring the image to judge will remain.
In the previous article, an anchoring effect caused “一方交通” to be “corrected” to “一方通行” (one-way street) in a 1963 Showa-era document. With a modern government document, that concern didn’t apply.
Separating OCR and LLM Correction
There’s a reason I didn’t integrate LLM correction into the hot folder script. Scanning speed is faster than OCR speed. Including LLM correction would extend per-page processing time and bottleneck the scan→OCR pipeline.
Keeping them separate:
- Scan a bunch of documents into
~/Scans/ hot_ocr.pyruns OCR sequentially in the background → moves to~/Scanned/- After everything’s done, run a correction script for batch LLM correction
The correction script isn’t implemented yet, but reading .txt files from ~/Scanned/ and sending them to ollama for diff output is straightforward to build.
Comparison with Raspberry Pi Setup
Comparing with the Pi + Samba configuration I wrote about in series-guide:
| Pi + Samba | Mac standalone | |
|---|---|---|
| Network | Samba share required | Not needed |
| LLM correction | Won’t fit on Pi | Works on M1 Max |
| Always-on | Low wattage, leave running | Sleep management needed |
| Portability | Pi + power + scanner (3 items) | MacBook + scanner (2 items) |
| Cost | ~¥60,000 for Pi 5 | Reuse existing Mac |
Pi’s strengths are power consumption and form factor — ideal for always-on operation next to the scanner. Mac standalone wins on being able to run LLM correction and reusing existing hardware. If you only turn it on when needed, the always-on advantage doesn’t apply, making Mac standalone the rational choice here.
While test-scanning documents I had on hand, I noticed my My Number Card’s electronic certificate had expired. Banks get upset about that, and seeing a doctor gets complicated. Apparently I can renew it online, but first I need to get an ID photo taken.