Running NDLOCR-Lite in an iOS Native App for On-Device OCR
 Contents
After trying Windows, Mac, and browser (someone else’s implementation), next is an iOS native app.
A browser version (ndlocrlite-web) already exists, but it requires downloading and initializing a 146MB WASM model. A native app with the model bundled can go from cold start to camera OCR in seconds. Since startup speed directly impacts usability, there’s a real reason to build native.
Test Environment
| Item | Spec |
|---|---|
| Device | iPhone 13 Pro Max |
| iOS | 18.6 |
| Chip | A15 Bionic |
| RAM | 6 GB |
Model Configuration
Four ONNX models bundled in the app:
| Model | Purpose | Size | Input shape |
|---|---|---|---|
| deim-s-1024x1024.onnx | Layout detection (DEIMv2) | 38.4 MB | [1, 3, 800, 800] float32 |
| parseq-ndl-16x256-30 | Text recognition (~30 chars) | 34.2 MB | [1, 3, 16, 256] float32 |
| parseq-ndl-16x384-50 | Text recognition (~50 chars) | 35.2 MB | [1, 3, 16, 384] float32 |
| parseq-ndl-16x768-100 | Text recognition (~100 chars) | 39.1 MB | [1, 3, 16, 768] float32 |
DEIMv2’s filename says 1024x1024, but the actual input size is 800x800. Reading the Python inference code shows input_size=800. Don’t trust the filename.
Total ~147MB. Large for an iOS app bundle, but well within App Store’s 4GB limit.
Inference Pipeline
flowchart TD
    A["Camera capture"] --> B["Vision perspective correction"]
    B --> C["DEIMv2<br/>Layout detection"]
    C --> D["Text line<br/>crop + vertical rotation"]
    D --> E["PARSeq<br/>Text recognition (cascade)"]
    E --> F["Confidence scan<br/>detect low-confidence chars via softmax probability"]
    F --> G["Reading order sort"]
    G --> H["Show correction results<br/>highlight suspicious areas"]
DEIMv2 detects text line bounding boxes in the image; PARSeq reads characters from each box. PARSeq uses 3 models in cascade based on string length (short lines → 256 model, long lines → 768 model).
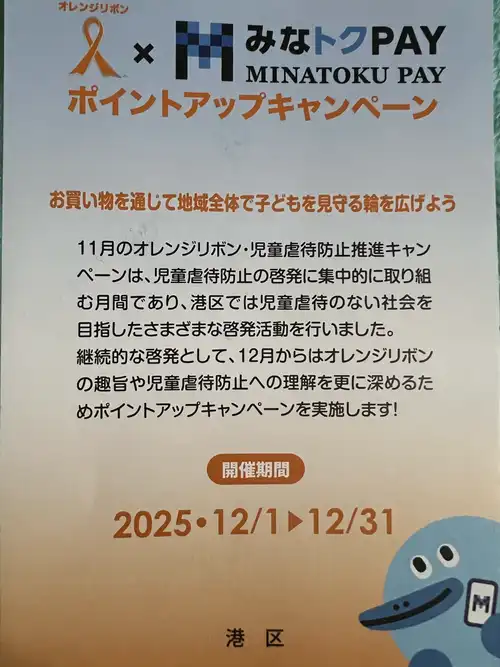
Running on real device (iPhone 13 Pro Max). Input is a MinaTokenPAY flyer (horizontal text).
Input image (MinaTokenPAY flyer)
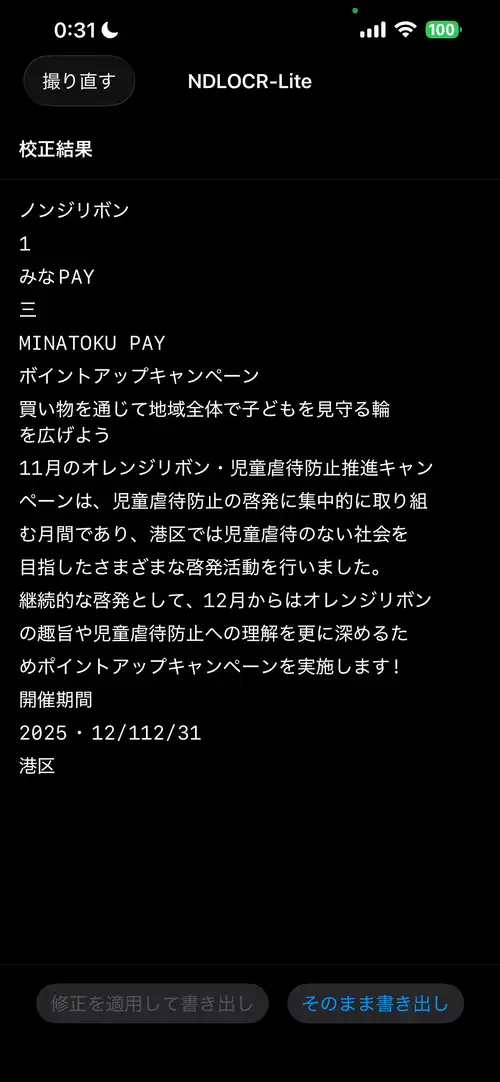
OCR result (iPhone 13 Pro Max)
Xcode Project Setup
ONNX Runtime via SPM
Add via Swift Package Manager:
- Xcode → File → Add Package Dependencies
- URL:
https://github.com/microsoft/onnxruntime-swift-package-manager - Version: 1.20.0 or later
- Add
onnxruntimelibrary to target
For xcodegen (project.yml):
packages:
  onnxruntime:
    url: https://github.com/microsoft/onnxruntime-swift-package-manager
    from: "1.20.0"

targets:
  NDLOCRLite:
    type: application
    platform: iOS
    dependencies:
      - package: onnxruntime
        product: onnxruntime
Adding Model Files
Drag and drop the 4 .onnx files from src/model/ in the ndlocr-lite repository into the Xcode project. Confirm they’re included in the target’s Bundle Resources.
The character set definition NDLmoji.yaml is also needed. Used to map PARSeq output indices to characters. Defines ~7142 characters including EOS (hiragana, katakana, kanji, alphanumerics, symbols).
Model Loading and Inference
ONNX Runtime’s iOS API is Objective-C based, accessed from Swift via bridge.
import OnnxRuntimeBindings

let env = try ORTEnv(loggingLevel: .warning)
let options = try ORTSessionOptions()
try options.setIntraOpNumThreads(2)
try options.setGraphOptimizationLevel(.all)

let modelPath = Bundle.main.path(forResource: "deim-s-1024x1024", ofType: "onnx")!
let session = try ORTSession(env: env, modelPath: modelPath, sessionOptions: options)
DEIMv2 Inference
Two inputs: image tensor images and orig_target_sizes.
let imageTensor = try ORTValue(
    tensorData: NSMutableData(data: imageData),
    elementType: .float,
    shape: [1, 3, 800, 800] as [NSNumber]
)

// orig_target_sizes: pass input_size to match Python implementation (not original image size)
var sizeArray: [Int64] = [800, 800]
let sizeData = NSMutableData(bytes: &sizeArray, length: MemoryLayout<Int64>.size * 2)
let sizeTensor = try ORTValue(
    tensorData: sizeData, elementType: .int64, shape: [1, 2] as [NSNumber]
)

let outputs = try session.run(
    withInputs: ["images": imageTensor, "orig_target_sizes": sizeTensor],
    outputNames: ["labels", "boxes", "scores", "char_count"],
    runOptions: nil
)
Get text line bounding box coordinates from output boxes, filter with scores. Output labels are 1-indexed, so classIndex = label - 1 maps to ndl.yaml class definitions. Text line class indices are [1, 2, 3, 4, 5, 16] (line_main, line_caption, line_ad, line_note, line_note_tochu, line_title).
PARSeq Inference
Crop each text line box detected by DEIMv2, select model based on line width, and pass to PARSeq.
// estimate character count from aspect ratio, select model
let aspectRatio = Float(width) / Float(height)
let estimatedChars = Int(aspectRatio * 2)

let config = parseqConfigs.first { estimatedChars <= $0.maxChars }
    ?? parseqConfigs.last!

let inputTensor = try ORTValue(
    tensorData: NSMutableData(data: inputData),
    elementType: .float,
    shape: [1, 3, 16, config.width as NSNumber] as [NSNumber]
)
Note that output tensor names differ per model ("13469", "21189", "40488"). Check the Python ONNX graph for correct names.
From the output float array, get character indices via argmax and decode with NDLmoji.yaml’s character set. Index 0 is the EOS (End of Sequence) token.
Correction
Why BERT Character Mask Prediction Didn’t Work
Initially tried detecting misrecognitions with BERT (bert-base-japanese-v3) perplexity scanning — replacing each character position with [MASK], running BERT inference, and flagging positions where the prediction probability for the original character is low.
bert-base-japanese-v3 expects input tokenized with MeCab + WordPiece. “児童虐待” (child abuse) would be split by MeCab into “児童” + “虐待”, then subword tokenized. BERT’s pretraining was done at this granularity.
Since loading MeCab on iOS is heavy dependency, I used character-level tokenization — “児”, “童”, “虐”, “待” as individual tokens. Single-character tokens exist in BERT’s vocabulary, but their contexts during training were sparse as standalone tokens, making the probability distribution unstable. Even correct text like “児童虐待” and “オレンジリボン” (orange ribbon) got high anomaly scores, turning everything red.
Lowering thresholds, switching to ratio-based scoring (BERT’s top-1 probability / original character probability) — none of it fixed the root issue of wrong flagging locations. Character-level tokenization for Japanese BERT correction is a dead end.
The model was reduced to 521MB (FP32) → 131MB (INT8 quantized) to fit in the bundle, but since the judgments were useless, it was removed.
PARSeq Confidence as Alternative
Dropped BERT, using PARSeq’s own softmax output for correction. When PARSeq outputs each character, the post-softmax maximum probability directly indicates “how confident the model is about that character.” No additional model needed — it’s available from the decoding process.
private func decodeOutput(data: Data, charCount: Int) -> (String, [CharConfidence]) {
    let floats = data.withUnsafeBytes { Array($0.bindMemory(to: Float.self)) }
    let seqLength = floats.count / charCount

    var result = ""
    var confidences: [CharConfidence] = []

    for pos in 0..<seqLength {
        let logits = Array(floats[(pos * charCount)..<((pos + 1) * charCount)])

        // softmax
        let maxLogit = logits.max() ?? 0
        let exps = logits.map { exp($0 - maxLogit) }
        let sumExps = exps.reduce(0, +)
        let probs = exps.map { $0 / sumExps }

        // argmax
        let (maxIdx, maxProb) = probs.enumerated().max(by: { $0.1 < $1.1 })!
        if maxIdx == 0 { break }  // EOS

        let char = charset[maxIdx]
        result.append(char)

        confidences.append(CharConfidence(
            char: char,
            confidence: maxProb,
            topCandidates: /* top3 */ ...
        ))
    }

    return (result, confidences)
}
Threshold and Detection Patterns
Flag characters below 0.5 confidence as “suspicious,” highlighting up to 15 in red. 0.5 means “the model chose this character with less than 50% probability.”
In early development, DEIMv2 duplicate detections (same line grabbed as both line_main and line_caption) and mismatches between camera preview area and actual capture area meant PARSeq was receiving inaccurate bounding boxes, producing many low-confidence characters. Observed patterns:
| Confidence | Pattern | Cause |
|---|---|---|
| ~0.1 | Characters at line start/end | Character cut off at bounding box boundary |
| 0.2–0.3 | Symbol misrecognitions | Hyphen↔dash, comma↔period |
| 0.3–0.5 | Similar glyph confusion | Mix-up of visually similar characters |
After implementing NMS to remove duplicate bounding boxes (IoU > 0.5 suppressed) and correct image cropping aligned to camera’s resizeAspectFill, the image quality going into PARSeq improved and low-confidence characters mostly disappeared. No red highlights in the screenshot above either.
Confident errors (high confidence but still wrong) can’t be caught, but that’s the same limitation for any post-correction method. In practice, improving preprocessing accuracy was the most effective way to reduce correction burden.
The UI highlights low-confidence characters in red; tapping opens a sheet showing PARSeq’s Top 3 candidates for selection. Apply the fix and export via share sheet.
Image Preprocessing Pitfalls
This took the most time. What’s a few lines with OpenCV + NumPy in Python hides coordinate system, pixel format, and scale traps on iOS.
Retina Scale Trap
UIGraphicsImageRenderer(size: CGSize(width: 800, height: 800)) produces a 2400x2400 pixel image on iPhone 13 Pro Max (3x Retina). Nothing like the 800x800 the model expects.
// WRONG: Retina scale multiplied → 2400x2400
let renderer = UIGraphicsImageRenderer(size: CGSize(width: 800, height: 800))

// CORRECT: explicitly specify scale=1.0 to guarantee 800x800 pixels
UIGraphicsBeginImageContextWithOptions(CGSize(width: 800, height: 800), true, 1.0)
defer { UIGraphicsEndImageContext() }
UIGraphicsImageRenderer can also take a scale parameter, but UIGraphicsBeginImageContextWithOptions is more reliable.
Pixel Byte Order Is BGRA
Reading pixel data from a UIKit bitmap context, byte order is BGRA (for ARM iOS: kCGImageAlphaNoneSkipFirst | kCGBitmapByteOrder32Little). Treating it as RGBA causes colors to swap and inference results become completely wrong.
let bytes = ctxData.assumingMemoryBound(to: UInt8.self)
// bytes[offset + 0] = B
// bytes[offset + 1] = G
// bytes[offset + 2] = R
// bytes[offset + 3] = A (or skip)
bytesPerRow Is Not width*4
The context’s bytesPerRow may not equal pixel width × 4. Padding can be added for memory alignment. Always use bytesPerRow for row start address calculations.
let bytesPerRow = ctx.bytesPerRow
for row in 0..<targetSize {
    let rowOffset = row * bytesPerRow  // NOT width * 4, use bytesPerRow
    for col in 0..<targetSize {
        let pixelOffset = rowOffset + col * 4
        // ...
    }
}
Different Normalization for Each Model
DEIMv2 and PARSeq use different normalization. Mixing them destroys accuracy.
- DEIMv2: ImageNet normalization
(pixel / 255.0 - mean) / std - PARSeq:
pixel / 127.5 - 1.0
Perspective Correction
Image distortion from smartphone photos is handled with Vision framework’s VNDetectDocumentSegmentationRequest to detect document corners, then CIPerspectiveCorrection for perspective correction. No OpenCV needed.
Vertical Text Rotation
Tall line images (vertical text) need 90 degree CCW rotation before passing to PARSeq.
// .right = "raw data is 90° CW rotated" → UIKit displays it 90° CCW
let rotated = UIImage(cgImage: cgImage, scale: 1.0, orientation: .right)
UIGraphicsBeginImageContextWithOptions(rotated.size, false, 1.0)
defer { UIGraphicsEndImageContext() }
rotated.draw(at: .zero)
Using CGContext.rotate(by:) directly causes rotation in the opposite direction from what you’d expect due to UIKit’s y-flip coordinate system. Specifying UIImage.Orientation is safer.
Parsing the Character Set (NDLmoji.yaml)
Processing NDLmoji.yaml’s charset_test: "..." string into a character array, using Swift’s Character type causes variant selectors (U+FE0E) to combine with the preceding character.
// WRONG: Character type combines grapheme clusters
// "☆\u{FE0E}" becomes 1 character → total is 7141 (correct is 7142)
for char in charsetString { ... }

// CORRECT: read at Unicode scalar level
let scalars = Array(content.unicodeScalars)
for scalar in scalars {
    chars.append(String(scalar))
}
Even one character off means all PARSeq output tensor readings are shifted, giving wrong argmax results for every position. If output is completely garbled, first check the character count.
Memory Management
The memory available to iOS apps is roughly half the device RAM. Even on iPhone 13 Pro Max (6GB RAM), you have about 1.5GB in practice.
ONNX Runtime sessions use several times the model size in memory when expanded. Loading all 3 PARSeq models simultaneously strains memory, so use lazy loading + autoreleasepool.
// lazy-load PARSeq on demand
if parseqSessions[config.width] == nil {
    parseqSessions[config.width] = try ORTSession(env: env, modelPath: path, sessionOptions: options)
}

// wrap each line inference in autoreleasepool
for box in boxes {
    let result: LineResult? = try autoreleasepool {
        // crop → rotate → recognize
    }
}
The BERT correction model (131MB) was dropped as mentioned. No additional models needed, bundle size stays at ~147MB.