Homebrew on a 2001 P/ECE: Windows 11 WinUSB and a from-source LLVM toolchain
 Contents

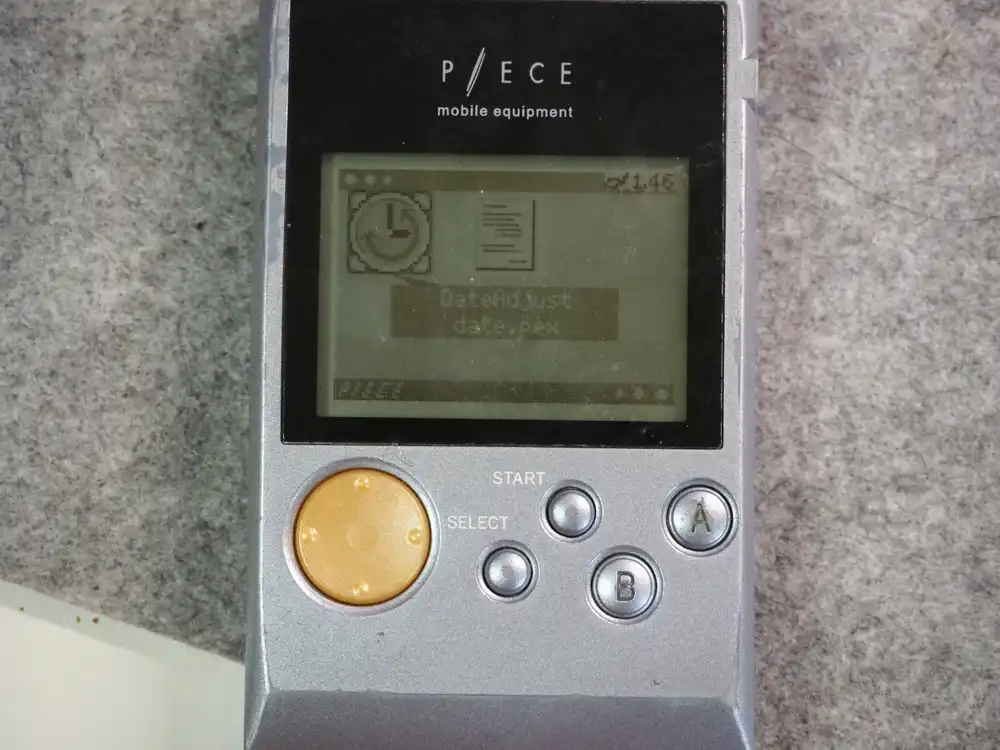
An Aquaplus P/ECE turned up in my closet after 20 years.
The P/ECE is a palm-sized handheld game console Aquaplus released back in 2001. I bought this unit about 20 years ago to play some game, never really got into it, and it sat forgotten in a drawer until I dug it out the other day.
If it’s out, I want to run something on it. And if I’m doing that, I’d rather load my own game, “Bento Escape” (written for a separate project), onto this 128×88 monochrome LCD. The thing is, getting it onto a 24-year-old handheld wasn’t going to be smooth. The original driver won’t run on modern Windows, the compiler I needed was gone along with the bundled CD, and I ended up building an LLVM toolchain from source. Here’s what I did, in order.
Test environment
| Item | Detail |
|---|---|
| Dev machine | Intel Core i7-13700H (14 cores / 20 threads), 32GB RAM |
| OS | Windows 11 Home (build 26200) |
| Build env | Ubuntu 22.04 on WSL2. WSL is given 15GB RAM and sees 20 threads |
| Toolchain | Clang/LLVM 22.1.1 built from source (autch/llvm-s1c33) |
| Target | P/ECE (PME-001). Specs in the next section |
What the P/ECE was
The P/ECE is a handheld Aquaplus released on November 30, 2001. It cost 9,800 yen (before tax). It was a game console, but it shipped with a C development environment as standard, and you were free to distribute and sell what you made royalty-free, which made it a pretty unusual product for its time. It’s close to an ancestor of today’s indie dev handhelds.
The main specs:
| Item | Detail |
|---|---|
| CPU | EPSON S1C33209 24MHz (32-bit RISC) |
| Main memory | 256KB SRAM |
| Storage | 512KB flash RAM |
| Display | FSTN 4-level grayscale LCD, 128×88 dots |
| Power | One AA battery, or USB bus power |
| Interface | USB Type-B, infrared |
| Size | 101×65×17mm, 67g (92g with battery) |
For context, the FSTN panel is a plain monochrome LCD with no backlight. Four levels means white and black plus two shades of light gray, and that’s it. Sound is PWM, i.e. the CPU emits the waveform itself in software, with no dedicated sound chip. There are no sprites either; the screen is just drawn straight into a bitmap. There’s almost no hardware acceleration; the CPU does everything, which is a refreshingly bare setup.
The controls are a D-pad, A and B, plus START and SELECT. I’ll be mapping the game’s controls onto these later.
This USB bus power turned out to be a big help. After 20 years in storage, this unit no longer runs on a battery. The battery contacts are shot, and a contact restorer didn’t bring them back. They’re probably oxidized, so a real fix would mean replacing the contacts themselves. But plug in USB and it boots fine. So I kept it tethered to the PC the whole time and ran everything, testing and development, on USB power.
The driver doesn’t run on modern Windows
The first wall was the driver. The P/ECE talks to the PC through a custom USB driver that its dedicated software uses. That driver was only ever built for the 32-bit Windows of the era, and it’s unsigned. Today’s Windows 11 is 64-bit, and an unsigned 32-bit driver simply won’t load. The bundled CD is long gone anyway, but even if I had it, this one driver would still be useless.
The moment you plug it in, it shows up in Windows Device Manager as PIECE PME-001.
But with no driver attached it sits in an error state (problem code 28 = driver not installed).
The device’s USB ID is VID_0E19 / PID_1000.
That’s the marker to look for.
There’s a way around it. Swap the P/ECE’s USB interface to the generic WinUSB driver, and replace the DLL the PC software calls with one reimplemented on top of WinUSB. There’s also the brute-force option of disabling Windows’ driver signature enforcement, but that lowers the security of the whole OS, so I’m not doing it.
A few terms:
| Term | Meaning |
|---|---|
| WinUSB | Microsoft’s own generic USB driver. It lets a user-space app poke a USB device directly without anyone writing a dedicated driver |
| Zadig | A tool that swaps a USB device’s driver to WinUSB and similar |
| pieceif.dll | The stock DLL the P/ECE software uses for USB. It won’t work while it still assumes the old driver, so you swap in a WinUSB build |
For the swap I used autch’s pieceif-libusb.
The v2.0 line, released in June 2026, talks to WinUSB directly, needs no external DLL like libusb-1.0.dll, and only requires overwriting pieceif.dll itself.
The overall flow:
flowchart TD
  A[Connect P/ECE over USB] --> B[Windows sees PIECE PME-001<br/>but errors with no driver]
  B --> C[Swap to the WinUSB driver via Zadig]
  C --> D[Overwrite pieceif.dll with the pieceif-libusb build]
  D --> E[Talk to the device via isd / WinIsd]
Make the device WinUSB with Zadig.
Pick PIECE PME-001, confirm the USB ID reads 0E19 1000, choose WinUSB, and install. That’s it.
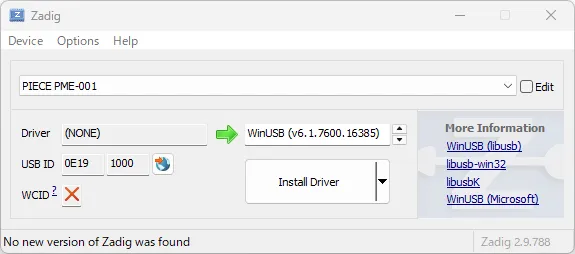
On success, the device that was erroring a moment ago goes healthy, and the bound service flips to WinUSB.
After that, swap pieceif.dll for the pieceif-libusb one and the PC-side transfer tools can talk to the device.
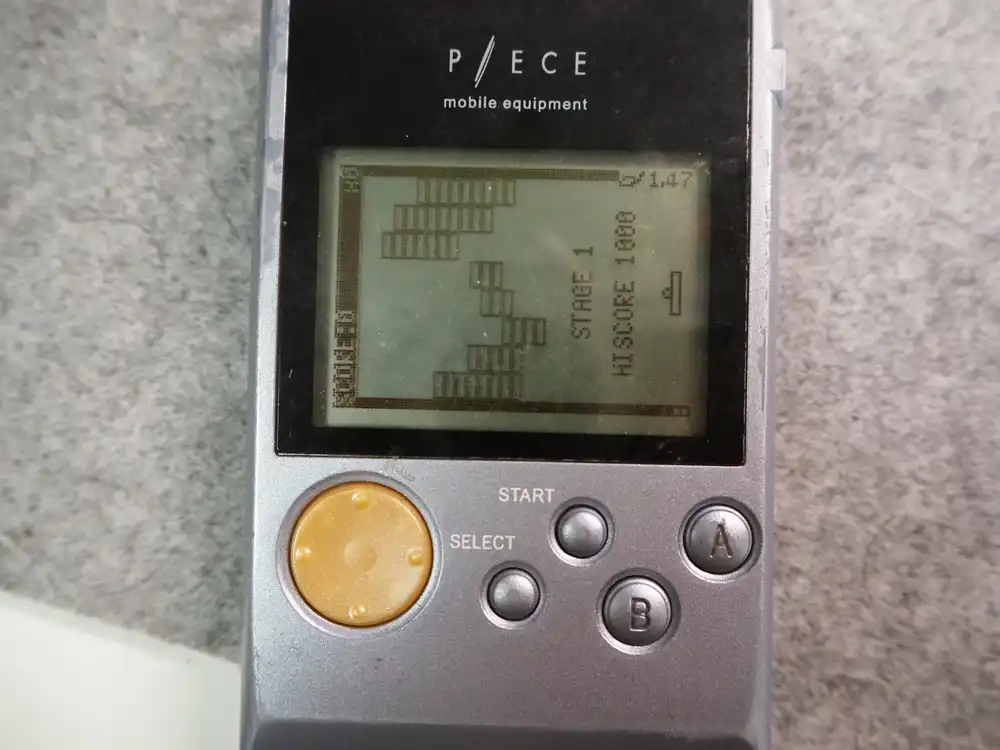
First, flash a bundled game to confirm the link
Before loading anything of my own, I wanted to confirm the transfer path actually works.
The P/ECE dev environment (still downloadable from the official site) includes the transfer tools WinIsd.exe (GUI) and isd.exe (a CLI monitor).
Point it at a working folder, pick a .pex (the P/ECE executable), and send it to the device.

The bundled block-breaker I transferred booted on the device. That confirms the link is correct.
As an aside, the device’s flash still had old data on it. A text reader (textread.pex) and a set of txt files numbered 1 through 11. Apparently 20-years-ago me carried some writing around on it, but I have zero memory of it. I left the contents alone without opening them.
But what I actually want is to run my own game
A bundled game running isn’t the goal, just a prerequisite check. The real point is to get my own game, “Bento Escape”, onto the P/ECE.
Bento Escape started when I heard about a contest along the lines of “make a game that fits on a floppy disk”, and thought I could knock one out quickly. The cap is probably one floppy’s 1.44MB, and I built it with raw Win32 and C as a text-and-meter game. The actual exe is only about 87KB, around 6% of the limit. Plenty of room to spare. The premise: trapped after an earthquake, you head for the surface using the bento you packed as your resources, in a pure turn-based survival format. What matters here is that the game logic doesn’t depend on Win32 at all. Only the drawing (GDI) and input (window messages) are Windows-specific; the satiety, toxicity, freshness, and event math is just C. So the logic ports as-is, and I only need to rewrite the drawing and input layers for the P/ECE.
The problem is how to build it.
The wall of a C33-core compiler
The P/ECE’s CPU is EPSON’s S1C33 core.
To build your own software you need a compiler for that core.
The bundled SDK includes pcc33.exe, a driver (a wrapper that calls the real compiler), but the backend that matters (the actual compiler, gcc33 and friends) only comes from the bundled CD.
The unit survived, but the CD vanished somewhere along with its packaging.
So I reached for autch’s piece-toolchain-llvm. It’s a Clang/LLVM toolchain targeting S1C33 that builds the runtime (newlib / picolibc / compiler-rt) from source too. The big win is that it builds without using any of the original SDK binaries. The cost is that you have to do a full from-source build of LLVM.
Building the LLVM toolchain (where RAM cries uncle first)
I did the build in the test environment’s WSL2 (Ubuntu 22.04). Clone the repo, then pull the submodules (the LLVM fork, picolibc, newlib). The LLVM submodule alone is 2.4GB.
The LLVM build roughly looks like this (in practice you follow the repo’s Makefile):
cmake -G Ninja -S llvm/llvm -B build \
  -DCMAKE_BUILD_TYPE=Debug \
  -DLLVM_EXPERIMENTAL_TARGETS_TO_BUILD="S1C33" \
  -DLLVM_DEFAULT_TARGET_TRIPLE="s1c33-none-piece" \
  -DLLVM_ENABLE_PROJECTS="clang;lld" \
  -DLLVM_USE_LINKER=mold \
  -DCMAKE_C_COMPILER_LAUNCHER=ccache
make            # llvm + sysroot
Running it with 20 threads (-j20), it died about 25 minutes in, at step 2400 of 3295.
c++: fatal error: Killed signal terminated program cc1plus
compilation terminated.
Cause of death: out of memory.
The OOM killer was taking out the compiler process.
Against the 15GB of RAM noted above, the Debug build’s huge sources (PassBuilder.cpp and ASTMatchFinder.cpp eat 3–4GB each on their own) were compiling 20 at a time and used it all up.
A couple of terms:
| Term | Meaning |
|---|---|
| OOM (Out Of Memory) | Memory exhaustion. The Linux kernel force-kills a process that hogs too much memory (the OOM killer). Killed signal terminated is the trace it leaves |
| -j20 | The parallel job count for make/ninja. Compiling as many in parallel as you have cores is fast, but each one needs its own memory |
Build the latest LLVM for a 24-year-old handheld, and it’s the host’s RAM that cries uncle first.
By the way, I did wonder whether something this slow could be thrown at the GPU. It can’t: a compiler is all branches and pointer-chasing, the exact opposite of the “same op over a pile of data” the GPU is good at, and there’s no practical path to running clang on a GPU. If you want it faster you tinker on the CPU side with ccache or distcc, and the only reason it was throttled this time was the memory budget.
The fix is simple: derive the job count from the available memory and dial it down.
If the heavy files are 3–4GB each, then 15GB ÷ 4GB ≈ 3, so -j3.
The key point is that the already-built objects (those 2400 steps) are reused as-is.
It’s not from scratch; you just re-bake the rest at -j3.
ninja -C build -j3 clang llc lld llvm-objdump llvm-objcopyThat got LLVM itself (clang 22.1.1) through.
But there’s one more snag.
The next runtime (picolibc) build complains that llvm-ar is missing.
The Makefile’s llvm target only builds clang llc lld llvm-objdump llvm-objcopy, leaving out the llvm-ar the runtime needs.
You just add it on its own.
ninja -C build llvm-ar llvm-ranlib llvm-nm
make -C tools/crt all     # picolibc / newlib / compiler-rt
Only now do I finally have a clang for S1C33 and a C runtime.
Porting the drawing and input to the P/ECE API
With the toolchain done, on to the actual port. The plan, as said up front: reuse the logic, rewrite the drawing and input.
Screen: re-laying it out for 128×88
The original game lined up a lot of text in a Windows window. The P/ECE only has 128×88. The P/ECE’s kernel font is 10×10 dots for full-width characters, so that’s at most 12 characters across and 8 rows down. The whole screen gets rebuilt around that constraint.
Drawing is framebuffer-based.
You hold unsigned char vbuff[128*88] at one byte per pixel, draw straight into it, and push it to the LCD with pceLCDTrans().
For text I used the kernel’s pceFontPutStr / pceFontPrintf, and for the meter bars I wrote my own rectangle-fill function.
Japanese came out as-is.
pceFontPutStr interprets Shift-JIS and draws full-width characters (you can tell it’s looking at SJIS internally from the fact that its return value is “the code, if the last byte was a Shift-JIS lead byte”).
There’s one trick on the source-encoding side, though.
Clang treats source as UTF-8 by default, so the display strings get converted to Shift-JIS at build time before they’re handed over.
For the conversion I specify CP932, the Windows flavor of SJIS (strict SHIFT_JIS stops on certain characters like the em dash).
bento_sjis.c: bento_piece.c
	iconv -f UTF-8 -t CP932 $< -o $@
Input: replacing number keys with cursor selection
The original game used number keys and Enter/X/C. The P/ECE has no number keys. Just the D-pad, A and B, and START and SELECT. So I rebuilt the controls around cursor selection.
I gathered the in-play actions (advance, push, rest, eat a bento, use a pickup) into a single command list, move a cursor with the D-pad up/down, and execute with A.
The kernel exposes both the held state (PAD_*) and the just-pressed edge (TRG_*), so for menu movement I use the just-pressed edge (so it doesn’t run away).
The skeleton of a P/ECE app is these three callbacks:
#include <piece.h>
static unsigned char vbuff[128*88];

void pceAppInit(void){              // at startup
  pceLCDSetBuffer(vbuff);
  /* initial draw */
  pceAppSetProcPeriod(1);
}
void pceAppProc(int cnt){           // the main body, called periodically
  int p = pcePadGet();              // button state + trigger
  /* update state on input, redraw on change, then pceLCDTrans() */
}
void pceAppExit(void){}             // at exit
The logic side (the 8 bento items’ decay and toxicity, the satiety ceiling, the random events, etc.) I brought over almost verbatim from the original C.
All I changed was wchar_t to char and swapping out the drawing and input.
For the build, I run the SJIS-converted source through clang and pack it into a .pex with ppack.
The compile throws a pile of “invalid character encoding” warnings, but that’s just the SJIS bytes being invalid as UTF-8; Clang passes the bytes through as-is (autch’s own sample apps build the same way).
The Japanese bytes land in the binary correctly.
Flashing the .pex and booting it on hardware
I write the finished bento.pex to the device.
The GUI WinIsd works too, but this time I flashed it by piping commands into isd.exe’s CLI monitor.
This monitor lets you poke the device’s flash file system (PFFS) directly.
=            list the PFFS
=w bento.pex write a file to the PFFS
Write with =w, and bento.pex shows up in the device listing.
+ 14: 14132 block.pex
+ 15:  4931 bento.pex      ← write complete
    18 sectors free
After that you just launch it from the device’s system menu.
Right after boot. The title and an opening line come up.
![Bento Escape's start screen. "Work again tomorrow," "[A] start"](/images/tech/2026/06/21/bento-intro.webp)
You pick a destination, pack the bento, and after getting trapped by the earthquake the rules screen comes in. Satiety 0 and you starve, toxicity 100 and you die, bento rots and turns toxic.
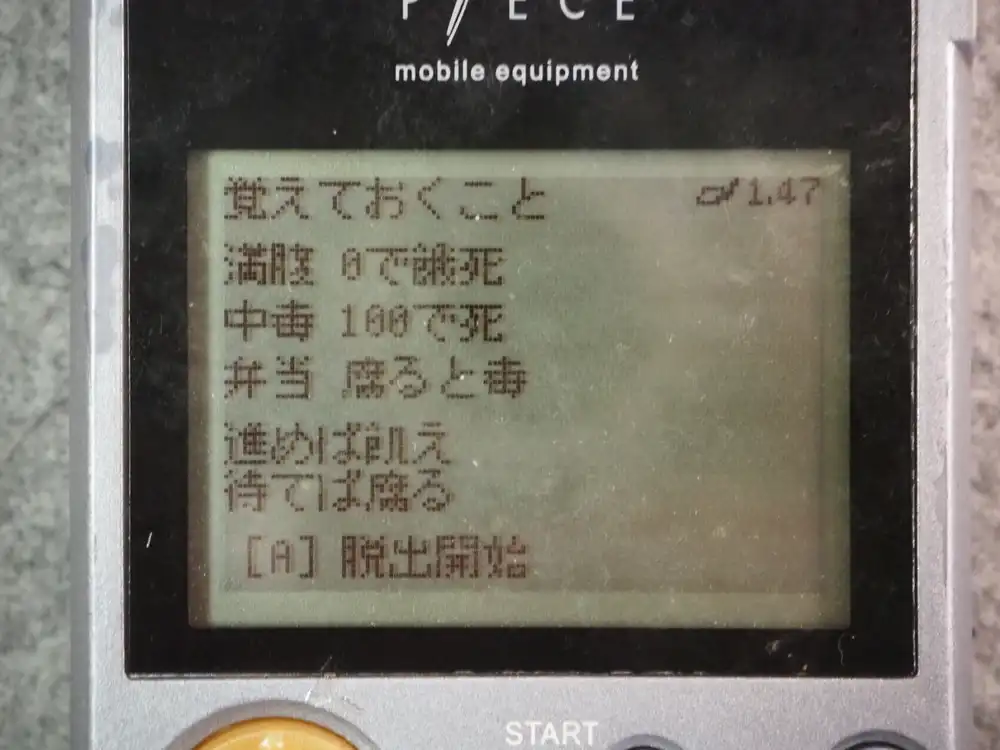
Then the escape proper. Turn count and escape distance up top, satiety and toxicity meters, and a command cursor with the bento freshness bars below. Each time you execute with A, a turn passes, satiety drops, and the bento rots.
It didn’t go smoothly, of course; I misjudged things and starved.
![The starvation ending. "Starved to death," "[START] again"](/images/tech/2026/06/21/bento-death.webp)
No emulator in the loop, flashed straight to hardware, and not a single broken pixel on the first try. Designing it to fit 128×88 paid off.
Since the drawing is straight bitmap, throwing in some rough pixel art might make it a bit more graphical. If it looks like it’ll stay within the floppy’s budget, maybe I’ll try it next time.